Showing posts with label Bird House. Show all posts

Monday, September 28, 2020

The Stenciled Nest


Like most of us, I have been keeping very close to home for many months now - longer than many, as I live in New York.  We went into lockdown earlier than most states and stayed there much longer.  For the first several scary weeks, I pretty much stayed inside.  The weather obliged by being cold and wet and ominous.  Curled up on my sofa in a nest of blankets, I spent hour after hour looking out the window, too worried and stunned to do much of anything but watch the birds at my feeders.  As so many others did this spring, I found consolation in the birds:  the bright flash of the goldfinches that brought yellow to my yard before the forsythia bloomed, the quarrelsome starlings, the nuthatches creeping headfirst down the tree trunks, the quick, acrobatic chickadees flitting from perch to perch.  Birds have always carried a lot of symbolism on their delicate wings, and this year it seems they've had to do a lot of emotional and spiritual heavy lifting for us - at least they have for me.  I tear up when I think how much I depended on my wild bird companions for comfort - and still do.  I bought so many additional feeders on-line that I started running out of places to hang them.
And I will confess, I have struggled with making art during this time.  My attention has been directed toward my family and my home, always driven by the nagging fear that this winter will likely be a hard one in many ways, and by the need to make repairs and prepare for uncertainty - my own nest has to be my family's sanctuary during the alarming uncertainty that lies ahead of us.
So, in keeping with the theme of home decor, I decided to offer an even larger invitation to my birds by hanging houses for them.  I offer this fall craft/ home decor project as a welcome to my bird friends - please, I beg you, stay by me.   Don't leave me. 
I began with three bottle gourds I purchased on Etsy, already drilled with holes to serve as bird houses.  I have always been fascinated by nests, especially the elaborately woven ones that look like giant baskets - the weaverbird nests that can house whole colonies.  With that in mind, I looked for stencils that might
Art Party S499

mimic that woven yet organic texture.  In Daniella Woolf's Art Party stencil (S499) I found the right texture -  woven without looking mechanical.  I like that there are some shaggy elements that make it look like bits of grass sticking out of the woven pattern.   Using a sponge and quinacridone nickel azo gold fluid acrylic, I stenciled randomly through this stencil onto tissue paper.  The best way to stencil onto a rounded or other 3-d object is to use collage, of course, and torn tissue applied with matte medium and a brush makes it possible to conform to any shape, no matter how irregular.  The unpainted parts of the tissue seem to melt and become transparent, allowing the underlying color to show through.  I overlapped the torn bits to give a somewhat random effect to the weaving. That way, what started as a plain gourd became a "woven" basket nest.


I followed this idea of stitched or woven nests to a looser interpretation with stencils from Pam Carriker (Eyelet Lace S569) and Carol Wiebe (Stitched 02 S540), using sepia fluid acrylic on tissue with two smaller gourds to produce one nest that appears crocheted or knitted, and one that looks patched and embroidered.  Because these must hang outside if they are to be true bird homes, I finished each collaged gourd with a few coats of polycrylic sealer, paying special attention to the edges of the holes to protect them from the elements.  Hanging from the same tree is a bag of alpaca hair for nesting material inside the houses.
So this is the home decor that resonates with me in the time of pandemic.  I don't know if any of my wild bird companions will use these houses, but I sure hope they choose to make their homes here and be my neighbors- and I hope they like the stencils!
May you all will be safe and warm in your own nests this fall, and may you can find inspiration, comfort, and security - be it in making art, or watching the birds.

Eyelet Lace S569


Stitched 02 S540


Wednesday, August 30, 2017

Deb Riddell: Trio of Sweet Life Stenciled Birdhouses

Hello, it's Deb Riddell here with you today and I am thrilled and honored to be guest blogging here at StencilGirl Talk! A huge thank you to Mary Beth Shaw and her amazingly talented team for asking me to create a project to share with all of you. I used a whole bunch of StencilGirl Products stencils and Tim Holtz's Tiny Houses die to create a little trio of Sweet Life Stenciled Birdhouses.
I started out with a piece of unloved 12" x 12" scrapbook paper from my stash, covered it with a thin coat of white gesso and then stenciled the paper randomly through the Rectangular Patterns For PlayCircular Patterns For Play and Doodle It Bigger stencils with three transparent colors of DecoArt Media Fluid acrylic paints (Cobalt Teal Hue, Green Gold and Quinacridone Violet).
More stenciling followed through the Tropical Floral stencil with Yellow Green Light acrylic paint and through the Rembrandt's Words Small stencil with Prussian Blue Hue.
Three houses were then die cut with the Tiny Houses die (two small houses and one large house)
from the stenciled scrapbook paper.
I scraped some shavings of Dry Ice Gelato into Ranger Opaque Matte texture paste, mixed it well with a palette knife and then stenciled some birds onto the fronts of each of the die cut houses. I used the Black Birds In TreesSong Birds and Nature's Gathering stencils. Once the texture paste had dried, the stenciled birds were outlined with a black Micron pen and a white Dylusions paint pen.
Three sentiments from Tim Holtz's Quotations Metallic Stickers were chosen, adhered to each of the houses and outlined with the same two pens as above.
On the back of each die cut house, Transparent Alpha Tiles were sewn on with a sewing machine.
Some words were chosen from Tim Holtz's Words Remnant Rubs and added above the tiles.
And finally, a Philosophy Tag was colored with Picket Fence Distress Crayon
and added to the top of the largest house with a brad.
The houses were then assembled, a line of glitter glue was added underneath the eaves of each little house and the Sweet Life Stenciled Birdhouses were complete!
I hope that you've enjoyed seeing how my project came together and a huge thank you again to StencilGirl for inviting me! I had so much fun playing with all of their wonderful stencils! Thanks so much for stopping by today to see my project and happy creating!
Deb xo
Deb Riddell of Paxton Valley Folk Art lives in British Columbia, Canada on a small acreage with her hubby and their beloved rescue dog. She started her creative journey as a watercolor and decorative painter but since discovering mixed media and paper crafts she's been hooked and is having great fun exploring these art forms. Deb has been published in several crafting publications and is currently on the design team for Emerald Creek Craft Supplies, Southern Ridge Trading Company and Therm O Web and is a Creative Guide at A Vintage Journey challenge blog. You can find her at the following links:


Monday, December 8, 2014

Birdhouse ATB!

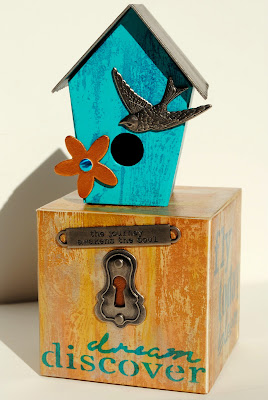
Hi! Mary Nasser here! For today’s project, I wanted to create an inspiring Artist Trading Block (ATB for short!) with a little bird house on top! I used Carolyn Dube’s Now Is The Time small and Now Is The Time large stencils, Eileen Hull's Barn Wood stamp, and a box and birdhouse from Sissix!


For the box, I began by painting the entire surface with unbleached titanium acrylic.
Once that dried, I used the Barn Wood stamp and StazOn Metallic Ink in Copper over the entire surface, too.
I added Tim Holtz Distress Stains in Brushed Pewter, Tarnished Brass and Antiqued Bronze.


Then I used a mini sponge dauber to apply Teal Blue StazOn through portions of Carolyn’s stencils.
Post-it notes helped mask off areas of the stencil around the words I used.


I also laid out some metal ephemera I was considering adding (Mary Beth calls this "auditioning" parts for a work!).


For the birdhouse, I began by painting the entire surface with cobalt turquoise acrylic.
Once that dried, I used the Barn Wood stamp and StazOnTeal Blue over the entire surface, too.
I placed a small matte board flower I’d painted copper and a metal ephemera bird on the surface to "audition" these elements.


Once I finished painting these, the box and birdhouse were easy to assemble with double-sided adhesive tape!
I adhered the bird, flower, text and lock with double-sided adhesive tape
and added a teal gem decal onto the center of the flower.
My last step was to adhere the birdhouse to the top of the box with more double-sided adhesive tape.


Below are views of the side and back:


And here's a detail:


Happy Stenciling!

Wednesday, April 9, 2014

StencilGirl Guest Designer Suze Weinberg


Welcome to Guest Designer


I knew I wanted to create something different for me... Everyone associates me with either UTEE or jewelry making & when I found these darling bird houses in a local store I knew this was the "it" project!

The bird houses came unassembled making it so easy to paint. 

On the first bird house I used Ranger Adirondack® Acrylic Paint Dabbers from the Tim Holtz line,  in assorted colors
I stenciled over the dry paint using a Ranger Archival Ink™ Pad in Jet Black which was applied using a sponge.
When everything was completed ( inside AND out) it was spray sealed to go outside.
Then I added the rubber stamp & bird embellishment & when everything was dry I hung it in my yard!

The 2nd house was painted with Tim Holtz® Distress Stains™ Giving the wood more of a "barn" finish. Same techniques as first.

Now I'm simply waiting for the lovely birdies to make their home!!


Today's Deal of the Day over at StencilGirl Products is the 
Hebrew Calligraphy that I used on this piece.


Stencils Used
Numbers designed by Seth Apter for StencilGirl Products
Hebrew Calligraphy designed by Jessica Sporn for StencilGirl Products
Straight Stems designed by Terri Stegmiller for StencilGirl Products


Suze Weinberg
Find me here :
MY BLOGhttp://suzeweinberg.typepad.com/suzeblogz
Visit my ETSY Shop http://www.etsy.com/shop/suzeweinberg
FACEBOOK 
: http://www.facebook.com/suze.weinberg
TWITTER @suzeweinberg