Showing posts with label cuff. Show all posts

Tuesday, August 27, 2019

Faux-Leather Stenciled Jewelry by Linda!


Jewelry made from StencilGirl® designs? And embossed onto painted a Lutradur surface that looks surprisingly like leather? Yes and Yes!

While rummaging in an old box of unfinished art quilts, I stumbled upon pieces of a half-finished project made with painted Lutradur and Tyvek. About five years ago, I had a vision of using strips of black and white harlequin painted Lutradur along the edges of my painted Tyvek design. The project never quite worked out, so I decided to try stenciling over the Lutradur to see what would happen. It had been years since I worked with Lutradur, a non-woven fabric that is often used in furniture construction and has been embraced by crafters.

Using a Versamark stamp pad through a stencil, the embossing powder looked perfect before heating.
The beauty of Lutradur is that it takes paint well, is lightweight, and can be easily stitched through by hand or machine. The downside is that it melts and becomes lace-like when you use a heat gun or blow dryer on it. My first attempt, on the partially painted harlequin design was a fail: the Lutradur melted away in the unpainted section and stayed put on the black painted areas.

Once I blasted the design with a heat gun, the unpainted (white) Lutradur melted. The areas painted with black gesso, however, were perfectly intact.
So, I decided to paint the whole strip of Lutradur, and covered it generously with Golden's black gesso. When dry, I tested various favorite StencilGirl® stencils using a variety of embossing powders. The fiber had more weight with the addition of the black gesso, and the paint prevented the Lutradur from melting when I heated the embossing powder. Gold, pale blue, and white looked great against the black. It looked surprisingly like black leather, but since Lutradur is vegan, lighter weight, and less expensive than leather, it was a win/win.


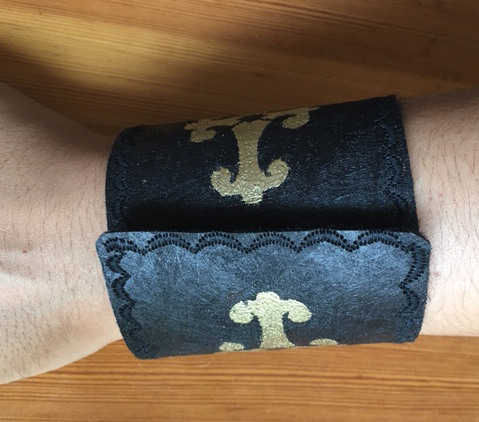
I set about stenciling some of my favorite StencilGirl® design on the black strips of painted Lutradur. I had a vision of making a cuff bracelet. I combined one of Jill McDowell's circular Japanese-inspired Crest stencils with a cross from Laurie Milka's Pilgrimage to the Renaissance.


After the stenciling was done, using a rotary cutter, I cut the design to the length I wanted for a cuff.

The painted Lutradur was a little scratchy, so I also cut some black felt (to use as a lining) to the same size. After some deliberation, I selected a decorative stitch on my sewing machine and carefully stitched along all edges.


The finished, stitched cuff.
I needed a closure of some kind, and decided to use Velcro. I carefully lined up three pieces of the Velcro on each end of the cuff.


The finished cuff is easy to put on and take off with the Velcro closure.
I was pretty excited about the success of the cuff bracelet, so I decided to make more jewelry. (It was kind of addictive!)

I used another one of Jill's Crest medallions for a pendant. I made two, and glued them together with Golden heavy gel gloss. I used Jill's full 2.5" circle as a template, traced around it with a pencil, and cut each shape so they would match perfectly. A small hole was punched with an awl, and a small jewelry ring inserted through the hole. I hung it from a piece of black cording that I found at my local bead store.


Clips held the two sides together while the glue dried. Be sure to cover the edges with waxed paper or parchment paper so the clip doesn't stick to the surface.
Some of my favorite India-inspired shapes from Gwen Lafluer's Not Afraid to Try design became earrings, as well as one of the shapes from Laurie Milka's Pilgrimage to the Renaissance.


Each earring shape was carefully cut out with small, sharp scissors.
I used a piece of wood behind the stenciled Lutradur to avoid poking holes in my worktable.
Two sets of the finished earrings.
I decided to make a more delicate, feminine cuff with a floral shape using pale blue embossing powder. I chose a section of Laurie Milka's Pilgrimage to Mexico. I tried adding white dots to the edges but they smeared so I used only the blue area. After trimming away the excess, I cut a piece of black felt for a lining, and used a machine stitched floral design along the edges. Again, I used Velcro for the closure.


Last, I took some triangular shapes from Laurie Milka's Pilgrimage to India, cut them carefully, and attached them to wide black grosgrain ribbon with Golden heavy gel gloss and brass brads.


Each diamond was backed with black felt.


Here are all of the embossed design that I experimented with. A few of the embossed shapes are being saved for future projects.
 

Finally, here's the finished collection of my handmade, faux-leather jewelry, ready to be worn.


Tips:
* Lutradur is fibrous, so if it is humid, extra embossing powder can stick where you don't want it. The excess powder can be brushed away with a fine paintbrush before heating. 

* Any extra embossed powder that ends up in the wrong place can be covered over with a black sharpie. 

* It doesn't really matter if your embossing powder isn't perfect; the edges are going to be trimmed away so only the center of the design shows.


Stencils used:
Laurie Milka, Pilgrimage to Mexico 
Laurie Milka, Pilgrimage to India
Laurie Milka, Pilgrimage to the Renaissance 
Gwen Lafluer, Not Afraid to Try
Jill McDowell, Crests

Tuesday, May 8, 2018

Stencil It! Wear It! From Trash to Treasure Cuff with Claudia Neubacher


Hi and servus! Claudia here and I am so excited to share with you my first project as a regular member of the StencilGirl® Creative Team! ( I so hope you will like what I have created for you!!!)

I recently found that some of my older kitchen towels didn't look too appetizing anymore. They once had a lovely natural beige color but had started to nastily yellow (obviously having moved to the far back of the kitchen drawer and therefore been forgotten for a long long time). They definitely didn't look good enough anymore to be hung up in my kitchen, but I thought they would make perfect fabric cuffs once they would be covered with yummy layers of stencilled on acrylic paint! 


Here are the stencils I used:
I have also done a short video in which I show the stencils that I have used and talk a bit about the fabric painting medium as well. You will find it at the end of the post.

This is how my favourite cuff looks when being worn: 


But instead of showing off let me take you through the process!

I started with one of my favorite things to do: select the stencils and paints I wanted to use for my cuffs! (of course I had put the towels into the washing machine before I used them to create my cuffs). I used DecoArt media fluid acrylic paints and Americana Fabric Painting Medium.


My wrist was measured to find the right length for the cuffs and I added an overlap of about two to three centimetres (which would be a bit more than an inch). I needed the overlap to sew on any buttons or other closures.


I roughly marked the space I needed for about three to four cuffs using a pencil and a ruler.


To turn my fluid acrylic paints into fabric paints I added some Fabric Painting Medium (according to the instructions given on the bottle). This way I made sure the paint would adhere well to the fabric and that the cuffs were also washable if necessary. I mixed the medium and the paints directly on my palette sheet with a palette knife.


Then, I started with the first layers of paint and worked my way from left to right (and sometimes back to the left again). I didn't pay too much attention to divide properly between the single cuffs' areas as I hoped that overlaps of patterns and colors from neighboring cuffs would add some beautiful randomness to the designs (which I think they actually did).


I used a cosmetic sponge to apply the paints through the stencils. I worked on all three cuff designs simultaneously - letting the patterns and colours take the lead and moving back and forth, adding layer over layer.

The final layers though, like the text on the left cuff or the skyline on the right cuff, were done with the finished design of the cuffs in mind and therefore put in the exact spots where I wanted them to be.


For additional texture I loaded a sewing wheel with black paint and added some dotted lines here and there.


Then, it was time to cut the fabric into strips to finally form the cuffs. I frayed the fabric edges before I continued. 


To tone down the cuff with the beautiful numbers, I mixed my own walnut ink mist and sprayed it on. As the walnut ink stays reactive to moisture, I sprayed on a matte acrylic sealant after the ink had dried (and after I had added some doodling with a white gel pen - which will be shown a bit later).


I mixed some white Gesso with the fabric painting medium and randomly scraped it on the other two cuffs.


Using a black fabric marker and a white gel pen, I added a bit of doodling and outlining here and there. The white gel pen stays water soluble, so that needed to be sealed as well.

Then, it was time to get out my sewing machine and add some stitching around the edges (to prevent the cuffs from further fraying) and also across the whole cuffs to create additional patterns and texture.


I rummaged through my stash of vintage buttons, beads and press buttons to find the matching closures and adornments for each design...


...and also added some hand stitched marks (using a six strand embroidery yarn in a rusty colour). 


Everything was sewn on by hand. Only the button holes were done using the sewing machine again. 


I hope you like my little cuffs collection as much as I do! These were such great fun to make and I will definitely have to do more (to give away as presents to dear friends and loved ones).  

I would also like to share some close ups of the focal pieces I have added: 

(a little Chinese fish bead)


(a vintage button from the sewing chest 
of my husband's granny)


(a large metal jeans button from my stash)

And here's the video I talked about earlier in this post. It is my very first and I am still on a learning curve with this (as you will undoubtedly notice). 


Thanks so much for stopping by! I hope you have enjoyed your visit! 
Happy stenciling!
Claudia
xxx