Showing posts with label Maria McGuire. Show all posts

Thursday, July 7, 2022

Creating Collage Paper Quilts with StencilGirl® Stencils

Hi, everyone! Jennifer Wilkin Penick here! I have always loved the look of quilts, so it shouldn't be a surprise that as a collage and mixed-media artist, I finally thought of making paper collage quilts. It then took just one more step for me to realize that using stencils with a gel plate could create the most wonderful fabric-like papers to use in my paper quilts.

I'm going to walk you through all the steps of making some gorgeous paper quilts, using "paper fabric" made with StencilGirl® stencils.

Step 1: Gather your materials:
gel printing plate
StencilGirl® stencils
acrylic paint
scissors
glue
optional templates (download here)

Step 2: Print your "paper "fabric". 
I like to use a variety of patterns -- some with big patterns and some smaller ones, that replicate the kinds of fabrics that I may choose if making an actual quilt. You will have fun choosing these or other similar StencilGirl® stencils that make an array of different "paper fabric" that is pleasing to you.

I have used the following six StencilGirl® stencils (you can see the names indicated in the photo, too):
Doodle It Tornado Bloom Stencil
Tapestry
Mermaid Scales
Fishscale Brick Stencil
Stockinette Small Pattern
Lila Stencil

The following photos show how I first print a solid color using my gel plate and then the results of making 4 different prints with each stencil using a second color of acrylic paint on top of the first printing. 

If you are new to gel plate printing with stencils, you can also check out this video to see me printing some papers using these same StencilGirl® stencils. Actually, even if you are NOT new to gel plate printing, you may find my simple two-step printing process interesting to check out. 

Step 3. Assemble your quilt
Now it all comes together, and I will use some gorgeous papers that I have made to assemble my collage paper quilt. To help you get started, I have provided a simple quilt block template in two sizes. 


You can use a large piece of paper and have your quilt block repeat several times (for stunning effect!) or you can start out by making maybe four or six and gluing them into your sketchbook or piece of paper. 

In the three photos below, you first see the result of me using my template to cut out the quilt pieces from my lovely stash of new stencil-printed papers. In the second photo you see me laying out the pieces into a pattern of repeating quilt blocks, and in the last photo you see the pieces glued down into the final collage paper quilt.

Since sometimes a picture is worth a thousand words, but a video tutorial is worth even more, you can see me putting a paper quilt all together in this video:
I hope that you try this tutorial and have fun either using the templates that I have provided OR making up your own quilt block pattern. If you've admired quilts before, you know that they can be made using many (many!) different patterns, and many of these are quite simple to replicate. 

Last of all, please consider sharing your collage paper quilt artwork on social media. On Instagram you can tag both @stencilgirl_products and @jenniferwilkinpenick so that I can see them. 

Thanks for your time,
Jennifer 

Jennifer Wilkin Penick is a practicing collage and mixed media artist. She teaches art for children and adults at her home studio located in a renovated 18th-century carriage house in the Georgetown neighborhood of Washington, DC. She also teaches at the Arlington Arts Center in nearby Virginia, and is an artist-in-residence at the Medstar Georgetown University Hospital in Washington DC.

Thursday, June 17, 2021

Rust Dye Printing with StencilGirl® Products

Hey everyone, Lorri Scott here to talk about my journey into rust dyeing on fabric using StencilGirl® stencils.

I became interested in rust dyeing several years ago when I was learning how to eco-dye using leaves and flowers.  The rusted areas that transferred from the iron pipe used to roll fabric on for eco dye prints intrigued me.   I began gathering iron objects such as trivets and gate pieces to create rust on and transfer print onto fabric.  The transfer method was to take the rusty metal object, lay wetted fabric on top and then weight the fabric down and let it sit.  Warm sunny days are the best to create rust prints!

After several years of rust printing on fabric I wanted to introduce the technique in classes.  And I have done that but it became cumbersome to lug heavy metal pieces around with me, let alone enough for students to use!  Seemed I would need one of those “Got Junk?” trucks.

One day I was reading a post on Facebook and a woman had mentioned using steel wool and stencils.  I could not find that post again and nothing came up when I did a search online. 

I knew I could figure it out and just started experimenting.  Right away I was hooked and I thought how much easier it will be to take stencils with me to teach workshops rather than super heavy boxes of metal!  LOL!  And so many choices of stencils too!

This is a sample of my own private “junkyard” treasure trove. (Well some of it).

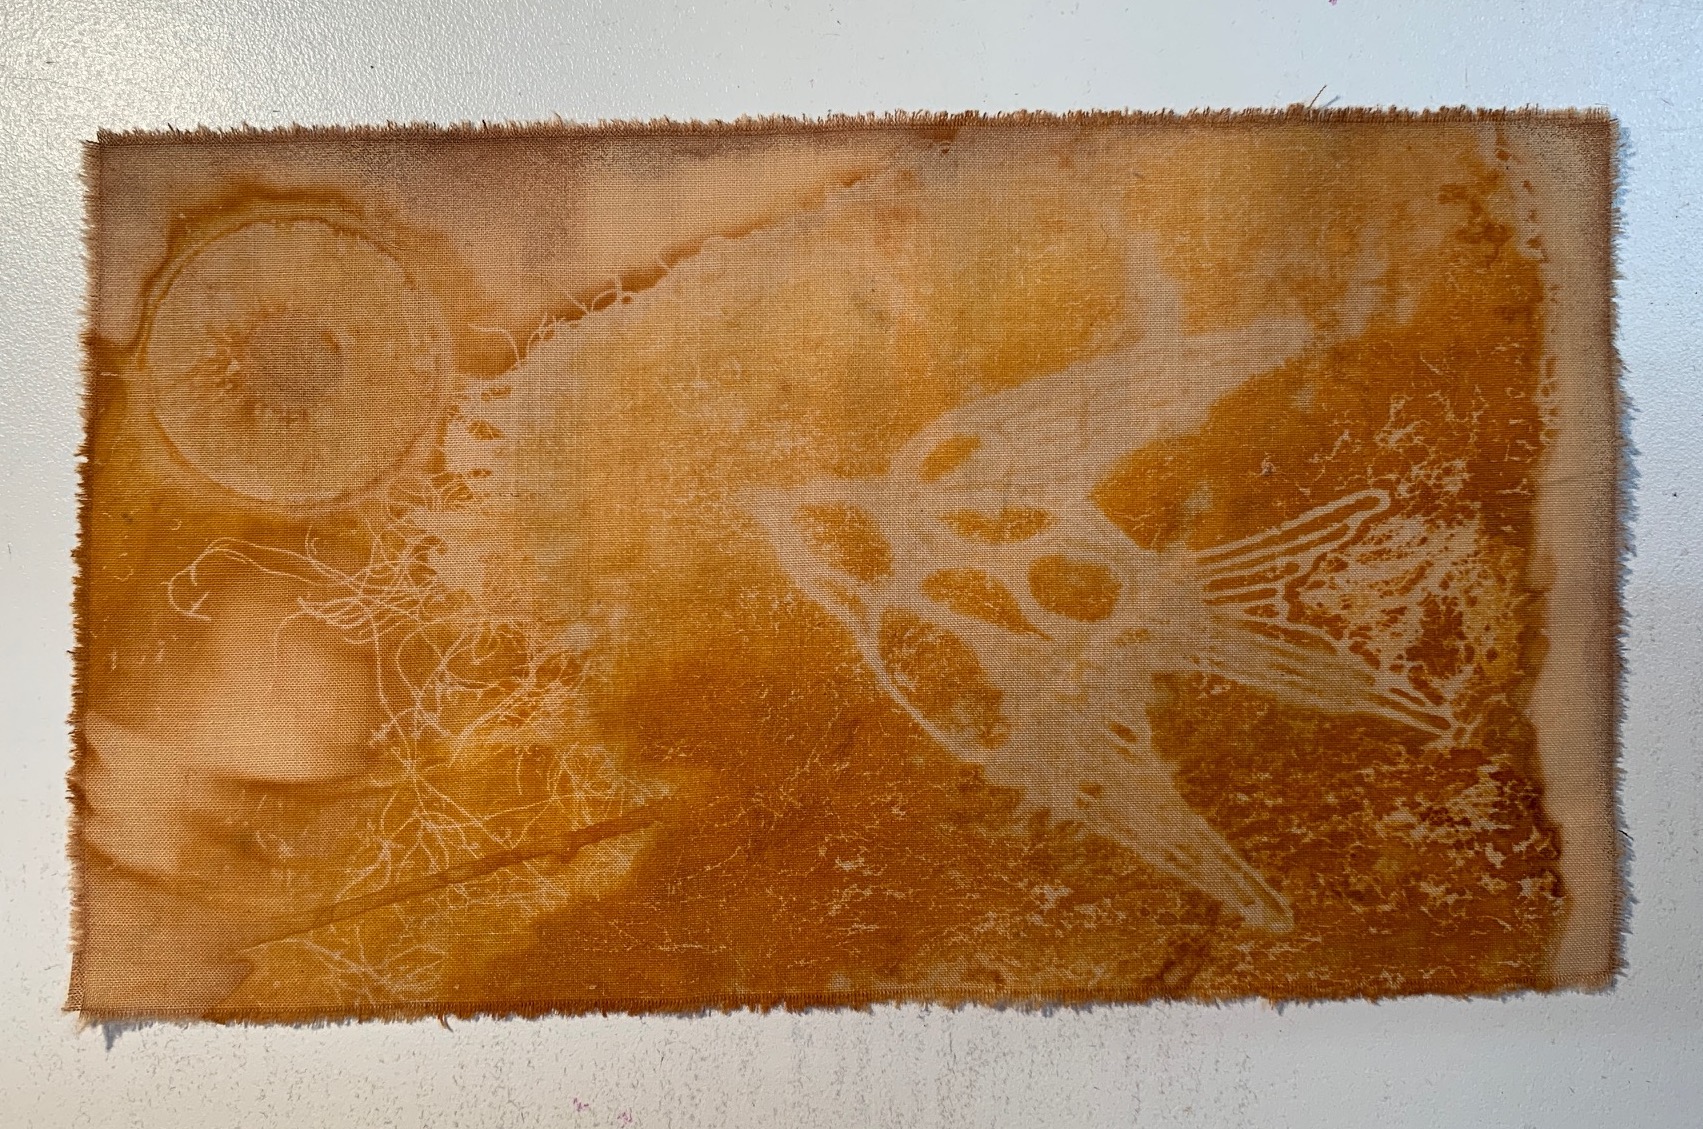
These are samples using StencilGirl® stencils.  These will make great background pieces for art.  These could become wall hangings, modern day prayer flags, and/or get stitched onto garments and accessories.  I use cotton muslin, silk fabrics such as noil and broadcloth and also vintage napkins and placemats, either cotton or linen.

Stencil on right – Basket (S327) Daniella Woolf

Stencil - Winter Trees Bark (L635) Valerie Sjodin

Stencil – Wrought Iron Gate (L224) Cecilia Swatton

Art Nouveau Rug (L695) Kate Thompson

Protector of the Fields (S407) Roxanne Evans Stout

Here are examples of how these could be used for backgrounds.

Kate Thompson sells images of her paintings printed on organza in her Etsy shop.  I have taken one of her prints and laid it over the Basket stencil rust print.  I could attach this using Lite Steam-A-Seam 2 fusible bonding.  It could be that simple or could be further embellished with paint, stitching, lace, etc.

I made this rust printed fabric image into a simple prayer flag.  I printed The Apache Blessing onto organza using an ink jet printer and stitched it onto the rust dyed fabric.  I wrapped the stick with some red embroidery thread and attached to the fabric. 

The Process

Supplies:

Choose the stencil you will use and be sure to use masking tape to cover the StencilGirl® information at the bottom or else that will appear on your rust print.

Fill a spray bottle with ½ white vinegar and ½ water.

Fill a quart size (or larger) baggie with sand and make sure it is sealed securely.

Take the piece of fabric and wet it, wring it out until it’s just damp.

Put a towel down and put a piece of plastic down larger than your piece of fabric.

Lay the fabric on the plastic and then the stencil onto the fabric.

Take a roll of steel wool and unwind it.  Stretch it out a bit and tear/cut the size you need to cover your stencil.  Lay it over your stencil.  If the steel wool exceeds the size of your stencil then the rust will show outside the cut of the stencil.  See the image of Roxanne Evans Stout stencil I used for the prayer flag.  Those rust areas outside the stencil were because the steel wool overlapped. Be sure to wear a mask when handling the steel wool, you don’t want to breathe the tiny particles, and it’s a good idea to wear gloves too.

Using the 50/50 vinegar water in the spray bottle, wet the steel wool until wet.  You do not want it saturated but you need it evenly wetted.

Lay the sand bag on top of the whole “sandwich”.  Plastic, stencil, fabric, steel wool, sand bag.  The sand bag will weigh the steel wool down onto the fabric.

Now the tricky part is how long?  Rust needs, moisture, air, and heat to promote.  So if it’s a hot sunny day this could go fast, within an hour or two.  Keep lifting the sand bag to make sure the steel wool is moist.  If it’s dry spritz it with the vinegar/water. If you have this in a warm room it could be done within 5 – 8 hours.  Or leave it overnight.

Gently lift the stencil and check to see if the image is showing yet.  If not you may need to wet the steel wool some more and leave a bit longer.

After you remove the layers and have the image on the fabric you need to iron it.  Remember that some of the rust is not going to set into the fabric and will rub off so be sure to put down a press cloth on your ironing area and also put a press cloth on top to protect your iron.  I buy cotton sheets at the thrift store and tear them up to use as press cloths.  Be sure the iron is on the hottest setting, this will help set the rust a bit more.

Fill a tub with ¼ cup baking soda and hot water.  Soak your rust piece in that for about 10 -15 minutes.  Then wash your fabric using a mild soap and rinse.  Let it dry and then iron it again and it’s ready to use.

If you want to explore rust dyeing techniques further perhaps you would like to join me and Jen

Cushman for an intimate gathering in Cottonwood, AZ in a private retreat compound.  Oct. 21 -25, 2021.  Five days of art and inspiration, sisterhood and creativity, intention and self-discovery (and rust dyeing).  Mundane meets magic … or better known as “Rust and Stardust”.  The perfect balance of chemistry and creativity with a sprinkling of mysticism.

For more info visit Rust & Stardust — Soul Stir Magic

Lorri Scott

Monday, May 10, 2021

Creating a Zine with StencilGirl® Stencils by Marsha Valk


Hi there! It's Marsha here today with a new column!

When you read this, I will be a couple of days away from finishing my '100 day project'.

#The100DayProject is a global art project. Every year, thousands of people all around the world commit to 100 days of creating. Anyone can participate. The idea is to pick something creative, work on it every day for 100 days and share your progress online.

I did not make a big deal out of starting. I did not announce it on social media, and I did not use the hashtag. I did one week of testing on a couple of my close friends, and then I just started posting.

What did I start posting? Little one minute Instagram TV videos of my daily life. I call them 'mini vlogs'.


Remember what people shared on Instagram when the platform just started? That's the best way I can think of to describe it. It's like old school Instagram: all the things I like, plus snippets of my daily life, however, in video format.

I did not think I would be able to keep it up. However, I did! Now, it wasn't always easy. There was one week where I barely left the house because I had so much work to do. And on other days, I felt I had walked around the same block for the seventieth time.

The mini vlogs did motivate me to keep going outside and to keep looking for things to capture. From the middle of winter all the way through spring. Around the neighbourhood. Around the city. On bike rides. In the woods.


I documented lots of things I had never noticed before. Small things. Like the way the sun sets outside my studio window. Or all the birds that like to hang out in the tree in the front yard.

And, I learned a lot about the history of the city I live in.


I'm sure my mini vlogs would have looked totally different if we had not been in lockdown for nearly all of the 100 days. On the other hand: maybe I would have been way too busy to take on a project like this if it hadn't been for the lockdown.

Anyway. What does all of this have to do with art or printmaking, you ask?

I don't know yet. However, I know it will have an effect. Or maybe it already has. Because this is the longest time in years, I haven't travelled, visited other cities, visited museums, or saw family and friends. I haven't read much in the past three months. I haven't watched a lot of films or TV either. I was just concentrating on my work and making the mini vlogs.


It's amusing to me to hear from viewers that they enjoy watching them so much. Because to me, what stands out is the lockdown routine: coffee, work, a walk, more work, dinner and then maybe some more work or a Zoom event or watching something short on YouTube.

So that's what I decided to document in a zine—my current daily routine. Watch the video to see me create the tiny booklet with the help of all the stencils in my stash that I felt needed a little love. Perhaps I can inspire you to make one too!


Enjoy your day! Until next time!

Marsha Valk

StencilGirl® stencils used:

ATC Mixup #1 Art Marks by Rae Missigman
 

Spoked Wheels Collage by Jennifer Evans

Signals by Nathalie Kalbach

Planner Words 4 by Mary Beth Shaw

Planner Spiral Notes 4 by Mary Beth Shaw

Exploded Fan by Mary Beth Shaw


ATC Mixup by Mary C. Nasser

Impressionist Water Lily Background by Margaret Peot

New Orleans 4 by Nathalie Kalbach


Noodles by Daniella Woolf

Moroccan Doily Stencil by Maria McGuire

ATC Mixup #2 Botanical by Rae Missigman

Trapezoid Squared by Mary Beth Shaw


Tapestry by Kristie Taylor


Monday, February 8, 2021

Mixed Media Gel Printing with StencilGirl® Stencils and PanPastel by Marsha Valk


Hi there! It's Marsha Valk here today, and I'm excited to share a new StencilGirl® Column and video with you!

I often share something about my latest little solo expedition or something that I've seen or read recently in this column. However, it's been months since my last visit to a museum, and by now I'm kind of bored of just strolling around the neighbourhood. 


All I want to do is to create. Something. Anything!

Luckily for me, there are online courses and events to help and inspire me. I'm still able to fill my 'creative well' even in lockdown.


One of my favourite past-times right now is Creative JumpStart. If you are reading this blog, you've probably heard of it before, and you may even be one of the participants!

If not, Creative JumpStart is an annual online event that is hosted by StencilGirl® designer Nathalie Kalbach. This years edition is even bigger and better than ever because of its tenth anniversary.

I'm lucky to be one of the 45 teachers this year, along with Mary Beth Shaw, Seth Apter, Nancy Curry, Carolyn Dube, Rae Missigman, Gwen Lafleur, and Jane Lafazio, Kae Pea, Kristin Reese Williams and Tina Walker.

I always try to create along with at least some of the daily video lessons. Some years I fill a whole journal, other editions I only manage to do a couple of projects. And, that's totally OK. CJS isn't a challenge. Its purpose is to spark inspiration!


This year's theme is 'Storyteller', and for some reason that prompted me to dive into some of the art, I created as a child. So for my video lesson, I kind of did a collab with my younger self.

The fun thing is that my childhood art came in handy for the embroidery project Kristin Reese Williams shared in her CJS lesson too.


So with the StencilGirl® Creative Team theme 'Mixed Media Pastiche' in mind, I could not help but wonder what would happen if instead of looking at the style or character of the work of one or more other artists, I would look at the style or character of my art as a kid.


Watch the video to see me create a mixed media gel print using a technique I learned from my friend Birgit Koopsen, combining lots of StencilGirl® stencils and PanPastel.


I realise I'm super lucky to have access to the art I created as a child. However, I feel the need to stress that even though I'm happy that my mom kept these, I don't want you to feel sad because you haven't hung onto every single item of kids artwork you've ever made or received.

Most of my childhood art only exists in digital form these days. The physical artworks are long gone. I did not enjoy them half as much when they were collecting dust and taking up space in my attic!


You can always use your (grand) children's art or create something new in the spirit of your younger self instead! Have fun!

Until next time!

Marsha Valk


Stencils used:
Interesting Dots Repeating Pattern by Jennifer Evans
Oval Grate Stencil by Mary Beth Shaw
Fragmented Line Columns stencil by Cynthia Silveri
Mid Century Modern Rocks and Leaves stencil by Jennifer Evans
Stone and Mortar Version 2 by Mary Beth Shaw
Ornamental Floral Screen stencil by Gwen Lafleur
Deconstructed Cabbage Rose, designed by Traci Bautista

Stitch a Doily Stencil by Maria McGuire
Midcentury Modern Elements #1 by Kae Pea
Central Ave stencil by Nathalie Kalbach
Teardrop Doily Stencil by Maria McGuire
Seeds Doily Stencil by Maria McGuire

Friday, January 15, 2021

Frieda Oxenham: Poetry with StencilGirl® Stencils


A New Year brings fresh hope and new beginnings in many ways, specially this year. Hopefully we will be able to look back and realize that life became more normal in 2021 after the disaster that was 2020. As always I am using Ben Okri’s poem as my guideline and once again it was just what I needed to hear: “We are not much more than what we think, in our minds we swim or sink”.  Let’s all try to keep on Swimming!

Here is the tutorial for my spread:

1.      Mix gesso with blue Radiant Gel, and apply to 2 facing pages of a large art journal. I use the ArtbyMarlene one)using a sponge.

2.      Using stencil Leaf Zen Landscape and a variety of blue paints with a cosmetic wedge and apply to the bottom half of both pages.

3.      Take an 8 x 10” gel plate, add and brayer out a variety of acrylic paints (I used 6 different colours) and take prints on plain copy paper.

4.      Again using the gel plate, brayer on some darker colours, put stencil Looping Leafy Vines on top of the plate and take prints on the paper made in step 3.

5.      Repeat step 4 but using white acrylic paint.

6.      On the sheets from step 4 and 5 stencil the fish from Boho Fish using black acrylic paint. Use both side of the stencil to get a variety of fish swimming in different directions.

7.      Cut out the fish and glue onto the pages with soft gel medium.

8.      With various green acrylic paints, stencil on patterns of greenery to the bottom part of the pages using stencil Looping Leafy Vines, with a cosmetic wedge. Outline with a sparkling green gel pen.

9.      Stencil on the sun as shown, using orange acrylic paint, a cosmetic wedge and the small stencil from the February 2017 StencilClub.

10.  Make the words of the quotation using a Dymo writer with self-adhesive tape black on clear, and adhere to the pages as shown. Cover with clear gesso to take the shine away somewhat.

11.  Stamp on shell images to the bottom of the pages. I used small Tapestry Stamps.

12.  Stencil on the words Keep on Swimming from Boho Fish to the left hand page with blue paint. Outline with a permanent black marker.

13.  Outline the fish eyes with a permanent white marker

14.  Spray on the sky part of the pages through Tropical Floral with blue mica spray to make clouds.

15.  Edge the pages with a blue inkpad.


© Frieda Oxenham 2021. To see more of Frieda's work, please visit her BLOG.