Showing posts with label Metal. Show all posts

Wednesday, August 2, 2017

Second Star to the Right and Straight on 'til Morning projects by our August 2017 StencilClub Voices

Greetings Stencil Lovers!

Carol Baxter curating this Voices post. 

Attention to detail was the first thing that game to mind after gorgeous when I saw what our StencilClub Voices had imagined and created with Mary Nasser's Second Star on the Right and Straight on 'til Morning StencilClub set for August 2017. Wow.

I shall now let Christine Slay, Jill McDowell, and Frieda Oxenham's own voices ring out and I'll jump back in at the end:


"Connections" by Christine Slay

"My husband is in the military so our family has had many deployments and welcome home events. The August stencils reminded me of these ups and downs and was fun to create using different vintage paper, old postage stamps and watercolor."


Jill McDowell's Mixed Media Canvas & Textile Collage

"I used many sizes of Mary's stars, (both stencils and masks) 10" x 10" mixed media canvas and embossed them onto a copper sheet, cut them out with tin snips, and then used a salt, white vinegar and ammonia technique, (learned from a Jeri Bellini YouTube video), to add some patina. For the background I started with a collage and then added multiple layers of stamps, acrylic paint, and molding paste."


"This one is a textile collage in my new Dina Wakely mixed media art journal. Both the post card and the blue "laced fabric" is made with Lutradur, a very cool product that just made it onto my radar screen. The postcard's "stamp" was made by stenciling Mary's sun through the bonus stencil onto Shrinky Dink material with Distress Oxide inks. Gwen's Ornamental Petals Stencil made it into the background too!"


Travel with Frieda Oxenham

"I've used the large star stencil, the medium Postcard stencil as well as the extra bonus stencil in the background. My travel scenes include US, Paris, and Venice. If only!"


Heavy Metal Movie Homage - Carol Baxter


I kinda cheated and used stencils from 3 of Mary Nasser's StencilClub sets - Here, There & Everywhere and The Sky's the Limit. If you are into music, you can check out my post.


Please do take a moment to spy the captivating projects the designer, Mary Nasser, has created exclusively for StencilClub members. 


Enter for a change to win a year of StencilClub - click pic for deets!

Wednesday, March 30, 2016

Guest Designer Elitia Hart: Metal Embossing With StencilGirl Products

Today we are delighted to have Guest Designer Elitia Hart demonstrating Metal Embossing with StencilGirl Products!  

As a metal art instructor and mixed media explorer, my planning for a workshop or tutorial is often kick-started by an awesome product, stamp or stencil, and I am constantly inspired by the wide variety of  creative stencils from StencilGirl Products! See how beautifully these stencils translate onto metal….


Enjoy Elitia's video below of her process...an online class in itself!


Supplies for Pewter Elephant Parade:
StencilGirl Stencils – Elephant Parade by Natalie Kalbach and Pilgrimageto India by Laurie Mika
Tools: from Ten Seconds Studio http://www.tensecondsstudio.com/
Tooling Surfaces: Paper pad, smooth clipboard and thin foam sheet and cutting mat
Cardstock or cereal box
SookWang double-sided adhesive tape-2 sheets of 20 cm x 25 cm
Pewter Sheet 36 guage or Aluminum 40 guage Sheet 20 cm and 25 cm
Artist Wood Panel 20 cm x 25 cm
Pewter Blackener Solution (Jax Pewter Black)
Gloves, Cotton Wool, Alcohol swabs
Nevr Dull wadding Polish
Glossy, transparent spray lacquer.
Ranger Vintaj Patina (various colors) www.rangerink.com


Visit Elitia Hart on her website and on Facebook for more inspiration!

Friday, July 17, 2015

StencilGirl Guest Designer Jen Crossley

Welcome to 
StencilGirl Guest Designer Jen Crossley!

I’m Jen Crossley, a mixed-media artist and instructor from Australia. I mainly work with found objects and metal. I was thrilled when I was asked to do this challenge using the StencilGirl stencils. As soon as I saw them, I knew that they would work brilliantly on metal. I used the Gigi, Song Birds, and the Art is Good For You Stencils.

Firstly I cut a sheet of brass metal to size – filing and sanding the edges to smooth them down. Next, I applied rubbing alcohol to make sure the metal was really clean before printing. Next, using a sponge and Stazon re-inker, I inked the stencil to create a nice, clear image. After having the metal in the ferric chloride solution for approximately forty minutes, the stencil image was etched into the brass.

After taking it out of the solution and cleaning it with baking soda, I then coloured the brass with antiquing patina. I hope you enjoy the art book and also the bird pins that I created. They just go to show that the stencils can be integrated in to a variety of mediums.


To find out more about Jen, please visit the following links:

Monday, April 21, 2014

Guest Designer Magdalena Muldoon


Welcome BACK
Guest Designer
Magdalena Muldoon!

This time I want to show you how easy it is to emboss pewter using stencils. Pewter is by far the best metal for its malleability, softness and its real silver-like shine. 


1) Rub the metal against the stencil (Stepping Stone #2 designed by Terri Stegmiller) with a paper stump until you can clearly see the design. 


2) Outline every part of the design with the pointy part of the Teflon D-01 tool and flatten any bump on the metal with a paper stump. 


3) Place the suede under the metal and use the appropriate size of the Cup and Ball to emboss or push the metal. Work doing soft long strokes with the round tool to push the metal to the desired size. The suede is the soft surface that allows us to push the metal to the dimension we want. I used the Cup and Ball #4 for the leaves and small swirls and the Double Ball to emboss the big parts of the design such as the trunk of the palm tree and the big swirls. 


4) At the front (and without suede) outline the embossed metal with the Teflon D-01. Going around the embossed shapes with this tool gives them definition and a fine and finished look. Missing this important step will make the embossed areas look “unfinished”. 


5) Add a border with any Decorative Wheel. This is done also at the back of the metal and on the suede. I used the Big Wheel for the border. 


6 and 7) At the front of the metal (and now without the suede), add details such as lines with the Teflon D-01 or create a background with the Star Wheel. This cool effect is done by moving the wheel back and forth on the metal while you slowly turn the metal with your other hand. It may not work the 1st time you do it but with a bit of practice you will get great results. It is a fun texture that I use a lot to fill all sorts of background spaces. 
Fill the back of the embossed areas with MercArt’s Filling paste (not shown here) and let it dry. This liquid paste is really easy to apply, it levels itself and it dries really hard so the embossed areas will not be pushed down. 


8) Apply the Pewter Patina with a brush all over the front of the metal. The pewter will turn black. Let it stay there for about 2 minutes and then remove the excess with a paper towel. 


9) Apply some silver polishing paste to the metal. 


10) Polish the metal with a cotton cloth or towel until you get the desired shine. 


Products used: 
Stencil Girl Products Stepping Stone #2 stencil designed by Terri Stegmiller
Glass or acrylic (surface to work on) 


Wednesday, April 2, 2014

StencilGirl Guest Designer Magdalena Muldoon


Hi, I'm Magdalena Muldoon. I am the owner of MercArt. MercArt was founded in 1970 in Mexico City by Magdalena Barrena (my mom).Since then, MercArt has been offering only the best quality products. In 2002 I moved to Texas with my husband and three daughters and I created MercArt USA, becoming the first company in the US to offer the best quality and most complete variety of tools and metals for Metal Embossing. We are commited to excellence, not only in our products, but also in our Craft.


I'm here today to show you how to 
emboss metal with stencils!

 First decide what to emboss: Place the aluminum (color up) over the stencil and over the acrylic IF you want the white part of the design to be embossed. IF you want the blank or empty parts of the design to be embossed, then place the stencil on the color side, and flip the metal to the back over the acrylic.


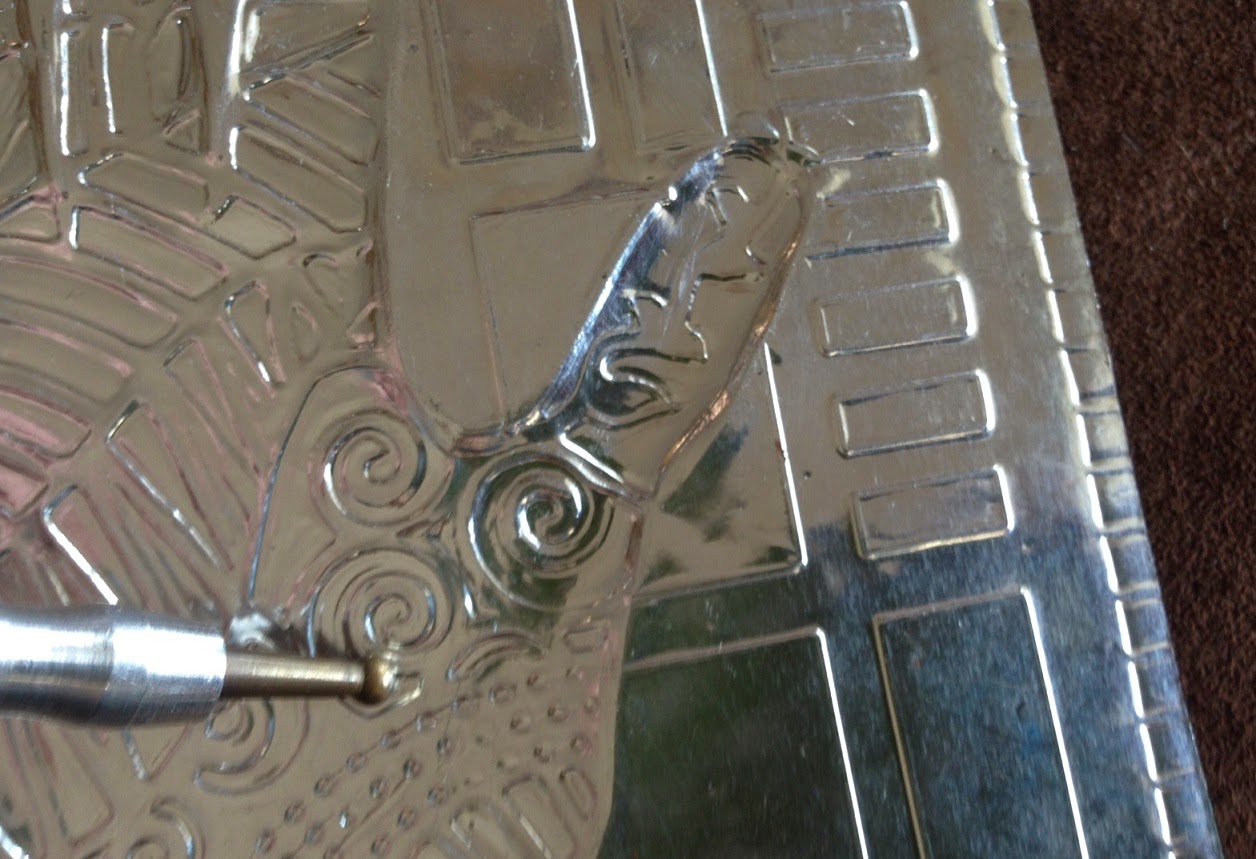
I am using two StencilGirl stencils today. Large Tribal hand and Small Segments.

Small Segments is the Deal of the Day at StencilGirl Products!


1. Rub the metal against the stencil with a paper stump until you can clearly see the design.

2. Outline every part of the design with the pointy part of the Teflon D-01 tool.

3. Flatten any bump on the metal with a paper stump.

4. For the background, place the metal over the stencil and rub with the paper stump to see the design.


5. Outline each line with the Teflon D-01 tool.

6. Remove the color off the embossed areas with a sanding block.


7. Use the thin Fiber Glass tool to remove the color from small or specific areas.It 
removes the color better than the sanding block. (Remember to clean any fiber glass  residue with a damp paper towel).


8. Add a border with any Decorative Wheel.  This is done at the back of the metal and on the suede.

9. Rub the metal with your choice of any Gilders Paste color to add several patinas and tones to the metal.

10.  At the back of the metal and over the suede, emboss assorted areas of the design with the Cup and Ball and the paper stump to create a bigger dimension and make the metal “puff”


11. Fill the embossed areas at the back with MercArt’s  “Filling Paste” and let it dry. This will prevent any embossed areas from being pushed down.


Here is another version with a slightly different color:


Where You Can Find Me

Products used:
StencilGirl Products Large Tribal Hand and Small Segments
Glass or acrylic (surface to work on)
Gilders Paste in assorted colors: Foundry Bronze, German Silver, African Bronze, and Copper.*
Sanding Block

Available Gilders Paste colors @ MercArt: Rich Gold, African Bronze, Copper, Iris Blue, Verdigris, Slate, Foundry Bronze, Sandalwood, Rust, Patina and German Silver