Showing posts with label home decor ideas. Show all posts

Friday, July 19, 2024

Stenciling on mini magnetic canvases - simple gift idea

Hi All,
Niamh here from down under! It's been incredibly cold down here for the last week or two, and our heater has broken, so working in my studio was not possible. However - to thank the people who came to fix the heater (who were fascinated by the different art in my studio where they had to fix the heater) I made this set of magnets for their office. 


The base was some canvas magnets I picked up cheap at my local K-Mart, but you could easily cover an old advertising magnet with canvas tape to get the same results. I painted my favourite colour combo for the background, mixing pinks, yellows and oranges to get a warm overall colour. 
To add texture to the background I used Random circles stencil  and Kelp Forest stencils in the same warm colours over the top. This added subtle patterning to the background and softened the harsher lines where the colours meet. 
Next I stencilled a strong contrasting colour to pop against the background, in this case turquoise. I used the circle line mask. This helped to make the background really quirky, so much so, I changed my orginal idea to add collage instead. 
To finish off the magnets I added these quirky collage images from Collage Soup and some snarky sayings from Natalie May. I'm a sucker for big eyes and crazy animals with hats!!! You could seal over the top with a gel medium or varnish, but I just left these as is and they have been pretty sturdy. And they were very well received by the recipients. Plus - more importantly, I got heat again!!!!

Hope you try making your own cute collaged magnets - so much fun, and such an easy way to display your art.
Happy Creating
Niamh
@niamhbaly (IG/Youtube)
@Niamhs Art Journal (Facebook)


Friday, January 19, 2024

Texture Media Mobile - by Claudia Neubacher


Servus, hi and welcome to today's share of weathered textural - easy to make - goodness! 
I was in need of some wall decoration for our guest room (which is our son's room in the first place when he stays with us in the house) and as we are living in a solid wood house surrounded by mountains, lakes, fields and forests, I wanted this home decor piece to reflect all of that. 


When I made the discs for my mobile my goal was not only to create my interpretations of all the amazing textural beauty I find on my forest walks around the house, but also try out various texture mediums and how they behave when being used with stencils. Some of these experiments turned out way better than I had expected, others showed the decreasing level of control the bulkier the texture medium got...and then there were some truly happy accidents as well of course...but let me start with the first steps.

What did I use to create my mobile?


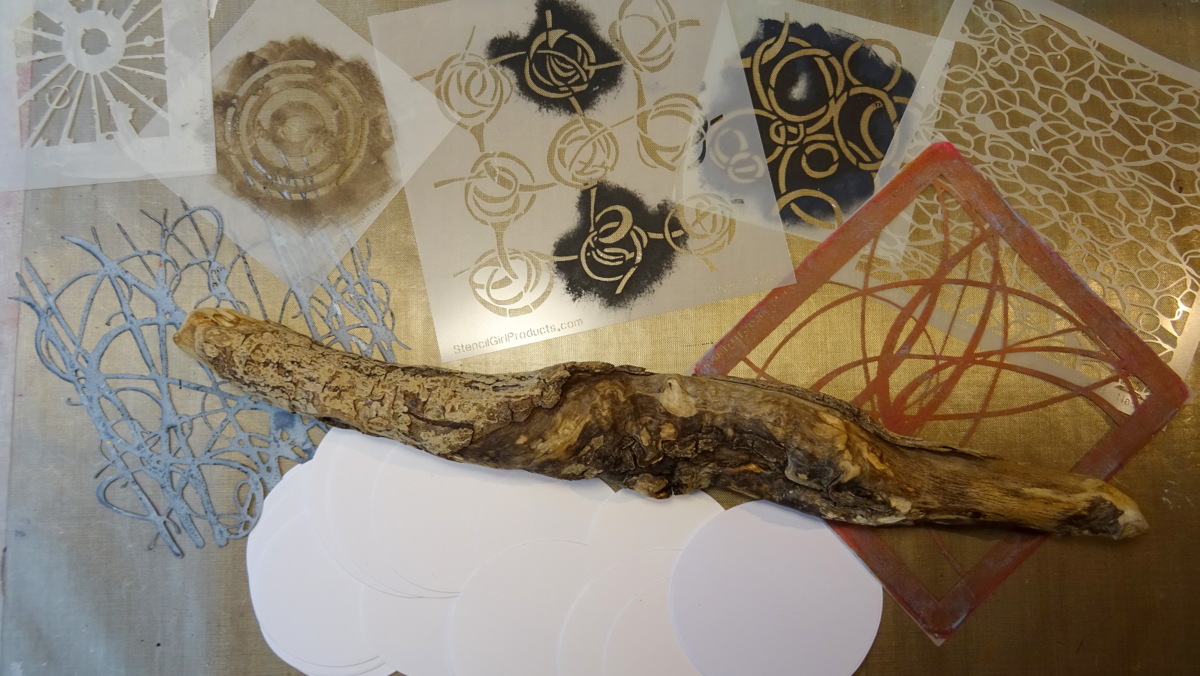
As you can see in the picture, I've used a piece of drift wood from the lake (about 40cm/16"), sixteen die cut card stock discs in two different sizes and a collection of StencilGirl stencils that provide patterns especially apt to create intriguing (abstract) detail when using only a small section of the design. 

In this case I've used Seth Apter's Urban Insiders Square Stencil (M058) and Techno Inisiders Circle Stencil (M086), Mary Beth Shaw's Curves (S430), Scribble Roses (S525) and the smallest stencil from the StencilClub October 2016 - Mary Beth's Private Collection - set, Mary Nasser's Abstract Water surface stencil (S898) and Trish McKinney's Dune Grass mask (S659) to play with. 

I die cut my sixteen circles using the two moon background cutting dies from the Tim Holtz "Moonlight" dies set. What I especially like about these is them not being perfect circles. Instead they are a bit wonky in shape and the set provides them in two different sizes - perfect for a make that was meant to have a nature feel to it. 


I primed the different pairs with different shades and mixes of beige DecoArt Chalky Gesso, brown Vintage Effect Wash and Dark Chocolate Americana acrylic paint. I also made sure there were a lot of brush strokes visible as that adds to the textural feel of the project. 


Once these had dried my texture medium experimenting session was ready to start! Using a palette knife and the Dune Grass mask I applied Goya "Antik Effekt" paste - a paste that is meant to produce cracks - the smaller the thinner the application. 


In my case I applied it too thinly, so hardly any cracks showed. To still add some texture, I fetched my heat tool and created some bubbles (which you can see in the picture below). Not too many and not too large ones though...just a hint around some of the edges (you can even spot some very tiny cracks close to my thumb, but I really love the bubbles and how they make the surface look rough and worn...so what usually is the result of an accident by overheating not yet dry pastes or paints can also be done on purpose to save texture paste results you are not content with ;)


My further experiments included various texture pastes like DecoArt media white Crackle paste together with the Abstract Water Surface stencil...


...that tore off some of the painted base layer when I removed it and revealed the rough paper surface of the die cut circle. A very happy accident from my point of view as the result reminds me of weathered bark and I think I wouldn't have got a result like this if I had tried to create this effect on purpose. 

The DecoArt media Texture Sand Paste was of course not easy to apply through the Scribbly Roses stencil. As it wasn't possible to apply it evenly with a palette knife, I rather dabbed it on here and there and tried to remove the stencil as carefully as possible. The highly textural result though was such a reward! I love it! 


Of course - REMINDER! - I immediately put all the used stencils into a pan filled with hand warm water, so none of the pastes would dry and permanently stick to the stencils (and thus ruin them). Keeping them in the pan underwater makes cleaning afterwards a piece of cake and you can go on working on your project without having to run to the sink to clean each stencil right after use each time. 

As most pastes do bubble when you use a heat tool to speed up the drying process, I decided to let my texture discs dry naturally overnight. This way I could be sure none of the pastes would react when being heavily loaded with paint washes (which was the plan for the next day). 

I used heavily diluted DecoArt media fluid acrylic Raw Umber and a wide soft brush to apply the wash quite loosely here and there to my circles, making sure the paint would create puddles here and there. I wanted an as uneven as possible result, so I got really messy and repeated the wash step several times (as sometimes you only see how much pigment has really ended up in a spot once it has dried...often the wet spot looks a lot darker and you find you have to go in again after it has dried). 


As heat drying would cause the water-pigment-mix to float and scatter, I let everything dry naturally again. This time it took about two to three hours maybe (yes, I had really soaked my circles to the point where the paper substrate needed to be handled with care to not tear it when moving it around).


But the results were so worth the wait! And I could use the heat tool for the very final drying phase to make sure all was really dry again. 


In the meantime I had die cut the other sixteen discs from various left over scraps from previous projects to use as "back" sides. 


And I also browsed my stash for three nature material "weights" to keep the mobile's strings straight. I found three little hagstones that were just the perfect fit (just look at the texture!!!). 


To fuse the circle pairs and the mobile parts, I used rough string and Tacky Glue (as that dries really fast). 


I made sure each texture circle sat at a different height compared to the neighbouring strings to add as much natural "randomness" to my make as possible. The three strings were then simply tied to the drift wood piece and that got a cord loop as a hanging device. Done! 


Our son's/guest room really needed some piece of atmospheric decoration and I was absolutely happy with how my nature inspired mobile turned out. And of course the texture-stencilling-experimenting session was great fun, too! 


I found that the loss of control that bulkier pastes bring, gets more than outweighed by the beautiful random results that give very natural looking effects. And by going by a monochrome colour scheme I really made the textures and patterns the stars on this project. Will definitely do this again. And I hope you will give it a try, too!


Hugs,
Claudia xxx


Tuesday, March 21, 2023

Parsley, Sage, Rosemary and Thyme


It's March in St. Louis and I, Nancy Curry, am all about the next seasons coming.  Apologies to those reading this who are approaching the colder times of year, or are still in the cold now.  The only season I really don't like is winter, but I really enjoy spring into early summer when things seem all new again.  I enjoy the spring holidays of Easter and Mother's Day especially, and always try to find interesting ways to share what I do with family members.  To that end, I plotted this project starting in January. Luckily, the big box stores seem to be ready to move on to spring quickly so I was able to find what I needed easily.  I'll list materials and stencils here before you watch the video. 

Materials: 

bamboo plant labels
acrylic paint (craft or fine art)
cosmetic sponge
palette/plate
brushes (thin and one for tint mixing) and a toothpick
gesso or white acrylic
scrap paper 
permanent marker (very thin) to sign if desired  
verbiage:  either alphabet stamps and permanent ink, stickers or printed herb names 
Krylon Kamar Varnish and Krylon Gloss Varnish or similar

Stencils: 

               Floral Frolics                         Woodland Blackbird                    Wild Daisies
 
This project could easily be done with many types of stencils and have any kind of vibe you'd like.  Let your imagination go wild and think outside of the box looking at all sizes of stencils. So many stencil parts will shine when used by themselves. You can prepare these sets in all quantities for gift giving so it makes them a convenient and interesting practical gift.  
 
Without further adieu, please enjoy my foray into functional art:  


As always, it's been my pleasure to create for all of you.  For more of my tutorials, follow me on Instagram or Facebook, and for artwork to purchase, my store.  

xoxo
Nancy


Friday, April 23, 2021

Refurbishing a New Dresser with StencilGirl® Stencils


I have seen many DIY projects with stencils on furniture, and very recently, I finally had an opportunity to use them. We were quickly renovating our condo to put on the market and the nursery dresser was showing some wear after removing the drawer safety locks. 
I wanted something neutral and geometric to go with the modern style of the dresser. One of my favorite StencilGirl® stencils, is Mary C. Nasser's Geometric Sky stencil. I love the triangles and decided this would be a perfect choice for the drawers. 
After removing the safety locks, we sanded down the drawer fronts to create a scuffed up surface to paint onto. This is an important step. I actually had to do it several times in order to get the paint to stick. 
I rolled two coats of white acrylic paint onto the drawer fronts and allowed to dry between each coat. 
I placed the stencil down and extended the edges so that as I rolled grey paint over the stencil, the edges of the stencil wouldn't show. I decided to apply the paint lightly so the pattern would appear more distressed.
I allowed the paint to dry and then added a lighter layer of white over the grey to tone down the contrast and pull everything together. 
I was so thrilled to bring new life into a perfectly good piece of furniture and help it look "new" again. 

Hello! My name is Megan Whisner Quinlan. I have been art journaling and book binding for about 20 years. However, I took a 10 year break from paper arts when I had my first 2 children. About 5 years ago, I came back into journaling after some big life changes, including 2 more children. Journaling had always been a part of my life, especially to work things out in life on paper. When I first started out, I really only focused on making books by hand and some basic collage and stamping. I was intimidated by the amazing art journaling artists out there who could create elaborate, mixed media spreads.  When I came back to journaling after such a long break, I decided that I was going to really push myself to learn all the techniques I had been too afraid to try.  Painting and drawing have really allowed me to find so much joy in my creative process, and I now almost exclusively create mixed media every day. I feel excited to have joined the art journaling community and you can find me on Instagram @Megan_Whisner_Quinlan or on Youtube: Megan Whisner Quinlan.

Monday, October 5, 2020

Online Estate Auctions, a $2 Brass Verdigris Frame, and StencilGirl Stencils


So, what’s a girl do when a pandemic hits 
and her upcycling sources dry up?  
Why she goes online like everyone else of course.....


Jill McDowell here with you today with a dose of upcycled inspiration.  This time of year, I’m usually busy fluttering between flea markets, tag sales, and architectural salvage yards searching for unloved pieces to upcycle.  But like many of us, I’ve had to rethink my game plan and look for a new venue to probe.  I’m happy to report that my search turned up a haven where there are still plenty of treasures to be had, safely. 

Have you ever placed a bid at an online estate auction?  If you’re looking to add a little excitement into your day, an online estate auction might just be the thing for you.  While some items can be pricey, if you’re patient and play your cards right you just might find yourself the owner of some pretty unique treasures to upcycle at really good prices. I’ve listed a few of my tips and strategies for getting in on the fun below.  Then I’ll show you how I transformed a $2 brass frame that I purchased at an online estate sale into a stylish verdigris tray to display my artwork.

Tips for getting in on the online auction fun

  • Search the web for Online Estate Auctions near you.  I happen to like the Auction Ninja web site.  It connects buyers like you and me with a bevy of estate sale professionals and auctioneers.  While the auctions on this website are primarily in the Northeast, I’ve seen some listings from as far away as Colorado and Texas.  (If you use another website be sure to review their FAQ’s.  Their rules may differ from those below.)
  • Once you find an item that you are interested in carefully review the Auction Details before bidding.  It contains all the legal terms and conditions of the sale and let’s you know where and when you’ll need to pick up your treasure.  In most cases, the actual pickup location will only be disclosed to the winning bidders once the auction closes.   You should also expect to see COVID related safety information here.


  • Caution - Do not bid on an item if you are unable to pick it up at the appointed place and time.  If you win and can’t pick it up, you will forfeit both the item and your payment. However, I’ve found that if you reach out to the seller prior to the auction, many are willing to make arrangements for shipping at an additional cost.
  • Note the buyer’s premium - This is an add on fee that the site charges for running the auction and will be added to your winning bid at check out.   In the auction above the buyer’s premium is 18%.  This means that if your bid is $10, you will pay $11.80 plus tax if you win. Take note that your credit card will be automatically charged as soon as all the items in the auction have closed. 
  • Do your homework beforehand.  One of the nice things about online auctions is that you have plenty of time to do your research before you bid.  The auction below doesn’t close for almost three days so I have time to look at past auction sales, Ebay, or othe websites to see what others have paid for a similar item. I recommend that you set a hard limit of how much you are willing to spend before you start bidding so you don’t get caught up in the excitement later and pay more than you wanted.  When setting your limit, don’t forget to take into consideration the additional buyer’s premium.

  • Bidding - If you find an item that catches your eye you can place a bid before the auction goes live. I call this the RONCO Set It and Forget It strategy. If the auction is run by an Auction Ninja vendor you will be asked for your opening bid and your max bid.  Don’t worry, your max bid will be masked so no one else can see it. This also means that you don’t know what other bidder’s max is.   Your max bid will only come into play if someone bids higher than your opening bid.  When that happens your bid will automatically be increased to just above the last bid.  The danger is that if another buyer is really interested in the same item, the bidding could proceed very quickly as your opponent will keep upping her bid by $1 in order to snoop out your max bid.  And when she finds it, she’ll outbid you and you’ll be toast.
  • That’s why, when I can, I prefer to hold my cards close and bid during the actual auction.  That puts me in a position to sniff out the other bidders max.  If I’m lucky, my nemesis won’t be participating in the live auction.  This gives me the chance to poke and find her max.  When I do, I can swoop in and grab the treasure for just $1 more.  Isn’t victory sweet?  
  • Everyone has their own strategy, but for now that’s mine and I’m sticking to it.  However if it’s an item that just takes my breath away...... then all bets are off, (or should I say all bids are on?)
  • Another advantage of bidding during the live auction is that’s where you will find the best deals, especially if your an upcycler.  Others are quick to bypass a piece that needs a little love and attention. We upcyclers however, can see the the potential in most everything and we have lots of love and attention to spare.  I’ve seen many beautiful pieces of furniture sold for under $10.
  • And my final tip for you is to watch a live auction for a while and get the feel for the speed of things and how they work before you start bidding.  I have a feeling that you will catch on quickly. Just not too quickly please... I’m still looking for deals. (LOL)

How to transform an old brass frame into a stylish verdigris tray with chalk paint

I won this lot of seven vintage frames complete with family photos in an online auction.  The total cost was $13.80 including the 18% buyers premium and the 6.35% Connecticut sales tax. At less than $2 a frame, the price is hard to beat.  But they could definitely use some freshening up.  


I could have chosen any of the three larger frames for this project.  However, the large brass frame in the front is the one that caught my eye.  Chalk paint is the perfect medium for a project like this as it sticks to metal without having to use a primer.  I thought that a verdigris finish would enhance the frame’s filigree design.  And I just happened to have the makings of an easy verdigris chalk paint finish pieced together from paint left over from other projects. 

I began by sliding the back panel and glass out of the frame and setting them aside.  Then I set about prepping my treasure for painting.  Gloves are a must for this task.


I’ll be using all four pieces of the frame for my tray.  This includes the metal frame, the velvet back plate, the glass, and the hardboard that sits in between.   The Downton Abby era family portrait however was set aside for another project.  (Oh how I miss that show!)


While there’s no need to worry about priming when you are using chalk paint, you need to be sure that the surface is super clean.  Any dirt, grime, fingerprints etc. left on the surface can keep the paint from sticking.  I cleaned the brass frame with a little White Lightning by Dixie Belle.  It comes in a powder that you mix with warm water and use to wash the surface.  Then you rinse it off with clean warm water, wipe it off with a lint free cloth, and let it dry.  

If you don’t happen to have any White Lightning on hand, a little Borax or TSP, (trisodium phosphate from the hardware store) will also do the trick.


I wiped down the velvet back plate and the hardboard with antibacterial wipes. Then I cut off the old hanging wire with wire cutters.


Now that the prepping is done, we can start developing a verdigris finish. 

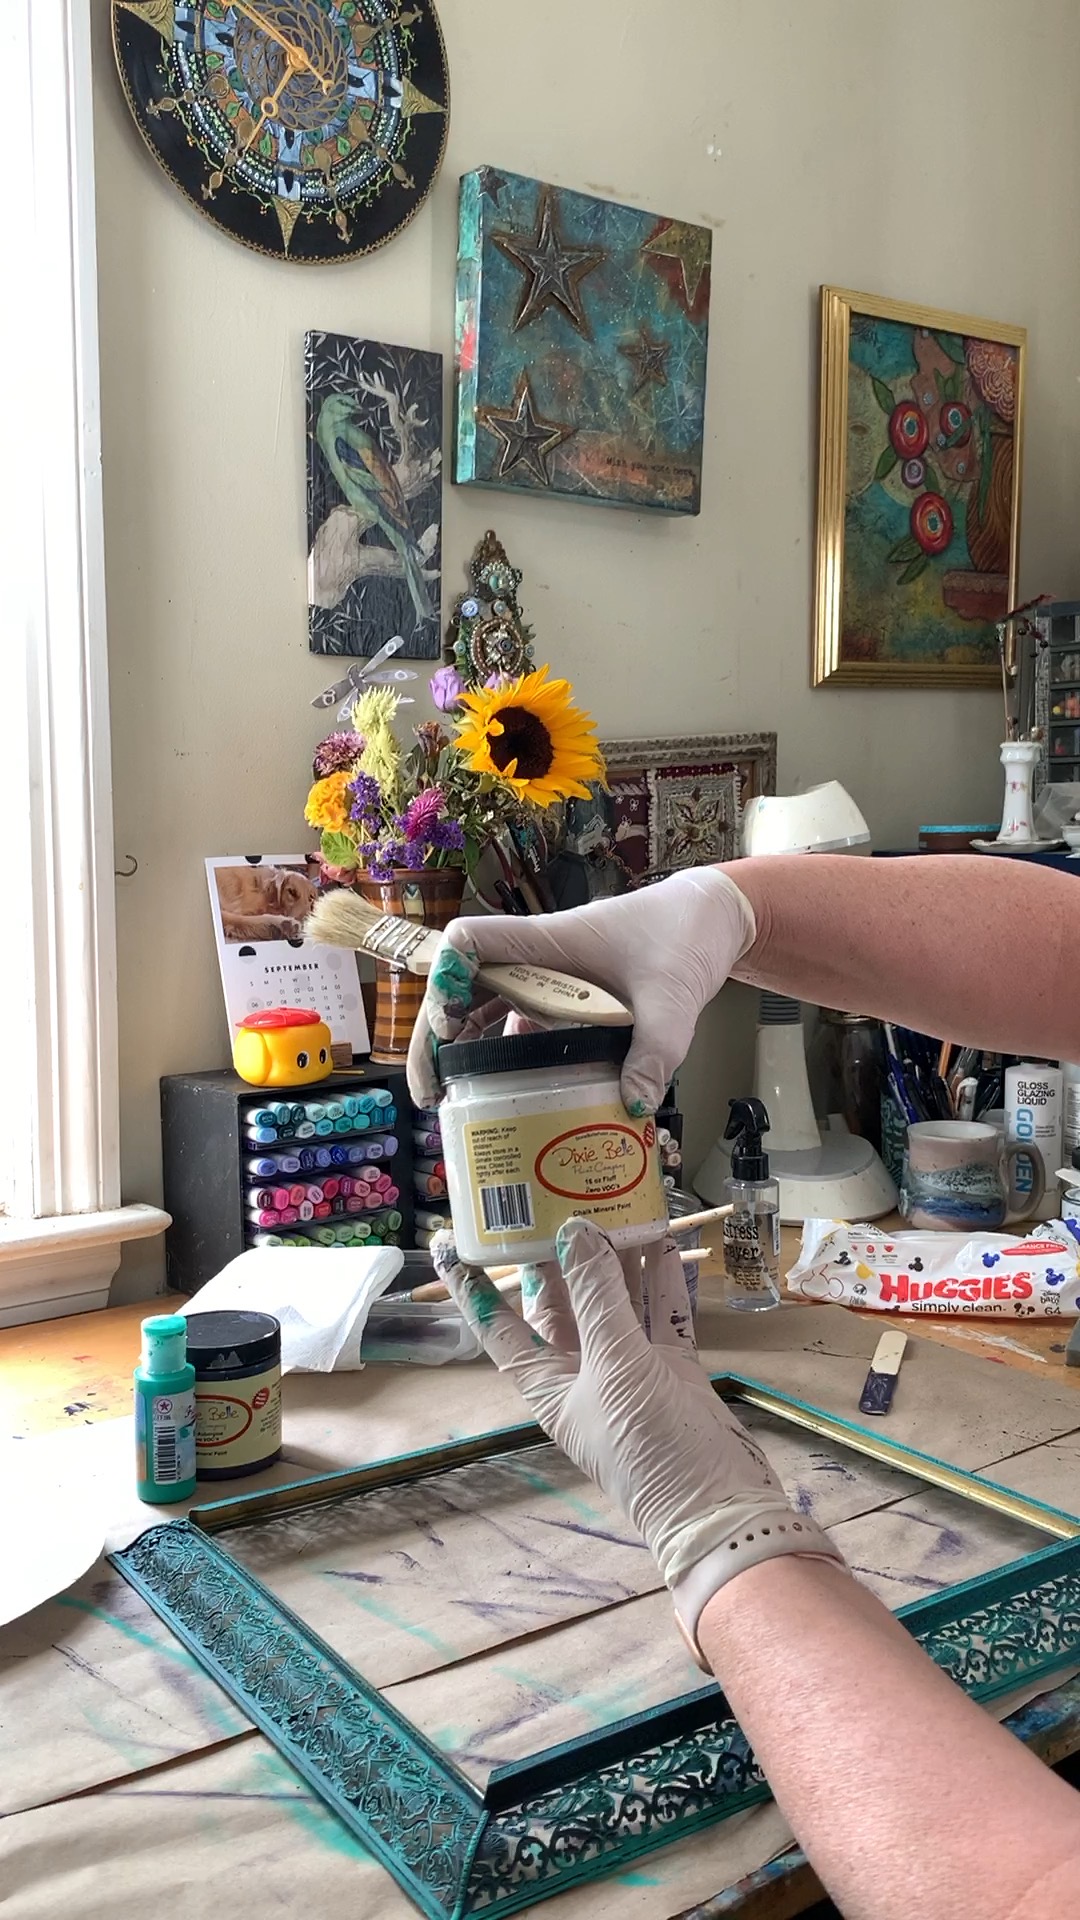
Step One: Dixie Belle Chalk Paint in Aubergine.  Aubergine is a deep shade of purple/black, (think eggplant).   I painted the front and the back of the frame and let it dry.  I’ve found that the secret to painting metal with chalk paint is to apply thin coats of paint. I used a cheap chip brush and dipped it into a cup of water before dipping it in the paint. 


Step Two - PaperArtsy’s Fresco Finish Chalk Acrylic Paint in Weathered Copper.   This is a semitransparent acrylic paint with a matte finish.  (Yes, you can mix chalk and acrylic paints.)  I dry brushed the paint on both the front and the back of the frame with a stiff bristle brush and let it dry.

Aren’t those filigree details gorgeous?


Step Three:  Dixie Belle Chalk Paint in Fluff.  I gave it a light dry brushing with this soft white paint applied with a stiff bristle brush to knock back the color.


Step Four: Black Walnut Ink applied with a soft cloth here, there, and around the edges to age the metal just a few more years.


Step Five:  Rust-Oleum Painter’s Touch 2X Satin Clear Ultra Cover.  I took the frame outside and sprayed it with two coats to protect the finish.

Isn’t it wonderful? 


Now that the frame is ready, it’s time to create something to display in it.  I rummaged through my stash and found this lovely piece of tea stenciled rice paper that I had created ages ago with Gwen LaFleur’s Decorative Flower Stamen Stencil.

I wanted to keep developing the paper with neutral colors so I pulled the Black Walnut Ink back out. 

And I used Nathalie Kalbach’s Amsterdam Stencil to add some pattern.  

A few splatters and ink spots just added to the charm.
If I had done some preplanning, I would have made sure that I had some spray adhesive on hand for this project.  But I didn’t, so I used some matte medium to adhere the rice paper to the frames’s hardboard insert. I have to admit that it was just a tad bit stressful gluing the rice paper onto the hardboard, but I took a deep breath, worked slowly, and it all worked out.  

I let the piece dry and then added some scribble marks with a red China marker pencil and random marks with a cap dipped in white India Ink.

I spent a few relaxing evenings coloring my focal motifs while watching Netflix.  There’s so much room for creativity with Gwen Lafleur’s Chinese Lotus Garden Stencil, Pitt Pens  and Posca Paint Markers. This is how they started on watercolor paper.  

I began by laying down a base color on the petals with a Pitt Pen.  Then I built up the layers to create depth, and finally, I used a Posca Marker to add details and lines. 

I like the effect of mixing cool and warm shades of the same color.  For example, the flower petals below on the left motif have a cool blue Pitt Pen base that is topped with line work made with a warmer blue Posca Marker.  While the flower petals on the right motif have a warm blue Pitt Pen base topped with lines made with a cooler blue Posca Marker.


Initially I started painting leaves in a style similar to the flowers, but I soon discovered that their busy design detracted from the flower motifs.  So I stenciled some more leaves and painted them in a much simpler fashion and in colors that should enhance the busy flowers. 

Then I cut the leaves out and glued them together in clumps of three. (In this pic you can see my original  “busy” leaves at the top.  While I won’t be using them for this project, I’m sure they‘ll soon find a home in another project.)

My glue of choice for thicker paper like watercolor paper is a mixture of Yes! Paste and Golden Satin Glazing Liquid.
I assembled my design in the frame under the glass; transforming this old, dull brass frame into a stylish Verdigris Tray.

In the pic below picture you can see my living room rug, which was the inspiration for my color palette.   


I’m willing to bet that you have more than a few Gelli Prints and painted papers that would look great in a tray like this. Picture one filled with your own artwork, (or your kids/grandkids 3rd grade masterpiece).  You could display it:

  • On your coffee table with a candle on top, 
  • On a dresser with a sweet little potted plant,
  • On a table with a bowl of candy to hand out to trick or treaters (maybe next year), or
  • On your kitchen table with a bowl of acorns, gourds, and mini pumpkins.

Change the look just by switching out the artwork. Restyle with the seasons or with your mood.  I’ve used the same frame below to display a stenciled paper weaving made from strips cut from Gelli Prints.  (I spy Mary Beth Shaw’s Curvy Lattice Stencil 6 and my own Four Buds Trivet Stencil in the mix.)

Hmmmm, I think I’ll use my tray to collect elements to use in my next project.

 In closing, stay well, find yourself a great online estate auction, bid, and then upcycle.  I’d love to hear all about your adventures.  Virtual hugs until next time.  Jill