Hello Beautiful!
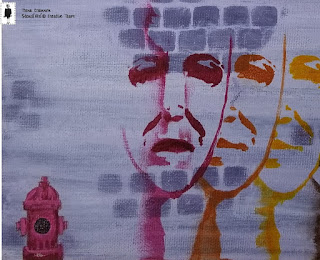
My artful piece was inspired by the creativity of street art.
adjective:
1. (of a person or action) clever or skillful, typically in a crafty or cunning way.
"her artful wiles"
synonyms: sly, crafty, cunning, wily, scheming, devious, Machiavellian, sneaky, tricky, conniving, designing, calculating;
antonyms: ingenuous
2. showing creative skill or taste.
"an artful photograph of a striking woman"
synonyms: skillful, clever, adept, adroit, skilled, expert "artful precision"
The description made me think of how people who paint on buildings and huge spaces have to think in a truly creative way – a way that is beyond a controlled environment. Below are the steps for my faux street art – a little piece of a building that will hang in my creative space.
Step 1:
I painted a thin coat of a medium shade gray onto a canvas panel with a sponge, being sure to paint the final strokes horizontally.
Step 2:
After it totally dried, I painted a thin coat of a lighter shade gray with a sponge, being sure to paint the final strokes horizontally. While the paint was still wet, I lightly wiped with a baby wipe through the Intersecting Brick Circles Stencil (S137) stencil in random areas to create the illusion of a brick wall.
Step 3:
After that layer completely dried, I used a sponge to paint the first face through the Shadow Face (S559) stencil.
Step 4:
I created a mask out of a piece of scrap paper. To make the mask, I sponged color through the face stencil onto the scrap paper and cut it out creating a side of the face shape. After the first painted face dried, I laid the mask over it and placed the stencil next to it, lining it up to overlap with the first. I then sponged in color, adding a face outline with a thin paintbrush.
I repeated Step 4 until all the faces were finished.
Step 5:
Using the Brush Alphabet stencil (L645) and a paint pen, I created the word “COMPASSION.” I practiced on a scrap piece of paper before adding the letters to my canvas. First – making sure I spelled the word correctly. 😊 Then deciding how I wanted to outline.
Step 6:
To add some interest and perspective to the “building,” I added a fire hydrant. I drew it with a pencil first, used a red marker for the outline and then erased the pencil.
Step 7:
At this point, I decided to have the first face be a full face. I flipped the stencil over and positioned it as mirror-image and sponged in the matching paint color. Using a small round brush, I drew in a hint of the left side of the face. I also painted the fire hydrant.
Step 8:
I absolutely love the November StencilClub Her Story set SC-11-2018 and wanted to incorporate the cool word design from Pam Carriker. I spayed a light white mist through the 6x6 stencil in two different areas.
Step 9:
To really make the letters pop, I added a vivid pink over the paint marker, being careful to not paint over the black lines.
Notes/Tips:
- I used dry sponges to apply paint - with a small amount of paint dabbing most of it off.
- Since I’m right-handed, I turned the canvas upside down to sponge the faces.
- I cleaned my stencil in between paint, first wiping off with a paper towel, then spritzing with alcohol to get all the paint off. I wanted the colors to remain pure as I applied them.
- Before outlining, I allowed the paint/ink to dry, wiping off pen tips before putting away.
- Be sure to move your artwork far away from where you are cleaning, otherwise, you will get some splatters and sprays – that may or may not end up enhancing your piece. Hehehe
- I shared my second attempt at creating this piece. The first time I tried to make this piece, the implementation did not align with my vision. Sometimes that’s ok, the implementation turns out better than my vision! In this case, it did not. 😊 I decided to start over. I repainted the canvas gray. I learned a lot from the first try – what not to do.
Supplies I used:
- Substrate: canvas board
- Paints/Inks: Liquitex gesso and acrylic paint, Jane Davenport acrylic paints, Golden fluid acrylic paint, Pebeo high viscosity acrylic, Mister Huey’s color mists
- Other: sponge, Tulip handle sponge, #4 round paintbrush, Sharpie markers, Derwent Graphik line painter
- Stencils: S137, S559, L645, November StencilClub 6x6 stencil
I hope this post inspires you to create something artful that makes your heart smile!
Thank you so much for reading.
Take care and STAY POSITIVE!
Trena
Take care and STAY POSITIVE!
Trena


No comments:
Post a Comment
If you are entering a GIVEAWAY, please add your email address in the event we need to contact you.
To avoid SPAM, please write it like this:
marybeth (at) stencilgirltalk (dot com)
Thank You!