Showing posts with label Polymer Clay. Show all posts

Tuesday, February 6, 2024

How to Create Pendants and Earrings Using Polymer Clay and StencilGirl Stencils

Hello everyone!  Jane Bellante here, and I'm back today to show you how to use your StencilGirl stencils and masks to create jewelry with polymer clay.

I love experimenting with polymer clay, and I just knew that I could create some fun pendants and beads with the Garden Flowers Tile Mask by Valerie Sjodin.


I started by rolling some white Sculpey Clay in my pasta machine on a #7.  This is about 1/8th of an inch thick which is great for pendants and earrings.  


Next, I grabbed my Archival Distress Inks and some make up sponges.  I cut my clay in half so that I had a small area to work with after I placed the Garden Flowers Tile mask on.  I pressed the mask gently into the clay and started applying the inks.  This part is so much fun- you can use any color combinations that you like!


I have a bunch of polymer clay cutters (you can use small cookie cutters if you have those) so I cut out several shapes from the clay with them.  You can use the leftover clay with the ink on it again by rolling it all together and kneading it.  When you roll it out again it will show some of the leftover ink, but you will never see it if you just ink on top of it again.


Then, I poked some holes in near the top of each shape so I can get a jump ring in them after they are baked.


You can bake these in your oven at 275 degrees for 15 minutes per 1/4".  These are about 1/8th of an inch, so they baked for about 8 minutes.

After you let the cut out shapes cool, you can then embellish them more.  Glaze them, paint them, use more ink, etc.  You can really create any look you love with your StencilGirl stencils and masks, Archival Distress Inks and polymer clay. 


You can watch the full tutorial right here:


I hope you enjoyed my tutorial!  You can find me at Jane Bellante Art on all social media platforms.  And- if you create something with your StencilGirl stencils and masks, please drop me a line and show me your results.

Until next time, 

Jane


Thursday, May 5, 2022

Cinco de Mayo with StencilGirl® Stencils

Hi, everyone! Laurie Mika here! Today is Cinco de Mayo, the fifth of May, which is a celebration of the Mexican Army’s victory over the French at the Battle of Puebla on this date in 1862. While the holiday is a relatively minor one in Mexico, here in the United States, this holiday has evolved into a beloved commemoration of Mexican heritage.  Being a lover of Mexican culture and traditions, I thought today’s blogpost would help celebrate Cinco de Mayo by focusing on handmade polymer “Milagros”. 

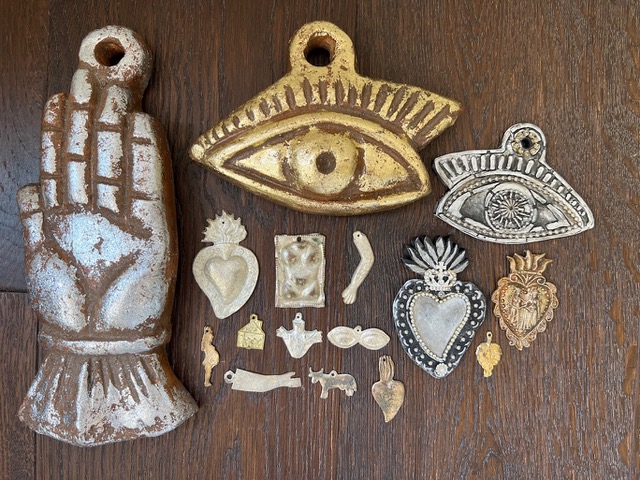
Milagros, which literally translates to miracles, are tiny, tin folk art charms that are used for healing purposes to give thanks for answered prayers. People pin individual milagros to the fabric of a saint or they can also be nailed onto churches. Sometimes these little charms are carried with people to remind them of their prayer for healing or gratitude.  They come in a variety of shapes and sizes and often depict body parts which are often in need of healing.

My Milagros were created using polymer clay and my Milagros and Sacred Hearts stencil sets.  

I am showing two different ways to use your stencils with polymer clay.

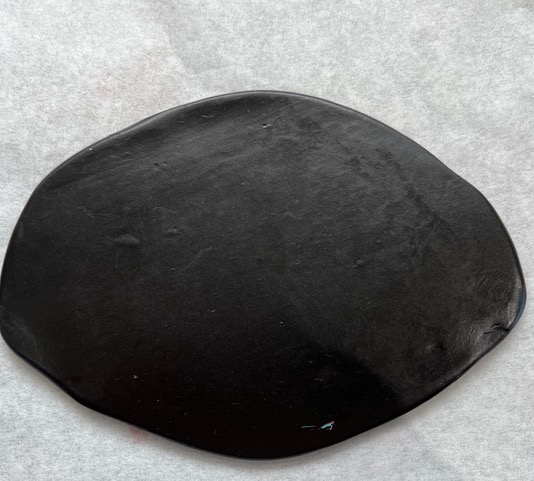
To begin with you will need to condition a 2 ounce package of polymer clay by kneading the clay until it is soft. Next you will roll out a slab of clay (using a rolling pin) to about 1/4 inch thick. I roll out my clay on wax paper so it doesn’t stick to my work surface.

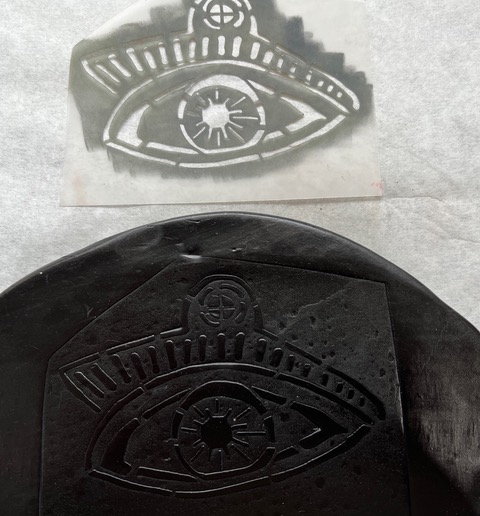
For an embossed stencil look, lay your stencil on your slab and push down lightly to set.

Then use your rolling pin to roll over the stencil applying firm pressure to “emboss” the design onto your clay surface.

Use a clay scalpel or an exacto knife to cut out the design from the clay slab.

If you would like your Milagros to hang on the wall, you will want to use a skewer or straw to push through the clay to create a hole. Next with a very light touch, use silver Rub n’ Buff to touch the surface of the embossed design and bring out the pattern.

For the second technique, I used a stencil from my sacred hearts collection and followed the same steps as above. However, instead of using the rolling pin to emboss the design on the clay, I simply set the stencil on the clay and then used a paintbrush to add the silver Rub ’n Buff over the top of the stencil. Be mindful that the Rub ’n Buff stays sticky until it is baked. Be careful not to touch those areas or it may smear. I then followed the design to cut out the heart with a scalpel. 

Next, I added a few details of a mixture of black and raw umber paint to give the Milagro a bit more depth and to make it look more aged.

If you would like traditional looking milagros, then you are done!! The pieces just need to be baked. However, the embedding step is my adaptation of creating milagros by adding some bling to give them a beautiful jewel-like look!

Carefully lay out your desired bling/“do-dads”. Cut rhinestone or ball chain to size.

Remove the do-dads. To adhere the rhinestone or ball chain, paint a channel of glue using a small paintbrush and Weldbond glue. To embed other items into clay, I have found that using a pencil eraser is helpful to get them sunk or securely embedded into the clay.

If some of your Rub n’ Buff has smeared, I recommend using a fine detail brush and some black paint to help restore the details.

The very last step is baking. I recommend using a small dedicated polymer clay craft oven. I generally bake in a 275 degree oven for about 25 minutes. 

Let cool and then enjoy these beautiful “miracles” that you have created! 

Tuesday, May 5, 2020

Milagros, Hearts, and Alchemy

Not quite the Cinco de Mayo you may have planned? Yup. We feel that too. However, StencilGirl is super excited about these new hand-drawn stencil designs by Laurie Mika.


Laurie Mika has a thing for hearts and she has a bathroom filled with her collection of hearts from around the world. 


It is these tin hearts that became the source of inspiration for this collection of heart stencils. Laurie's favorite hearts are Mexican folk art sacred hearts and a lot of her polymer clay shrines incorporate this type of imagery so she wanted to design stencils that could be used with polymer clay as well as with paper arts and collage.


Cut the Four Sacred Hearts Stencil into 4 parts, and the ATC stencil into 9 hearts for ease of use. Perfectly sized for ATCs but you can use them anywhere in your art.


Over the past few years, the influence of Medieval art has also informed much of Laurie's polymer clay work but more recently she has been drawn to the imagery of alchemy, the medieval forerunner of chemistry. From anatomical hearts to the Hand of Mysteries, she adores the mystery and magic associated with Alchemy and this was the source of inspiration for these stencils that are a wonderful addition to making Medieval looking shrines.


The Alchemy Stencil depicts hearts, eye(s), a skull with a crown, a sun, and the Hand of Mysteries.


Mexico is the source of inspiration for Laurie's collection of Milagros (miracles), the tiny tin charms that are used for healing purposes and votive offerings. Milagros are often in the shape of body parts because they were used to give thanks for the healing of a particular ailment.


Cut the Milagro Stencil into 6 designs for ease of use: an ear, an eye, a pair of eyes, a hand, an arm, and breasts with the word brave underneath.


Laurie actually took some of her favorite milagros, made a mold from them, and used them with polymer clay that she then embedded. She used these polymer clay milagros to create the actual designs for my stencils.

If you want to create with these stencil designs you can get them HERE.


Tuesday, November 6, 2018

Make Polymer Clay stenciled Gratitude Bowls with Silvia Souza


Greetings.

I have my own gratitude ritual at the beginning and end of each day, but I had a hard time conceiving of a project to express gratitude. Then I remembered art lessons I had once taught and there seemed no better representation of gratitude than a bowl, or three bowls. Bowls for keeping, giving and receiving.

There are Empty Bowl projects around the country to feed those needing food, but most of them are for food safe and ceramic bowls. I no longer have access to a kiln but I do have a toaster oven! The bowls I created are polymer clay.  


While this project required a bit of polymer know-how and some reverse engineering, I did want to show how to use pan pastels with stencils on polymer. The layering that you can create can add depth and interest in polymer projects, whether jewelry, wall art or bowls. You can also use eyeshadows or grated chalk pastels if you do not have pan pastels.

I’ve created a video that takes you through the main steps of the process. I hope you enjoy and that you also get to participate in an Empty Bowl event near you someday.


With gratitude for the food in my belly and the time and ability to create,
Silvia

Stencils used:
Mid Century Modern Rocks & Leaves by Jennifer Evans S586, Fade Horizontal by Michelle Ward L027, Floating Cubes Trio by Andrew Borloz L463, and Mary Beth Shaw's October 2016 StencilClub.


Tuesday, June 12, 2018

Favorite Art Book & Giveaway - Victorian Paper Dollhouse a la Laurie Mika by Silvia Souza


I love working in polymer clay.  I have used the clay to create jewelry, miniatures and wall pieces. I enjoy learning different techniques and experimenting with surface treatments, including using stencils.  It is a very flexible (no pun intended) medium, both in how it can be used and how artists use it to interpret their ideas. One book that I find compelling is Laurie Mika’s Mixed Media Mosaics because she has an unorthodox approach to the clay. She developed her own style, making the clay accommodate to her needs.  Besides that, her work is beautiful and inspiring! The book is delicious eye candy. While it does have projects one can follow, with great instructions, for me this book is more of a go to when I need a jolt of creativity juice. I return to it often and always find something to propel me back into the studio.


All that being said about polymer, the piece I was inspired to make has no polymer clay!  I used paper clay instead, which I discovered a year ago and also love using since you can make very light but big pieces to wear.  I have always been enchanted by dollhouses and I especially love the graphics of Victorian paper dollhouses. I happened upon a set of three papier mache houses at Michael’s and thought I would try to bring a little Laurie Mika to a paper dollhouse.  I hope you enjoy the video I made of the process.


And to top it all off, on my birthday this month I finally got to meet Laurie at one of her workshops which  my best friend and I participated in at the lovely Queen’s Ink in Savage, MD. I learned so much that I am hoping to incorporate into my own work.  Steph and I are already planning a time to have an art day to make more pieces. Here are photos of our creations. We are already both plotting to go to Laurie’s workshop in Mexico as soon as we can! What more could a girl ask for for her birthday!

Steph's triptych
My triptych

Stencils used:
Laurie Mika's Pilgrimage to India Stencil *You have the chance to win this & more!
Gwen LaFleur's Ornamental Compass, Petals, and Circles Stencils
Andrew Borloz' Grindstones, 4 Tribal Patterns, and Wheel Spokes Stencils
Carolyn Dube's Connected Eyes Layer Me Stencil
Mary Beth Shaw's ATC Mixup 1 & 2 as well as the large stencil from October 2016 StencilClub


One lucky winner will receive Laurie Mika's stencils plus a set of her Female Collage Image Sheets!

Enter by commenting below by June 17th, 2018. One winner will be chosen at random on June 18th. Winner notified by email.