Showing posts with label assemblage. Show all posts

Tuesday, September 3, 2019

Dress It or Wear It Challenge with Shel and Peg


A big hello from Peg and Shel. Today we are excited to share how we each met the Dress It or Wear It Challenge from StencilGirl®️. There are so many ways this challenge could be interpreted and it is always fun to see what everyone does. 


Peg found a cute wire dress form at the secondhand shop. When she started thinking of ways to recycle it, she wanted it to serve a purpose in her studio. Now this wouldn’t have to be a dress form but the form did fit the challenge. Using some clothes pins from the dollar store, and some spray paints to transform them, the pins became the foundation for the skirt. 


Shel took a different approach to the collaborative challenge to ‘dress up’ decorative dress-forms.
She did not have a wire form like Peg’s so instead she made her own from materials you would
normally toss in the trash. A soap bottle, a paper tube and a tissue box.  She glued these together
and then added some paper clay to the front of the bottle to make it more lady like. Then covered the
whole construction in paper mache with tissue. The top layer of tissue is from a dress pattern which
seemed appropriate. 

Shel’s next step in making this dress form project fabulous was to create some custom fabrics with
stencils and fabric paints. Shel used the agreed upon stencils and some pre-washed cotton muslin
fabric. She plans to make this dress form decoration a fun seasonal project for each holiday, so she
chose colors of Decoart So Soft Fabric paints that reminded her of Halloween and then went crazy
with pattern and color!

This crazy fun stenciled fabric was then cut into pattern pieces and sewn together to ‘dress up’ the dress-form with a cute little witchy dress. Shel also created a pointy hat accessory with some
stenciled black cardstock paper to finish up the look. So cute!

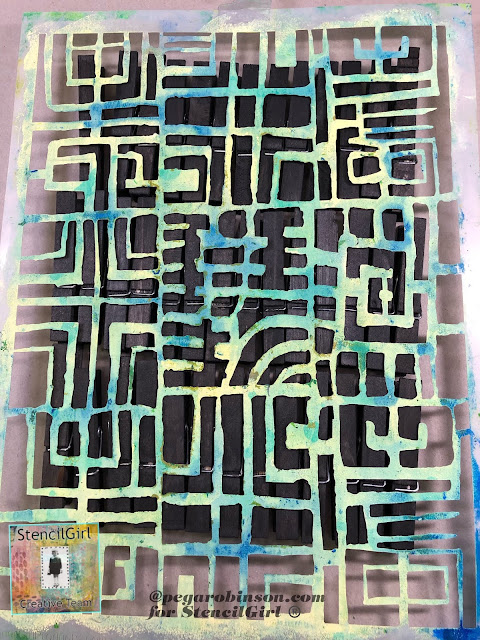
To finish off the dress-form Peg used Liquitex spray paints applied to all the surfaces of the pins through stencils. This month, Shel and Peg had chosen to use Klimt Forest Stencil by Cathy Taylor (L358), ATC Mixup 1 Stencil by Mary Beth Shaw (L543), and Ancient Marks Stencil by Suzi Dennis (L435).


Earlier, Peg had prepared some fabric for this project while collaborating with Shel on a live printing session aired on their Art Joy of Sharing YouTube channel. Some of the fabric was torn and woven into the wire on the dress form. More stenciled fabric was glued to the bodice before applying sari ribbon and trim.


So now when Peg needs to clip up a wet piece of paper or fabric, she will know right where to find her pins.


Wouldn’t it be fun to make a batch of these decorative clothes pins for your friends? I think she may have plans to make some more. Thanks for stopping by and giving us love. Peg and Shel


Monday, December 18, 2017

Gwen's Gems - Get Translucent with your Mixed Media!

Hi all, it's Gwen back with the December edition of Gwen's Gems! This month I was intrigued by the idea of doing something that was transparent / translucent in some way as opposed to working in a journal or on a canvas or panel. I decided to do some experimenting, and ended up creating an abstract mixed media assemblage with a translucent background based in an embroidery hoop!


It's a bit funky, but I really like how it came out. Are you ready to see how I made it?

To start, I took my Art Deco Medallion stencil and just traced the outside border of the circle onto a piece of chipboard, then I cut out the ring.


I had a bunch of these mirrored triangles that I'd picked up at a creative reuse center, and I liked the idea of creating something reminiscent of a sun, so I adhered those around the chipboard ring.

From here I mixed up some Aves Apoxie Sculpt (2-part epoxy clay,) and rolled out a line of it which I then layered over the ring. This locked all of my triangles in place, and also gave me somewhere to insert a whole bunch of rectangular copper sequins which I added in random directions until it was full. I also took the slip from working with the clay and spread that over all of the triangles to prime them for the paint I'd be adding later.


I set the outside ring aside to give the clay time to cure, then started working on the inside elements. To start, I took a sheet of rice paper that I'd plasticized with polymer medium and used a gold texture paste with my Art Deco Medallion stencil to start making the background that would go in the ring.

While that dried, I gathered several different elements from my stash along with a sun shape cut from cardstock using Seth Apter's Sunburst Die Set and used waxes and a gray glaze to create consistency between them before assembling them as part of the focal point.


Above you can see a close-up as I measured things out... I layered my glazed components along with a piece of a broken necklace and a cool glass dome that fit perfectly over everything. 

When the clay was cured, I pulled my ring back out and painted it - I didn't worry about changing the color of the embedded sequins, just making sure that nothing from the base layer was showing. Then I added some embossing powder to enhance the rusted / patina look I wanted. (Just a note, the sequins are a thin plastic and will curl and melt a bit when you use this kind of heat gun. I actually wanted that effect - I thought it added to the character of the piece!)


With that done, I cut out my stenciled translucent background and adhered it to the back of my frame.


Then I adhered the focal point to the center of that and added some Turkish Nazar beads to each of the triangles (those covered up some small holes that still showed through the paint.)

Next up, I wanted to create more translucent elements that I could use to anchor the center section inside of my embroidery hoop frame (I sanded the front edge of the frame to a curve to get rid of that hard line, then painted it bronze.) 

To do this part, I used the Asian Character Impressions 3 Mini stencil by Carol Weibe and a few of the designs from the Circle 6 stencil by Michelle Ward with more gold texture paste on my plasticized rice paper. When they were dry, I cut them out and then arranged them until I liked how it looked, then adhered them in place.


Of course, the polymer coating made that paper much tougher than it was, but it wouldn't hold the weight of the center section, so I took out some 24 gauge annealed wire, poked a few holes through the translucent background, and wrapped some wire around my sun frame, then wrapped the other end around the embroidery frame. I did this in five places and it was a little tricky, but I got the whole thing anchored in place and it held perfectly! (Whew!) I used a few drops of polymer medium to seal the holes around the wires, then I was good to go.


Of course, you could leave it like this and it would be pretty cool! I almost stopped here, but more is more, right?

Next I took some sari yarn and wrapped it around the frame, skipping places where the translucent background was connected.


I also took some gold thread and wrapped it around, leaving long tales hanging off the bottom where I added some Turkmen jewelry pieces to dangle below the main piece. (Normally, I'd add something like that last, but I needed to have anything that would wrap around the frame done before getting to the next step.)


After that, I wanted to add one large background, so I cut some more rice paper off of a roll and stenciled it with teal paint and Nathalie Kalbach's Manhattan stencil. Next I coated this paper with polymer medium as well and let it dry overnight.

Once dry, I cut out the circle and adhered it to the back of my frame - I love the contrast from the color and pattern!


Before adhering completely, I took some more sari ribbon and tied it around at the top to make a hanger of sorts, then sealed that off as well.

With that, I was done!


Here are a few close-ups so that you can see more of the detail:


You can really see how the light comes through the translucent backgrounds - I love the effect!


I hung the finished piece on the door of my studio - the dangling jewelry bits act a bit like chimes when they move, which I love!

That's it for this month... I hope you enjoyed today's project and that you're feeling inspired to add some translucent elements into your own work!

Until next time, happy stenciling!

Monday, January 16, 2017

Gwen's Gems - Stenciled Statement Necklaces

Hi everyone! It's Gwen, back again this month with a new edition of Gwen's Gems! 

I had a pretty crazy December - lots of stuff going on with work and family (more than the typical holiday season,) and I didn't quite get around to sending Christmas gifts to all my friends. So this month I'm making Chinese New Year gifts! (Sounds much better than Belated Christmas Presents, don't you think?) I knew I wanted to make necklaces, and what better foundation for creating unique jewelry designs than using stencils!


I made nine stenciled statement necklaces. I don't actually need that many, but once I started I just couldn't seem to stop!

Here's a quick little overview of how these came together...

First, I got out some very old oval punches and punched out a shape that was pretty close to the size of my pendant tray / bezel. I trimmed each one just a bit so it would fit (I was already planning to cover the edges, so making it an exact fit wasn't too important.) Then I painted each one (can you tell my palette was influenced by the cold and snowy weather here in Utah?)


When the base layer was dry, I used my stencils and some gold and silver acrylic paint to add the background design. One of the things I like to do to help make stencil designs my own is to just use bits and pieces of the design. I auditioned several stencils on top of my painted ovals until I found compositions I liked, then stenciled away!

Here are the stencils I used for the necklaces... can you tell which designs go with which necklace? (Here's a little hint... I'll list them in order of the photo below, going from left to right and top to bottom.)

Decorative Folk Flower Stencil (the next one used this same design)


Once the backgrounds were stenciled, I went through my drawers full of small pieces of broken jewelry and found little bits and bobs that I thought would work and auditioned them on top of the different designs.

Once I'd decided what I wanted to do, I went ahead and glued the background into the bezel. I was going to fill these with a clear resin, and the glue helps keep the paper from curling until the resin cures. I used Weldbond glue since I knew it would stick to metal.


With that done, I went through with gold and silver metallic paint markers and closed the gaps from the stencil bridges  - I just think that gives it a more finished look.

Next, it was time to start gluing on the embellishments! I added the broken jewelry bits and then used beads and rhinestones, etc... to put borders around and cover up any gaps from the background.


Again, I used glue to put them down so that they would stay put until the resin cured. Speaking of... next I added the resin! I used a clear, jewelry grade resin (Ice Resin is a great one) and filled up the bezels. I added some micro beads and glitter here and there. Obviously that would be totally optional (even the resin could be skipped if you want!) but I love a little glitter!


I let that dry overnight... some of them had to be touched up, then it was time to add more embellishments to the bezels! Again, this step is totally optional, but you know me... layers and tiny details are a requirement!


I had lots of different metal findings and charms, did lots of auditioning to see which ones worked best and with which designs, and then started gluing everything together - I used E-6000 for this part.

While the glue was drying, I put together the chains... some were chains I'd made a few years ago that I was able to re-purpose, a few were just plain metal chains, one was a store-bought necklace that I'd taken apart and I used part of that, and a few of them I made to match the pendants. (I knew keeping all of my jewelry making supplies was a good idea!)

Here are the five gold necklaces:


Then the four silver necklaces:

Of course, I couldn't leave you without showing individual shots... you can see how the stenciling in the background isn't something you pay a lot of attention to, but it's definitely what ties everything together! Think how different they'd be with just plain colors in the background... blah!


That's it for this month... I hope you enjoyed it! 

Have you ever made jewelry using your stencils? We'd love to see! (Especially if you make some using this tutorial!)

Until next time, happy stenciling!

Monday, May 23, 2016

Gwen's Gems - Make a Mini Shrine with Stencils

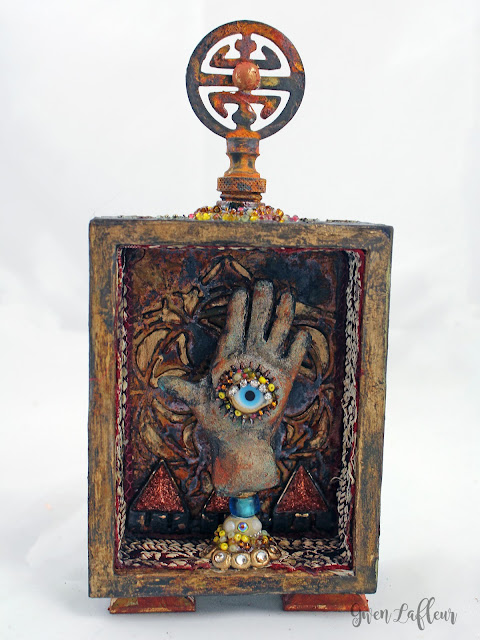
Hi everyone, it's Gwen back again with the May installment of Gwen's Gems! This month I was inspired to finish a project that I'd started a few months ago that's been sitting in my "to-do" pile ever since. When I first got my batch of StencilGuts, I knew that I wanted to use one of the hands to make a sculpture and put it in a kind of shrine (for lack of a better term.) I'm so glad that I went back to this project, because it turned out even better than I'd pictured! (Granted, I hadn't pictured much... LOL.)


Since this was a pretty involved project, I don't have a detailed tutorial this month, but I have an overview of the steps I took to make this - hopefully it will help you if you're interested in doing something similar!

To start, I took my hand StencilGuts and made one of them into a sculpture. (These are sold out right now - make sure you get the newsletter to know when they're back! However you can always get the original Hands stencil by Jessica Sporn and trace your own hand.) I used cardboard to build up an armature on top of the hand cut-out, then I coated it with Aves Apoxie Clay and shaped it until it looked right. I added a very thick wire in the base that I kept there to mount it later. I followed that up with a coat of paint, then an initial layer of dry brushing. 


Next up, I finished the dry brushing - there are at least 15-20 layers of paint on here... I just keep adding until I get it looking the way I want it. In this case I wasn't going for realistic (because creepy, right?) but I wanted it to look like stone. I added a gear and a glass Turkish nazar, then put more clay on to turn the nazar into an eye by adding eyelids.


While the lay was curing, I took a light wooden box (probably balsa wood, it's so light) that I'd picked up at a thrift store for like $0.50. I gesso'd it, then used Laurie Mika's Pilgrimage to Mexico stencil along with molding paste to add a raised design along the outside of the box. You can see that I put it on pretty thick since I really wanted the texture to show through.


I did two sides, dried it, then did the other two sides. In between, I worked on what was going to become the background on the inside of the box. I cut a thick piece of cardstock to the dimensions of the inside opening and used my Decorative 6-Petal Flower Stencil to put on a very thick coat of molding paste.


Here you can get an idea of exactly how thick I made it. I did this all in one coat - you just need to make sure that your stencil is kept flush with the paper, you put down a smooth coat, and you remove the stencil peeling in one direction slowly. It takes a bit of practice to get it to work without seepage, but when it does... so cool! (Who says you can't get thick texture with a thin stencil?)


This is where I got really caught up and didn't take many pictures, but I'll give an overview... I glued in my dried background piece and then painted the inside of my box bronze, Then I used some VerDay paints (I used the iron paint) and the aging spray to rust everything, including the metal parts of some of the bits I was planning to add to the piece. I left that to dry for several hours, then came back and added scrap sari ribbon around the inside of the box.


Next up, I put a piece of broken jewelry on the bottom-back of the inside, then added some metal findings as the feet, plus a cool Asian looking finial type piece of metal on top. The jewelry is adhered with strong glue, the feet and finial are all held on with Apoxie clay. Once that was in place, I created a mount for the hand, put some beads on the wire to cover it, and set that in place (and added some rhinestones, of course!)


Once the clay was cured, I painted the outside - a layer of Payne's Gray topped with a gold-blue interference paint. I added seed beads around the finial, over the top of the eye, and on the base of the hand. Then I used some Rub 'n Buff to highlight some of the raised stenciling and also darken the edges of the wood.


So there you go! A fun little mini shrine using stencils. Here are a few more views so you can see some of the details:


I hope you enjoyed today's project! Have you got any in-progress projects sitting unloved in your studios? We'd love to see how you use StencilGirl stencils to finish them off!

Until next time, happy stenciling!