Showing posts with label stencil jewelry. Show all posts

Wednesday, January 29, 2020

Making Mixed Media Jewelry with StencilGirl® Products

Hi, everyone! Silvia Souza here! Sometimes process is more important than outcome. I have been exploring different techniques to grow a paper jewelry collection I am developing. Towards that end, I wanted to use StencilGirl® stencils in two different ways, along with some other trial paints and ways of applying it to create texture. I create multiple sheets at one time.

First I applied a skim coat of house paint to one side of black Kraftex with a brush.
Then using different colors I applied another skim coat.
Then a heavier coat of paint was put on and I dragged a texture tool through the paint.
The other side also followed the first two steps but instead of creating texture I applied pattern with stencils Soulful Scribbles Dots Dash stencil by Traci Bautista and Mary Beth's Private Collection 16.4 stencils printing from the gelli plate. I used both the positive and negative print on all my sheets.
Then using the Rough Maze Pattern stencil by Kristie Taylor, Suzi Dennis’ Ancient Marks stencil and Rectangular Patterns for Play stencil by Carolyn Dube as masks, I used an embossing ink pad to dab over the stencil onto each sheet. Then I applied a mix of embossing powders and set them with the heat gun.
I then cut out “components” in different shapes in different sizes.
I organize the components into a pattern that I then follow to sew up a necklace or make into earrings. I also use these components in larger artwork that I am working on.

I was able to make 4 necklaces from these components.
The loop is long enough to wear doubled or tripled.
Have fun stenciling with StencilGirl® Products!
If you want to see more of my paper and thread work and follow more progress with messy experiments, please go to @paperifils on Instagram or www.paperifils.com.

I hope 2020 brings you many artful adventures,
Silvia


Monday, March 19, 2018

Gwen's Gems - Use a Stencil for a Wire Jig Pattern

Hi all, it's Gwen with the March edition of Gwen's Gems! This month I decided to tackle an idea that's been kicking around in the back of my head for quite a while - using a stencil to make a pattern for wire jewelry. Intrigued? I hope so! Here's the pendant that I made with my pattern, and then below is a quick tutorial to show you how it all came together.


About two years ago I took a class at my local bead shop to learn how to make wire-wrapped pendants. I loved it - it's fun and a lot easier than it looks! I've played with the concept on and off since then, and a few months ago I had an idea for a necklace that required a wire jig so I picked one up. As I worked on that piece, it occurred to me that I could probably use a stencil to make a pattern, and I just couldn't get that thought out of my head... I had to give it a try!

Of course, the first shape I wanted to try was a peacock feather, so I used my Ornamental Peacock Feathers stencil to create the pattern. To do this, I laid the stencil over the jig and then inserted the metal pegs into the stencil openings (I secured them on the bottom as well with the little plastic tubes that come with the jig,) and played with how they were laid out until I was happy with the arrangement.


Once I had the positioning down, I took some 20 gauge gold-colored wire and cut a long length (about 18-20,") then started shaping it around the pegs. (I like 20 gauge for this because it's thick enough to hold its shape but not too thick to be workable. I've found that 24 gauge is definitely too thin; 22 gauge could work depending on how soft the wire is.) I used my fingers and pliers to do the shaping - nylon jawed pliers are especially helpful to keep from marking the wire as you work.

I started with just the basic feather shape, leaving the cross pieces to do separately. When I had it shaped, I pulled it off the jig and added some small Christmas beads (African trade beads) into the very center section to jazz it up a bit.

Once the small beads were in place, I used 24 gauge wire and wrapped it, securing the loose end of my feather shape to keep the beads in place. I decided to go with bronze colored wire for a bit of visual interest. I also strung a few more beads on another piece of wire and attached it by wrapping the end so that it would hang down into the center opening of my feather.

I wanted a few more decorative touches, so I used more of the 24 gauge wire in a few places around the feather and wrapped it.


I used these flat blade pliers to tighten up my wrapping - I learned about these in my class and they're incredibly helpful!

For the cross pieces of the feather, I went back and shaped the wires on the jig, then pulled them off and molded them just a bit and wrapped with more 24 gauge wire to secure the loose ends. Then I took another small length to attach each one onto the main feather (you can also see where I added a small wooden bead in between - it's ornamental and functional at the same time since it helps keep the two cross pieces separate.) I went for a kind of rustic look, crossing the wire back and forth so that the wrapping would be secure and a little decorative at the same time. You can see at the very tip where I left the end visible - you want to make sure to do that so that you can hook your pendant onto the chain of your necklace.


Voila! A fun and unique beaded wire pendant made using a stencil for the pattern. It takes a little practice to get used to working with the wire, but I love the effect you get as it all starts to come together. I just added some beads, chains, and metal findings to turn it into a complete necklace and now it's ready to wear!


That's it for this month... I hope you enjoyed this month's project as much as I enjoyed making it! Have you ever used a stencil as a pattern for your own wire jewelry? I'd love to see!

Until next time, happy stenciling!
Gwen


Monday, January 16, 2017

Gwen's Gems - Stenciled Statement Necklaces

Hi everyone! It's Gwen, back again this month with a new edition of Gwen's Gems! 

I had a pretty crazy December - lots of stuff going on with work and family (more than the typical holiday season,) and I didn't quite get around to sending Christmas gifts to all my friends. So this month I'm making Chinese New Year gifts! (Sounds much better than Belated Christmas Presents, don't you think?) I knew I wanted to make necklaces, and what better foundation for creating unique jewelry designs than using stencils!


I made nine stenciled statement necklaces. I don't actually need that many, but once I started I just couldn't seem to stop!

Here's a quick little overview of how these came together...

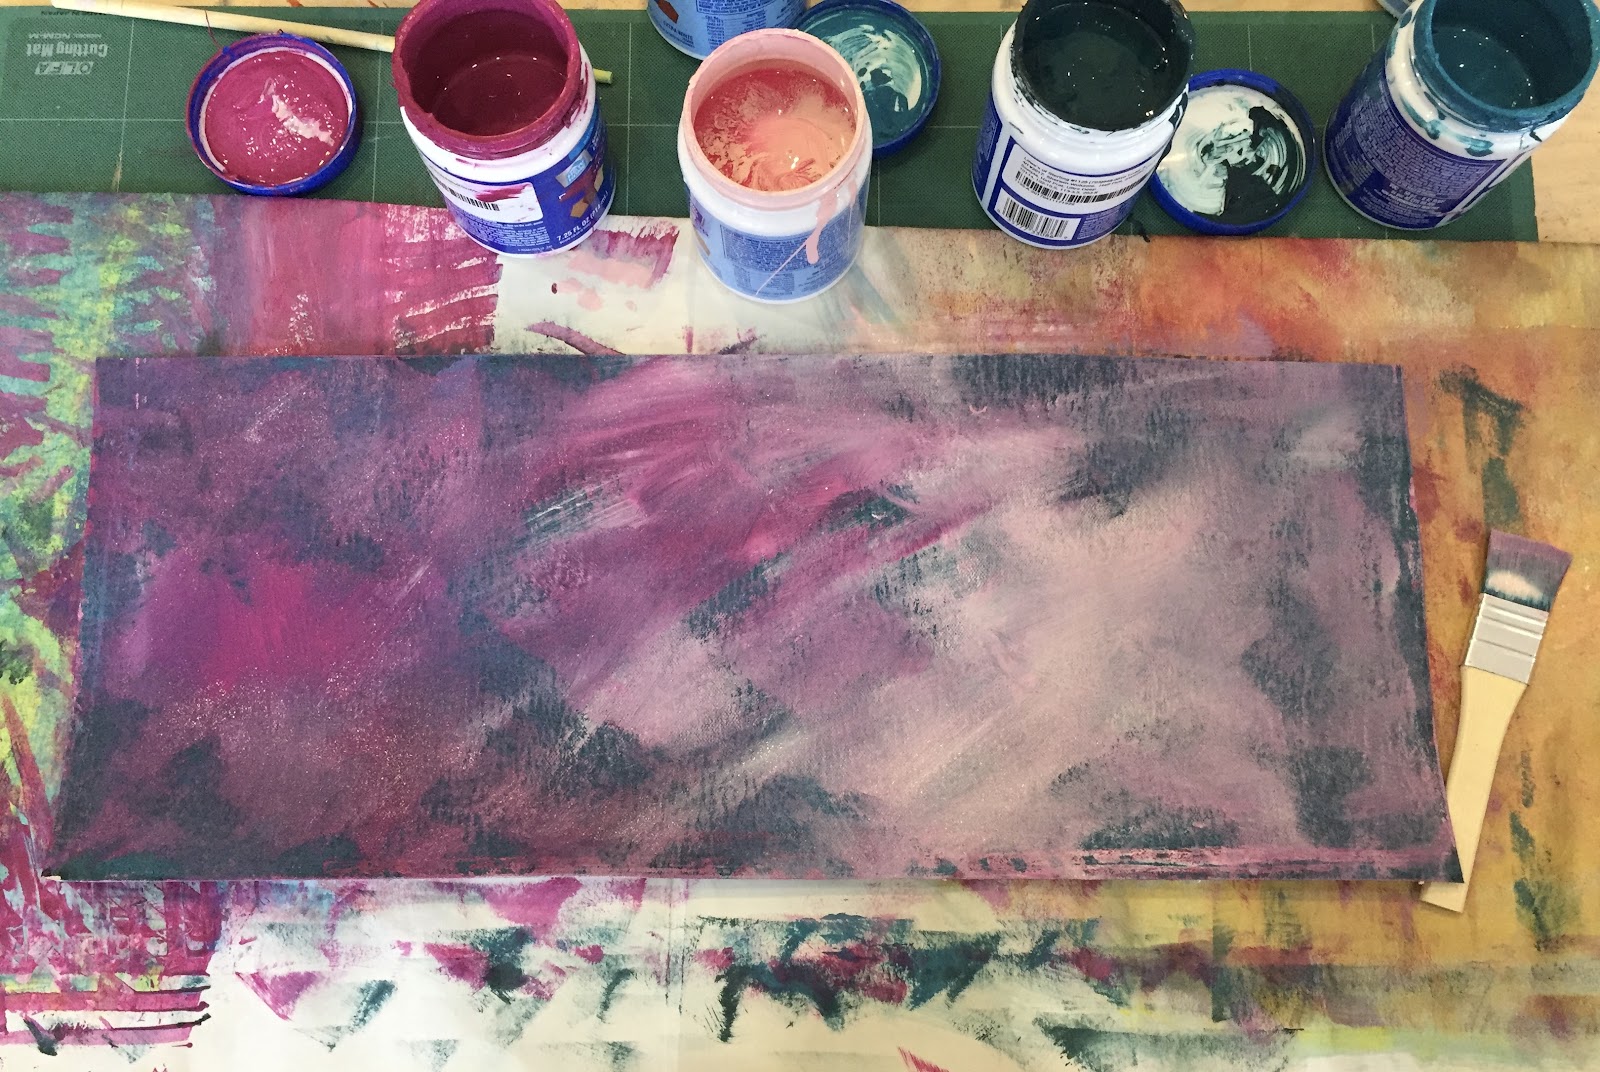
First, I got out some very old oval punches and punched out a shape that was pretty close to the size of my pendant tray / bezel. I trimmed each one just a bit so it would fit (I was already planning to cover the edges, so making it an exact fit wasn't too important.) Then I painted each one (can you tell my palette was influenced by the cold and snowy weather here in Utah?)


When the base layer was dry, I used my stencils and some gold and silver acrylic paint to add the background design. One of the things I like to do to help make stencil designs my own is to just use bits and pieces of the design. I auditioned several stencils on top of my painted ovals until I found compositions I liked, then stenciled away!

Here are the stencils I used for the necklaces... can you tell which designs go with which necklace? (Here's a little hint... I'll list them in order of the photo below, going from left to right and top to bottom.)

Decorative Folk Flower Stencil (the next one used this same design)


Once the backgrounds were stenciled, I went through my drawers full of small pieces of broken jewelry and found little bits and bobs that I thought would work and auditioned them on top of the different designs.

Once I'd decided what I wanted to do, I went ahead and glued the background into the bezel. I was going to fill these with a clear resin, and the glue helps keep the paper from curling until the resin cures. I used Weldbond glue since I knew it would stick to metal.


With that done, I went through with gold and silver metallic paint markers and closed the gaps from the stencil bridges  - I just think that gives it a more finished look.

Next, it was time to start gluing on the embellishments! I added the broken jewelry bits and then used beads and rhinestones, etc... to put borders around and cover up any gaps from the background.


Again, I used glue to put them down so that they would stay put until the resin cured. Speaking of... next I added the resin! I used a clear, jewelry grade resin (Ice Resin is a great one) and filled up the bezels. I added some micro beads and glitter here and there. Obviously that would be totally optional (even the resin could be skipped if you want!) but I love a little glitter!


I let that dry overnight... some of them had to be touched up, then it was time to add more embellishments to the bezels! Again, this step is totally optional, but you know me... layers and tiny details are a requirement!


I had lots of different metal findings and charms, did lots of auditioning to see which ones worked best and with which designs, and then started gluing everything together - I used E-6000 for this part.

While the glue was drying, I put together the chains... some were chains I'd made a few years ago that I was able to re-purpose, a few were just plain metal chains, one was a store-bought necklace that I'd taken apart and I used part of that, and a few of them I made to match the pendants. (I knew keeping all of my jewelry making supplies was a good idea!)

Here are the five gold necklaces:


Then the four silver necklaces:

Of course, I couldn't leave you without showing individual shots... you can see how the stenciling in the background isn't something you pay a lot of attention to, but it's definitely what ties everything together! Think how different they'd be with just plain colors in the background... blah!


That's it for this month... I hope you enjoyed it! 

Have you ever made jewelry using your stencils? We'd love to see! (Especially if you make some using this tutorial!)

Until next time, happy stenciling!

Wednesday, August 3, 2016

Mixed Media Art & Jewelry by our StencilClub Voices with the August 2016 Stencils


Hi Art Lovers, Carol here, introducing our August StencilClub Voices: 

Terry Garrett, Lorraine Vogel, and Mary Thoma! 

I've been brimming with excitement over these Voices projects and sure appreciate each of them taking the time to share their talents.

Our Voices artists worked with paper, clay, and canvas to create art with the "Here, There, and Everywhere" stencil set Mary Nasser designed for August 2016 StencilClub.

Carousel Book by Terry Garrett

Terry said he had "big fun" making a variation of a carousel book.

The black silhouettes aren't stencils, they are cut out of black card stock.


You can discover more about Terry on his Whisperwood Art Works blog.

Necklace by Lorraine Vogel

Lorraine made a clay veneer (pictured below) and then cut out her pendant shapes.
Starting with the largest stencil, archival inks were applied to white polymer clay then a dark gray ink was applied with a sponge. The middle sized stencil was then laid over the first inking, where strips of aqua and lime green inks were applied overall. Dark gray was applied in the circle areas. Lastly, the smallest stencil was laid over the veneer and the same general strips of aqua and lime green inks were applied. After inking, the circles and dots were pressed into the clay and filled with white acrylics.

You can connect with more of Lorraine's work via her Wired Orchid Facebook page.

Mixed-media Watercolor Painting by Mary Thoma

Mary writes: 

Hello StencilClub members, this is my first "Voices" contribution. The artwork is mixed media on 9X12" Strathmore 140 lb. watercolor paper. I used spray inks, mini gelli plates, and acrylic paint with the August StencilClub stencils. 

For a more detailed outline of how I produced this piece please check out my Make It In Oklahoma blogspot

Carol again. I'm diggin' the August stencils and feeling oh-so-lucky I get to spy these works of art first. The original StencilGirl, Mary Beth Shaw, and I are thrilled to share this inspiration with you!

If you'd like to see Mary Nasser introduce her stencils, CLICK HERE.

Remember, if you are a member of StencilClub and would like to put your name "in the hat" to become one of our upcoming Voices (you'll receive the month's stencils early plus a few other perks) just contact Carol via the secret Facebook group or email.