Showing posts with label boxes. Show all posts

Thursday, June 4, 2020

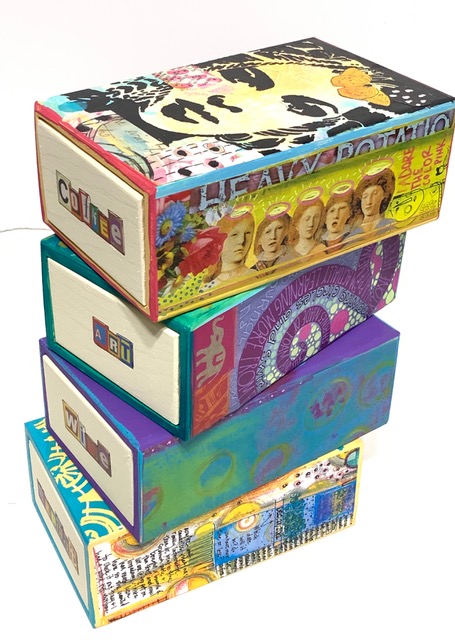
Wooden Matchbox Stackable Stash Boxes with StencilGirl® Stencils

WOW! That’s a lot to say in one breath!

Hello Creatives, Kim here. I am happy to be on the StencilGirl® Blog today to share with you how I decorated these really cool stash boxes. First of all, I was really fortunate enough to come across them, so when the vision reveals itself, you immediately snatch them up. I’m typically a fan of stash boxes, because I mean who doesn’t have a lot of stuff to stash away in cute stack boxes.
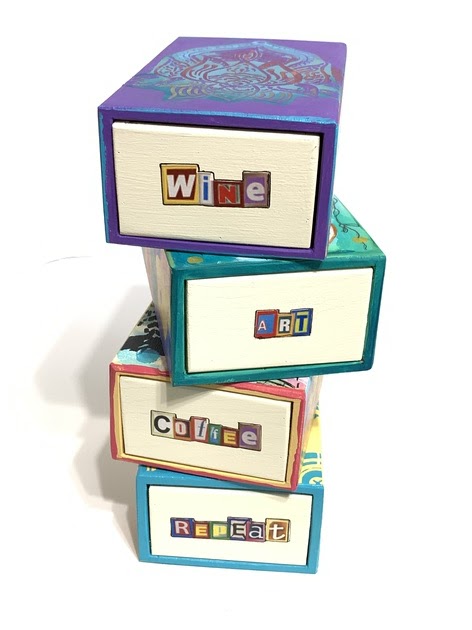
The four boxes I used are all wood and the drawers slide open just like a paper matchbox does. Because the drawers slide and come completely out, I created one end of the matchbox drawer with words and the other end with numbers, so they can easily be switched around. 

I didn’t have to think twice when it came to the top of the boxes, I went straight for my drawer of StencilGirl® Products. So if you have a box, cigar box or any other wooden box, you can easily create your own stackable stash boxes. Assorted sizes would work great as well. 

Matchbox Number 1.
Pretty as a Peacock Stencil by designer Andrea Matus deMeng was used on the top.  Before Using the this stencil, I painted the box, then I used a cosmetic sponge and two designs on the stencil Wolf  by designer Roxanne Coble to add some texture and color to the background before using the face stencil.
Next I placed the Pretty as a Peacock face stencil down and used a cosmetic sponge to dab on some black acrylic to all the open areas. After lifting the stencil off and a few swipes back and forth with my heat gun, I added some collage elements to the face. To the sides and back of the box, I added collage elements and papers from my stash. Once all sides were completed. I lined the edges of the box with acrylic paint using my finger to wipe the paint on, not necessarily being neat. On the edges, I prefer a little messy look. 
The drawer on this box reads: “COFFEE”, because that is what I need to start my day, the inside of the drawer says “Coffee by the Pound” and the reversible side of the drawer has the number #1 stamped on it using a vintage label that I painted.

Matchbox Number 2.
For Matchbox number two, I painted my box first a neutral crème color and the top of the box blue with some green paint around the edges. Next I added some stencil elements from Roxanne Coble’s stencil design Wolf.  After sponging on some background features to give a water effect, I used the Chinese Garden - Koi stencil by designer Gwen Lafleur.  Using a sponge in the same way as the first one, I dabbed on some orange acrylic. This time, I got a little too much paint and it was a bit messy underneath so I took a brush and spread the orange acrylic paint on the fish. I did lose some of the white stencil marks, but that was okay as I filled it in with my design and it was still an easy peasy way to add the Koi. Lastly, I added some pen doodling on the fish and the background.

Next, I collaged the sides and the back and lined the box edges again with acrylic paint using my finger. 

The drawer on one side of this box says “ART” because that is what I love to do every day. The inside of the drawer says “Always” and the reversible side of the drawer is stamped #2 on a vintage label that I painted first before gluing.

Matchbox Number 3.
For this Matchbox, I painted the top of the box blue and used Thanks A Lotus by designer Andrea Matus deMeng. I placed the stencil on top of the box holding it down with my hand and dabbed on red, gold, teal and purple, extending the purple out over the top of the box.  I used a thin brush to fill in any areas that I wanted more color. After adding collage papers to the sides and back of the box, I lined the edges with a coordinating paint color.

For the word on this drawer, I used the word, “WINE”, because some days just call for wine, especially during this crazy time we have all been experiencing.  The inside of the drawer has a stamped label that reads: “By the Bottle”.  The reversible end of the drawer has the #3 stamped on a vintage label that I painted with acrylic paint.
Matchbox Number 4.
For Matchbox number four, I used a stencil by designer Gwen Lafleur called Collage Textures and Patterns, Circles. I love all the designs on this stencil and I used the center one to have a focal point to add an elephant collage piece. Elephants always seem to find a place in my art and my heart.

To start with this box, I painted it yellow, and blended the background with a few darker hues. Next I placed the stencil on top and again used a cosmetic sponge to dab on some teal acrylic paint and some gold in the center. Once lifting it off and using my heat gun to dry, I added a little black with a brush and a couple more elements from the same stencil at the top. Lastly for the top I added my Ellie collage paper in the center. 

Once adding collage papers to the sides and the back, I lined the edges with paint using my finger. This also helps to seal the edges of your collage papers and give your box a more cohesive look. 


For Matchbox #4, on the drawer I collaged the words, “REPEAT”, because it is something I feel very blessed in my life that I get to do over and over again. The inside of the drawer has the word “Daily” stamped on a vintage painted label.   The reverse side of the drawer has the #4 stamped on a vintage painted label. 

So there you have 4 Stackable Stash Boxes, all easy to do using StencilGirl® Products and with so many possibilities. Thank you for viewing my post today. I hope this will inspire you to grab some stencils and get creative!


The colorful words on the box drawers are from MischiefCircus, a great place for Collage images and words.
Kim Collister is a Mixed Media Artist, a Design Team Member for Retro Cafe Art Gallery and a regular contributor to Stampington and Company. You can connect with her by visiting her website and blog at: KimCollister.com , KimCollisterArt.Etsy.com and social media found on her website.

Monday, September 30, 2019

Origami Treasure Boxes by Martice Smith II


Origami Treasure Boxes
by Martice Smith II

Hi everyone! Martice back on the blog again, sharing a super cute and functional way I like to use up my scraps of paper from my printmaking sessions. one way to help me keep my work desk neat and uncluttered.


Stencils used to create these origami treasure boxes:
Kilim Patterns by Cathy Nichols 
Scribble Scratch Handwriting Stencil by Carolyn Dube
Ancient Marks by Suzi Dennis


STEP 1: Stencil the paper with bold patterns and bright colors!
I love the gritty, mottled effect produced by a sponge roller. I think it resembles paint or chalk markings on concrete. The lines are jagged, expressive and just sit on top of the surface instead of being absorbed into the crevices. I’m always experimenting with different surfaces to get that cool, unexpected look. Kraft paper does the trick! 


I used a sponge paint roller for these origami treasure boxes but you may want to try a rubber brayer for a smoother paint application, or a cosmetic sponge for more control and ability to really lay down heavy layers of paint. Try them both to see which look you love the most.

Experiment with layering two stencils - try to create a new stencil design!

Use the gel plate to pull a print, choose a contrasting paint color, load the sponge roller, then roll over a stencil that has a bold pattern. 


STEP 2: Fold the paper to create the origami box.
I trimmed the kraft paper into squares. Some are 10” x 10” to create medium-sized boxes and 6”x 6” for smaller boxes.


STEP 3: Embellish!
These origami treasure boxes make handmade gift-giving even better! Gently tie a colorful piece of yarn around your new treasure boxes.  

Here are some of the items I like to keep inside of my origami treasure boxes:
Unmounted rubber stamps, rolls of washi tape, push pins, jewelry, and of course M&M candies! Yum!

That’s all for today, friends! I hope you enjoyed learning how I repurpose my stenciled papers and if you’re interested in learning more stenciling techniques, please check out my eBook ‘7 Unbelievably Easy Stenciling Techniques’. Use the secret code STENCILPRO20 to get 20% off!
Happy creating!
-Martice Smith 

To learn more about Martice and her mixed media art tutorials, please visit her website or follow the inspiration trail on her Instagram  @MarticeSmithArt.

Monday, December 10, 2018

All "Wrapped" Up with Stenciled Bags, Tags and Boxes


Hi everyone!  Debi Adams here and I am relishing the upcoming holidays.  Though I am not fond of all the long lines and busi-ness of the season, I definitely like the sights, sounds and colors of Christmas. Whether you celebrate this time of year or not, there are always opportunities for gift-giving so today I thought I would share some ideas on how to creatively wrap your packages using stencils. You can work up some special, coordinating sheets of paper or just use the scraps of left over castaways and extras from your stash.


So I have to admit that I have not used my gelli plate as much as I should have so I pulled it out for this particular post and started playing. (Thank you Carolyn Dube for the suggestive/inspirational instagrams :) ). I put watercolors down before I started with the gel plate.  It's my favorite medium, and definitely my comfort zone.  I chose three colors to begin with and then added another one or two to give it some depth.


When I started adding stencils, I didn’t think about my choices a lot. Just picked what I was in the mood for.  I tried to make my designs work for Christmas and all-occasion so you could see the possibilities.  I misted my paper with some of Dyan's Dylusions because I love the bright colors they bring to my pallet.  

The mark-making really helped it all come together.  I used a white marker but also added a few touches of gold with a thin gold marker to make it a little fancy.  


Once I got the pieces designed the way I wanted them, I began making embellishments for my packages. I cut out, punched and strung a variety of doo-dahs. This particular package was decorated with cut-out hearts attached to string and wrapped around the gift.  We all have scraps of this and that and they are perfect for package decor. Great way to get rid of those odds and ends that were too nice to just toss!


I also decided it might be fun to make mock-flocked ribbon so I used gesso on regular acetate ribbon and let it dry.  Making the tag personalized was super simple. Ann Butler's Flourish Alphabet Upper Case stencil used as a monogram made it easy.  (Pattern for the tag was from the Simple Geo Circles Stencil.) I finished the letter and the edge of the circle using a gold pen.  


Creating a “wrap” for a box meant I only had to a portion of my hand-designed sheets. It also solved the problem of some types of paper being too thick (depending on the substrate you use) to fold and tape down. The box stays nice because no tape touches it.   It simply slides off!  The Circles Layer Me Stencil by Carolyn Dube worked perfectly for a strip of paper ribbon! And adding a tag doesn't have to be complicated. I used this Starlight Mini Stencil to add a festive look and then added a separate piece for the name.  It took only a few seconds using the stencil, blending tool and ink.  

Sometimes a quick box can be worked up with small pieces of patterned paper.  Perfect example is this box.  You can make it as big or as small as you want based on the size of the substrate. (See pattern at end of this post.  Make sure to use red tape when securing the sides. It needs to be strong enough to stay closed.)

I LOVE Pam Carriker’s Knitting stencil but hadn’t used it yet (imagine!),  so I decided to create my own wrapping paper using bulletin board paper, a blending tool and ink.  I  turned the stencil in a different direction after every usage, making sections of patterns instead of trying to connect them into one straight line. 

I also stenciled it directly onto one of those pillow boxes. It was a great fit.  And the small knitting needles? A skewer and a bead. :) Maybe Pam will be impressed? Oh I wish I could sit long enough to knit like she does!


Sometimes adding a few tags finishes it off. 

                           
I love decorating all my packages. I honestly think of the person as I am wrapping it and wishing them great things. I hope I have given you some ideas on how to broaden the usage of stencils. There are a myriad of ways to use them.  This one definitely gives a personal touch to any gift-giving occasion.


Thanks for stopping in.  Can't wait to see what you create! 

Debi Adams

Website: www.debi-adams.com
Insta: debi_adams
Facebook: Debi Adams
_______________________________________

Learn to make 10 cards as easy as the above projects.   Check out my "The Art of Cardmaking" video by StencilGirl Studio found here.

Stencils Used:


Pattern for Box


When sealing the last area closed, twist the top part in the opposite direction from the bottom part.  The side seam should be located on the side of the box then.