Showing posts with label canvas. Show all posts

Friday, April 4, 2025

Cry Wolf Canvas - by Claudia Neubacher


Hi, servus and welcome back to some messy grunge and texture fun! 


This time I entered my studio after what feels like ages without holding a brush or palette knife - and ages it has been! So even if I knew I was up to having some creative fun, I also knew I hadn't  been in touch with my creative mojo for quite a long time. So how do you tackle this? What are good ways to make sure you'll be ending up enjoying yourself and the process?


One way that really works for me is to gather "favourites" - designs, materials, colours and objects that make me feel good by just looking at them. So I picked stencils without thinking at all about how these would go together or create a specific theme. I went for a mix of paints, pastes, brushes, palette knives I thought I might use and in my pants' pockets I found some used rough garden string in black and white, nicely weathered during the winter (as it had been outside, holding protective jute bags in place). When clearing my desk I also kept some tiny snippets of Asian text paper strips from an earlier project for a possible use. 


Also a good way to take off any pressure of having to succed in creating something "special and precious" is to use up old paints and pastes that have already started to dry out a little but can still be applied through stencils, cheap paints and media and some low price substrate to work on like a cheap canvas or some left over cardboard. 

But let's take a look at the stencils I've used:


S861 - Abstract Marks - by Jeanne Oliver
L455 - Wolf - by Roxanne Coble
L792 - ATC Mixup Missigman #1 Art Marks - by Rae Missigman
L433 - Clustered Leaves - by Cecilia Swatton
S621 - Totally Triangular - by Wendy Aikin

There's one more stencil in the picture, but I didn't use that one in the end. It is always good though to have more stencils to choose from. 

I started without having any idea of a theme or look in mind. I only knew I wanted to go by a reduced colour scheme, having black, grey, beige and white as my main colours and adding yellow, maybe orange or rusty tones later. The bright pink somehow demanded to be used during the process. 


But let's start at the beginning! Breaking the clean white of a canvas can be an intimidating moment. Especially when you start without any concept for your piece of art. 


So what I did was use some cheap grey outdoor acrylic paint from a dollar store that needed some good stirring. For that I used the handle of a long old soft brush. When I started scraping off the excess paint afterwards, I found there was still so much of it left on the brush handle, that I decided to scrape that onto the canvas, twisting and turning the handle during the process. I actually liked the result! 
Next I masked a stripe to add some slightly transparent yellow acrylic paint to with a palette knife. 
I heat dried everything thoroughly, before I went on.


Using a second stencil on top of another is a great way to create a textured shape in one go. I used the large open oval shape from Rea Missigman's "ATC Mixup" stencil on top of the "Totally Triangular" stencil and applied carbon black acrylic paint using a stencil brush. 


So far, so good!


Honestly, one of the main goals for this project was to experiment and use the stencils in different ways.
For example, I applied thick white Gesso (that had already started to dry out a little) with a small bristle brush in random circular motions through the oval and circle shapes of my stencil. This way the added shapes looked random and loose, but still had a sharp outline. I heat dried, then  put the stencil back in place again and added some black lines, using the stencil as a mask so the lines' ends would line up with the previously added shapes. 


I also had a small pot of black modeling paste I wanted to use up (or at least save from drying out almost half full) and I decided to use that alongside the lovely "Fallen Leaves" stencil. I applied that to the left side of the canvas and as there was a lot of paste left on the stencil afterwards, I rubbed that residue off the stencil and onto the bottom right corner of my canvas using a baby wipe. 

I found this is a great way to not waste any paint residue and get a soft fading effect at the same time. 


You can see it close up in this picture, which shows me using some dry herbage (or moss?) to "stamp" with. Remember, I was in experimenting mode...

If the outcome of the project isn't of much importance, this is also a great time to practice particular techniques. I used the opportunity to get a bit better at using modeling gel for example. But first I applied some (also a bit dried out) rust paste using the geometrical design on the "Wolf" stencil. 


As you can see I had previously added part of the "Fallen Leaves" design using the baby wipe technique in this corner too. I let the rust paste dry a little (but not fully) and then sprayed on some orange acrylic paint. I created some drip lines and while these were left to dry, I applied the garden string using the modeling gel and a fine tip palette knife. Later I carefully heat dried everything, before I added some white spray paint on top. 

At that point I found my canvas needed its "star" - my beloved wolf (one of my all-time favourites...see HERE). Instead of stenciling it in place with white paint, I used the stencil to draw the outlines using a black archival ink fine tip pen and later filled in the paint using a small bristle brush. I also added some spying eyes (from the same stencil) for a bit of a mystery touch. 

Before I went to sleep and let my canvas sit for a while, I also added more white spray paint in some spots where I found I had added too much texture in black. That was followed by some tiny yellow dots (through the stencil from the October2016 StencilClub set) and more yellow (scraped on, using a palette knife). 


A new day - some new ideas!

I found my garden string looked like a cloud - so I added some falling rain here and there. Now a story started to unfold! 


Suddenly there was a mysterious hand...dangling in the wind...a sign from above? A warning? Food for my poor hungry wolf? 


I went in with an ordinary graphite pencil and traced or filled in some of the stencils' shapes by scribbling randomly and outlining. I also added some scribbling around the rain cloud. 

Finally I added some handwritten text in spots that I found still needed more interest. I adapted a quote from a very successful Neue Deutsche Welle (New German Wave) song from the Swiss band Grauzone (Grey Zone) that goes: 

Ich möchte ein Eisbär sein (I want to be a polar bear)
im kalten Polar. (in the cold polar circle)
Dann müsste ich nicht mehr schrei'n (then I wouldn't have to cry anymore)
Alles wär so klar! (Everything would be totally clear)


Of course I had to change the "Eisbär" (polar bear) into "Eiswolf" (polar wolf), but the text definitely tells the story, doesn't it? And those who know the song, know that the famous refrain says that "polar bears never need to cry!" - so there's some poetic depth in it, don't you think? ;)


I didn't like the plain white wolf body, so he got some red and white banded Angora hip warmer (at least that was my husband's interpretation, which I am happy to go by)...


All in all the canvas maybe lacks in consequence compositionwise, but I really loved where this journey took me and had a lovely time messing in my studio. Taking some close ups and editing these on my lap top made me realise, I love a lot of the detail shots and can well image these as little paintings or canvases on their own...so this canvas also is a kind of catalogue for further inspiration and directions to explore creatively. And there's loads of yummy texture and layers whereever you look! But take a look yourselves!


Thanks so much for stopping by!!!!
Hugs and happy creating!
Claudia
xxx


Monday, July 5, 2021

Stenciled Waxed Canvas and Denim


I’m back with another easy upcycle idea.  In my last post for StencilGirl®️ Talk I wrote about three ways to make solar powered prints on vintage linens using rust, bleach, cyanotype solution and stencils.  For this column I thought it'd be fun to keep the textile theme going by repurposing canvas curtains and old jeans.  I'm going to show you how I waxed them and made a cool Artist Roll and Art Patches for my journal.

Lately I’ve been spending a lot of time on Pinterest and Etsy eyeing anything made of waxed canvas.  What’s not to love?  I’m enamored with the weather beaten look and feel of the waxed cloth.  The wax deepens the colors of the fabric, softening the fibers as it ages with a lovely, scratched patina.  Waxed fabric repels water while still being breathable.  And it’s easy to care for; just wipe away any dirt or stains away with a damp cloth.  (You shouldn’t ever machine wash or dry waxed fabric.)  Garments made with waxed canvas can last for years and the wax can be reapplied if it ever wears away.  

While you can buy pretreated waxed canvas, making it yourself is easy so why not to let your creative personality shine?  If your seamstress skills are on par with mine, you’ll be happy to know that there are lots of “No Sew” or  simple hand stitched projects you can make with it like the Artist Roll and the Art Patches I made. Getting ready to head back into the office soon? How about a canvas lunch bag? I actually made a few and will be sharing them soon on my blog and on Instragram.

I picked up two pair of tab top curtains at the thrift store to repurpose for this project. They are made from 100% cotton duck cloth which is the perfect fabric and weight for waxing.  With my 30% coupon, I paid about $11 for two full pair which gave me quite a lot of material to play with.  Since I had some old jeans left over from my last post I decided to stencil and wax them too.  While 100% cotton is always best for this project, I’ve successfully waxed denim blends with a high cotton content so don’t be afraid to give the denim you have on hand a try.  Do a small test piece first and see how it comes out.


Here’s a list of the supplies and tools that I used in this project.  
  • Scissors (this is an an opportunity to get out and proudly use your pinking shears),
  • StencilGirl®️ Stencils, and Stenciling tools (brushes and/or makeup sponges),
  • Ink pads (I used Versa Fine Clair and Distress Inks),
  • Faber-Castell Pitt Artist, (assorted colors) and Big Brush (white) Pens,
  • Parchment paper to protect your work surface,
  • An old bath towel that you have no intention of using ever again (Method #1),
  • Paraffin wax, (from the canning aisle at the grocery store),
  • Beeswax, (you’ll find it in the candle making supply section of the craft store),
  • A paint brush with natural bristles, (inexpensive chip brushes are perfect.  Note: brushes made from man made materials may burn/melt during this process),
  • Needle (I used a tapestry needle),
  • Button and Craft Thread (I used Coates and Clark),
  • A heat source with a temperature gauge (this could be an old mini crock pot, a double boiler or an electric griddle/hot plate, etc. I picked up a small used warming plate at the thrift store and it works great),
  • Glass Pyrex baking dish or other vessel to melt the wax in,
  • An old iron (Method #1) and/or a heat gun (Method #2),
  • Optional: Pearl Cotton thread (should you feel an urge to add some decorative stitching like I did).

Stenciling the canvas

Note:  it’s best to avoid using acrylic based products on any surface that you plan on waxing since wax and acrylic don’t play nice together. 
I washed and dried the curtains to remove any dirt and oil from the fabric then I cut them down into manageable pieces and stenciled the fabric.  I used my own Trivet Duo stencil with four different shades of red Distress Ink to create a border on the two parallel edges of the fabric.  Using different shades of the same color subtly adds depth and interest your stenciling.
For the center of the motif I used Pam Carriker’s Beautiful Halo stencil to create the four main petals of my design. I constructed a crude template out of card stock to help me position the petals on the canvas and to keep the ink from bleeding over the edge of the stencil.

I filled in the petals with the Trivet Duo stencil and added highlights and shading with Farber-Castell Artist Pens.  Pitt Pens are filled with India Ink, work well for fabric projects, and are permanent when dry.

For the background I used Gwen Lafleur’s Collage Texture and Pattern- Leaved stencil. And now it’s ready for waxing.  


Waxing the canvas

I watched hours of YouTube videos to research the waxing process.  I found that there are basically four different methods for applying the wax and then getting it to absorb into the fabric.  I quickly narrowed the four methods down to two that I wanted to test. Here’s why the first two didn’t make the cut:
  • The first method was actually the simplest of the four, but it involved a lot of time and elbow grease.  While it may have been a really good workout for my arms, the reviews were not great so the couch potato in me ditched it.  
  • The second method involved encasing a large piece of wax covered fabric in a pillowcase and running it through the dryer on the highest heat setting.  Call me sentimental, but I just couldn’t stop seeing the inside of my Kenmore after I’d washed my then toddler son’s jeans with crayons still in his pockets…. And so method #2 quietly fell by the wayside.
The two methods I did try used an iron and a heat gun to coax the wax to absorb into the cloth.  Both methods started by melting a paraffin wax and beeswax mixture over a heat source and then using a natural fiber paintbrush to coat the fabric with the wax.

I got out my kitchen scale to precisely measure out equal parts of paraffin and beeswax.  (LOL, You really don’t need to be so precise - I was just excited to have an opportunity to use my new kitchen scale.)  There are lots of recipes online for the wax mixture.  They all called for paraffin wax and beeswax but differed on the proportionality.  A few brave souls used turpentine in their wax mix, but nah… I don’t think so... I found that a 1:1 ratio of paraffin to beeswax worked for me but feel free to experiment to see what works best for you.


Paraffin wax is man made, petroleum based product.  It’s less expensive than beeswax and adds stiffness to the cloth. This wax is sold in blocks and can usually be found in the canning section of the grocery store.  Since the blocks can take a long time to melt I found it easiest to shave off thin slices of the wax with a large carving knife. 

Beeswax is all natural, more pliable, less likely to crack, and smells wonderful.  It’s also ‘stickier.”  You can usually find it in the candle making supplies section of your local craft store, (or at a local bee keepers hive if you are lucky enough to have one nearby.) I happened to have bag of Enkaustikos BW Beeswax in my stash.  This brand comes in a fine pellet form so its easy to melt.

Before you start make sure that there is good ventilation where you are working.  If the wax gets too hot it will begin to smoke and those fumes are not good for you.  I try to keep the temperature between 150 and 180 degrees, just high enough to liquify the wax.

I purchased a glass Pyrex baking dish and a small electric warming plate at a thrift store for approximately $10.  If you can’t find an electric warmer you could use a double boiler, an electric griddle, or a mini crockpot to melt the wax.  Try to find one with a temperature control so that you can control the heat. 

I melted the waxed in the Pyrex dish over low heat.  


I covered my work surface with parchment paper to protect it from any excess wax that drips through the fabric. Then I laid the stenciled fabric on top of a piece of parchment paper.

It helps to warm up the fabric a bit before waxing it.  You can do this with your heat gun or laying it on your griddle for just a few seconds.  This wlll help the wax go on more smoothly.  I painted the entire canvas with the melted wax using a brush made from natural fibers.  (Stay away from brushes made with nylon as they can melt in the hot wax.) You want to achieve an even coating of wax over the entire surface.  Don’t be surprised if wax on the canvas turns white as it dries and expect the fabric to stiffen.  It will be fine after the next step when the wax gets fully absorbed into the fabric. 


Now here’s where the two methods I tried differed on how to coax the wax to absorb into the fabric. 

Method #1 - Ironing

Use an old iron to melt the wax deep into the fibers.  I covered my ironing board with an old towel to protect it from the excess wax that will penetrate through the fabric.  (Warning - I use this iron only for craft projects.  Also you'll want to use an old towel -  you won't won't to use it again for any other purpose.)

Then I covered the fabric with a pressing cloth (I actually used a large piece of packing paper but an old towel would also work.  I also don’t recommend using newspaper as a pressing cloth since the ink could transfer and get sealed into the canvas.) 

I remelted the wax with my iron set on the highest heat without steam.  I kept moving the iron around, never stopping in one place, until all the wax was melted and the excess was picked up by the paper/pressing cloth.  (Don't through that waxed paper away - you can use it in your art journal or as a fire starter.)

Then I picked the canvas up and waived it in the air for about a minute until it cooled and dried enough to set down.   At this point I just let the canvas cure for 24 hours before doing anything else to it.

I decided to add some decorative stitching on top of the waxed canvas.  I have to say, I loved stitching through the soft wax.  I found it very relaxing and as an added bonus, my hands felt so soft when I was done.


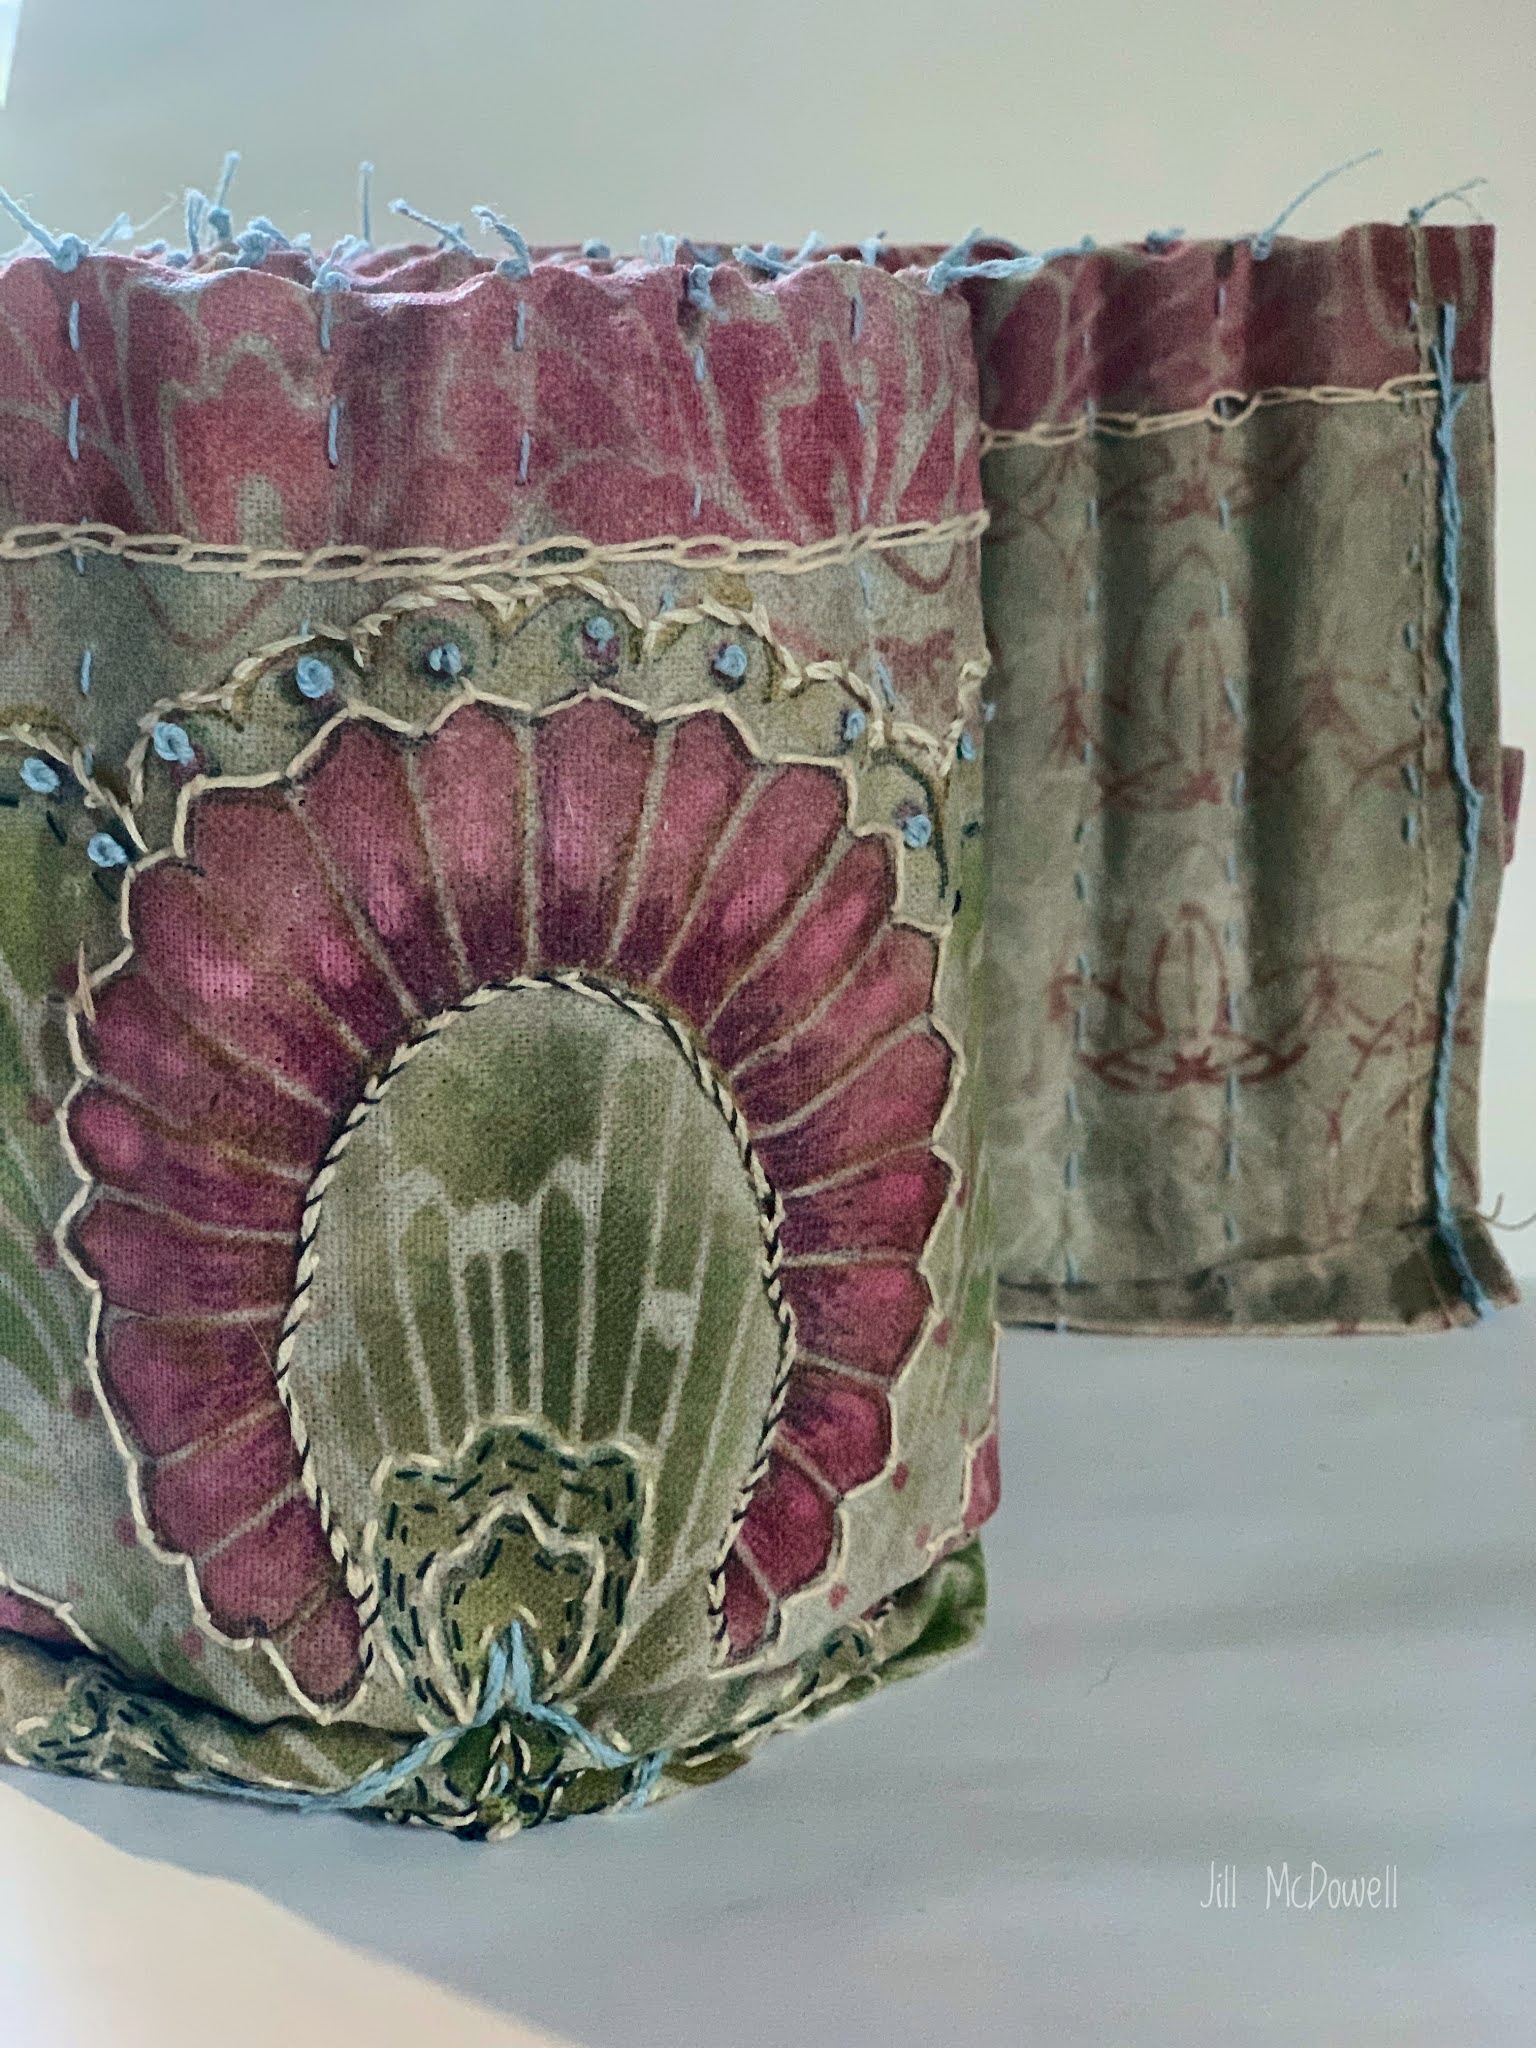
Here’s a pic of the finished waxed canvas after its been stitched.


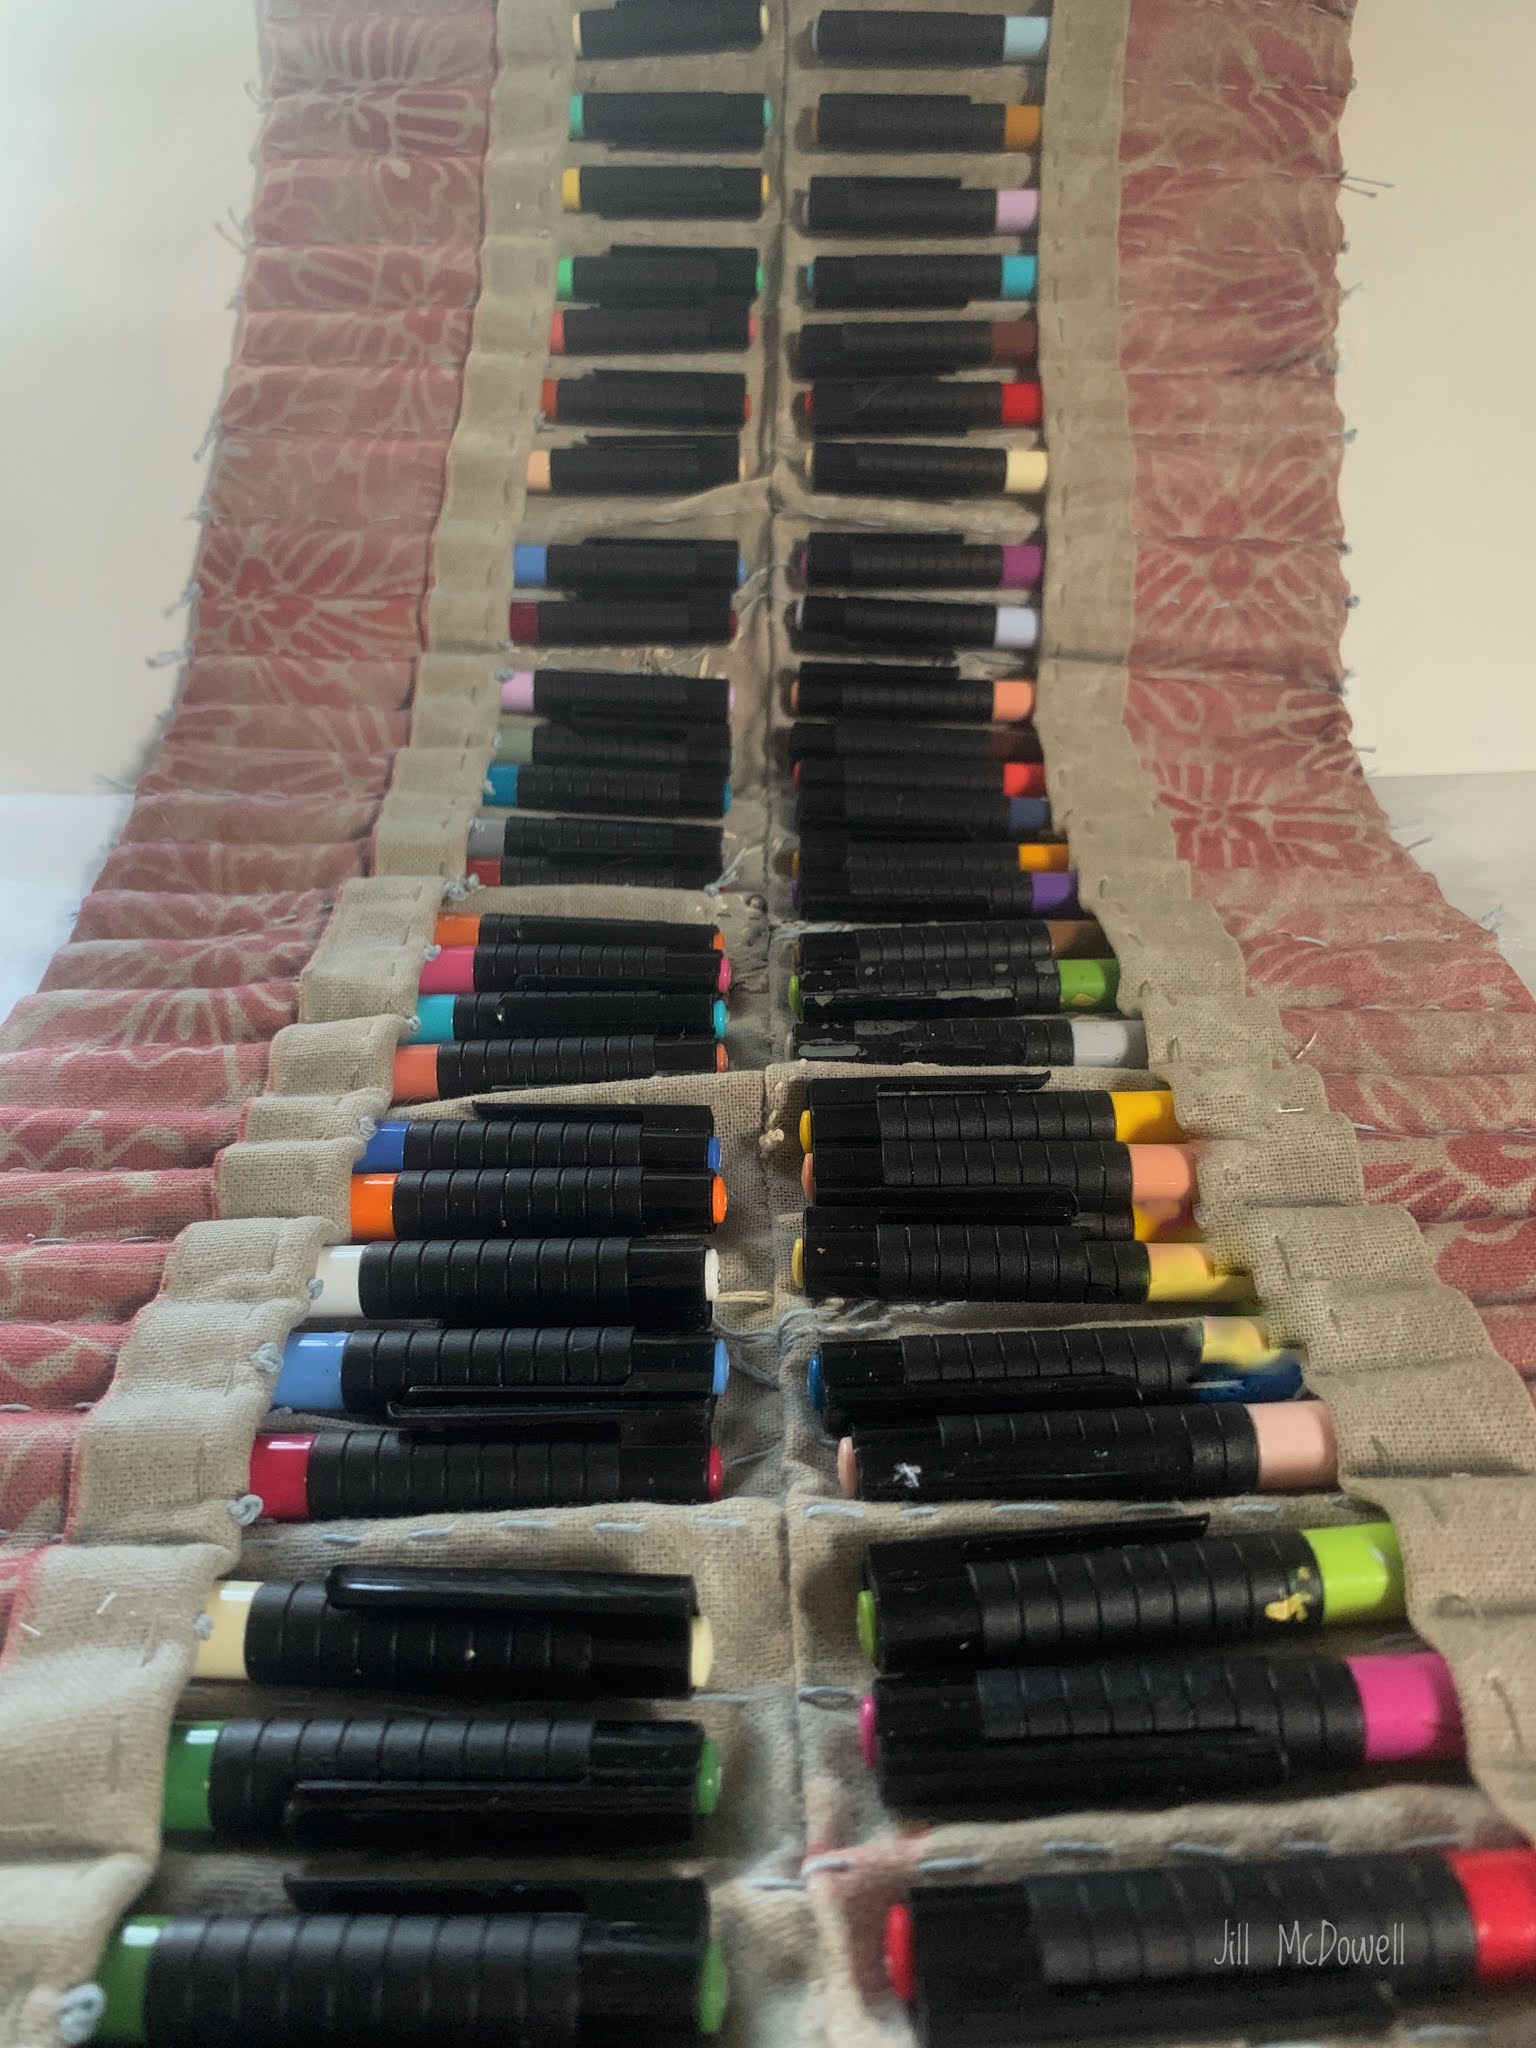
I made an Artist “Roll” out of this piece of waxed canvas to hold all of my beloved Pitt Artist Pens.  It was all sewn by hand with a simple straight running stitches. (I used Coats and Clark Button and Craft thread and a tapestry needle for this part.)


It hold 62 pens.

It also works as an Artist Trifold rather than a roll.  It makes it easy to carry my Pitt Pens to the couch so I can keep busy and watch my shows at the same time. (This satisfies my inner couch potato.)


Method #2 - Heat gun

The second method I tried involved my heat gun and worked quite well on smaller pieces of fabric.  I tested it out on scraps of denim cut from old jeans and made art patches for my journals.

First I stenciled the denim with a white Pitt Big Brush Pen.  (Leafy Tree Arch Mask by Valerie Sjodin)

Then I  melted and applied the wax to the fabric the same way as before, (Crow, Cedar Waxwing, and Chickadee by Cynthia Silveri). 


Here’s a fully waxed patch created with the  Tokyo stencil by Nathalie Kalbach and my own Candle Heart Trivet.


This time I used a heat gun to remelt the wax so that it would fully absorb into the fabric.  I kept moving the heat gun in a circular motion all around the piece until all the wax had melted into the denim.  This method felt more to me like working with encaustic medium.  
I dried the patch as before and let it cure for 24 hours. (Four Bells and Trivet Duo by me). 
   
Pretty easy, right?
I’m loving the effect of the wax on dark material.  Here’s a montage of waxed patches ready to add to my art journal.

And finally, I want to leave you with just one last thought courtesy of Valerie Sjodin's Leafy Tree Arch Mask and Carolyn Dube's Uplifting Words Stencil :

Now that things are starting to get back to normal, doesn't it just feel wonderful to Breathe again?

Have I given you any new ideas to try?  I had a lot of fun experimenting with waxed canvas and hope that I’ve inspired you to give it a try.    Hugs until next time.  Jill

For more inspiration visit me on my blog and Instagram