Showing posts with label gift bag. Show all posts

Tuesday, June 9, 2020

Typography with StencilGirl® and Art Joy of Sharing Collaboration


Hello and welcome. Thanks for the visit. Today we are talking about Typography.

For this month Shel worked on using kraft colored handled gift bags to create wall art. Of course, they can be used as gift bags as well...but they hang up on the wall so easily with just a thumbtack! 

She used a gel plate to make some monoprints onto thin papers with 'coffee and tea color' paint like Sienna and Umber. She used the stencils Alpha Jumble Large and Letter Mania for the prints. 


Next, she collaged and layered different gel prints into a square on the front of the bag for an interesting and graphic background. 

To create the focal image, Shel used the ordered alphabet half of the Alpha Jumble Large stencil to make words that related to coffee like Latte, Americano, Expresso. She cut out the paper into a coffee shape and glued it over the background. After some shading and highlights with some pens, the piece was done and ready to hang!


Today Peg is working on a journal made from the backside of napkins or serviettes. In this blog post, she is also sharing a stepped-out video tutorial that shows how the cover is created.


Peg says, "I peel off the plain paper and use the pretty prints for collage but do not wish to discard all of that tissue, so I needed a plan to use it up. A bit of topstitching and embellishment and my cover is complete. Then I simply stitch in a signature from stenciled watercolor papers."


Thursday, April 9, 2020

Decorative Stenciled Gift Bag, Box and Bow

Oh hey my creative friends! Welcome to another adventure in art making. I'm Debi Adams and as some of you know, I come from a stamping/crafty/scrapbooking background.  Over the course of the past few years I have jumped into the mixed media field and love it! Nothing like a lot of layering goodness to make one a feel a part of the art.  As much as that is my go-to these days, I thought it might be a nice change of pace here on the blog to revisit the crafty approach by using stencils in their simplest forms.  What better way to show that look than with some fun gift wrap ideas.


For my first project, I have a gift tote that I made pretty much made from a card sealed up on the sides with a handle, but you can purchase a pre-made box or bag as well.  I stenciled the bag portion using Michelle Ward's X Rows stencil with black ink on white cardstock.


To create all the embellishments, I stenciled up a sheet of cardstock using Wendy Brightbill's Peony Blooms and Tim Holtz/Ranger's Oxide Inks. Oxide Inks are so creamy and blend really well together. They were perfect for making the rose a peachy-pink and the leaves a funky green.  For this particular project I used Picked Raspberry, Crushed Olive, Fossilized Amber and Carved Pumpkin.  And my new favorite applicator is a cosmetic brush, the kind with a zillion little bristles in it. (See it in the right hand corner).  Oh my.  (Try it. You will like it! Available on a lot of craft company sites and Amazon.) It makes the application so easy! Don't forget to dry the design with a heat tool at the end because Oxide inks like to stay wet.


Next, I die-cut the bow out from the stenciled paper. You can use a die-cut, as I did here. (Picture below to show what the die-cut pieces look like.)  I love Designer Brenda Walton's bow and Spellbinder's Bow-tique and used those. However, if you are not a die-cutter, there are a ton of similar patterns available online for free.  There are pre-cut bows and boxes available for purchase online as well, that you can apply the stencils onto directly. I fussy-cut some of the leaf images and used them under the bow on the box.


I also decorated a party favor box but applied the stencils directly onto the box rather than from a printed sheet of cardstock. It made it easy for placement purposes.


And don't forget to embellish the tissue paper...I used Wendy Brightbill's Floral Frolics for the background.


For something new, try embellishing the Peony Bloom with Oxide inks onto white cardstock,  then go back over it with glue and apply Fun Flock for dimension. I absolutely love the look of velvet.


Truly the possibilities are endless.  Here is a different color palette used on some different boxes.


Aren't we lucky to have so many great designs available through StencilGirl® that can stand on their own and be applied to a variety of items? Would love to see what you create.

Thanks for hanging with me today. Hope I challenged you to try something different.

XO,

Debi Adams


Website: debi-adams.com
Instagram: debi_adams
Facebook: Debi Adams
                  Debi Adams 04
Pinterest: Debi Adams


Tuesday, November 5, 2019

Gift it or Grid it Challenge from Shel and Peg


Hello,
Peg & Shel with you today. We are so happy to share a few gift and wrapping ideas with you. This time of year we are always looking for an easy gift to take to out host/hostess and friends, so let us share with you some quick and easy ideas.


We are using L736 Leafy Doodle Border, S708 Leaf and Clover Prints and L422 Herbs stencils. StencilGirl® carries many leaves, flowers and nature stencils. Did you know you can shop by category? It is so convenient. 

Peg Robinson's Gifts, Tags, Bags, and a Dispenser


In the picture above and in my video, I'll show you how I created gift bags, a decorative journal to gift in a bag, a pleasing gift tag and a decorated soap or cream dispenser. I chose to work with Archival inks and Gina K Glitter paste. Isn't that green shimmer lovely?


The bags are inexpensive sandwich bags in a kraft brown paper and a wax paper much like glassine.

The tag can be used to adorn homemade flavored vinegar or oils recycling old wine bottles. You can purchase soap and lotion dispensers at the discount store and decorate them with glitter paste and stencils. 

Did I mention the decorated sandwich bags are great wrappers for gifting stencils to your crafty friends?

Shel's Wrapping Gifts Up!


For the November Gift It/Grid It theme I focused on up-cycling beautifully stenciled gift packaging using the three stencils. 

For the first one I used spray inks and the Leafy Doodle Border stencil to make my own gift wrapping paper our of craft paper that comes in ordered boxes as packaging. Iused the same stencil & spray to make a belly band and tag for the package.

The second project was created with a used box that some essential oils came in. As it was just plain craft colored box I stenciled it using some acrylic paints with the Leaf and Clover prints stencil. 

I like this stencil because you can use the designs on top of each other to add highlight or shadow with different colored paint. This box can be used again and again and doesn't have to be wrapped. 

I made a matching tag to tie on the ribbon.

For the final gift packaging project I used a paper sack from the grocery store produce area with oranges in it. I used a regular dye based ink pad and the Herbs Stencil to cover the bag in stenciled rosemary leaves. Then I used a piece of cardstock to create a topper for the bag to keep it closed. You can also use the stenciled topper as a tag to write a greeting or the to/from information. 

I hope you found my stenciled packaging upcycling ideas fun and useful and give them a try this gift giving season.


Well, we hope this helps you with your last-minute gifts this season. Thanks for checking us out and a big thanks from Shel and Peg at StencilGirlTalk. 
Enjoy the holidays.

Peg & Shel

Stencils used:

Leaf & Clover Prints 6" x6" Stencil by Jennifer Evans
Leafy Doodle Border 9" x 12" Stencil by Valerie Sjodin
Herbs Stencil 9" x 12" by Jessica Sporn


Wednesday, June 5, 2019

Art by our Voices ~ Aboriginal-inspired Stencils by June for June StencilClub!


Faint backgrounds to bold statements. Elegantly austere to heartfelt intent. I'm Carol Baxter and that is what I see when I look at these stencils and art projects.

Our wonderful StencilClub Voices, Carol Burger, Jessica Hitt Bullock, and Debbie Fabbri, prove that the Aboriginal Collection by June Pfaff Daley will inspire you to create new artwork!


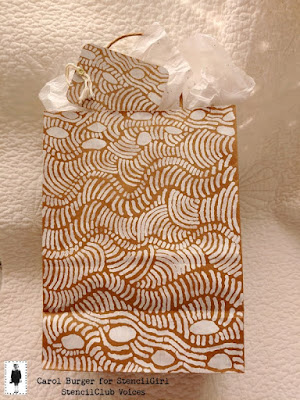
Carol Burger's Tag, Bag, and Keepsake Box 


Debbie Fabbri's Collage Pages


Debbie likes being able to see the patterns of these stencils in her collaged journal pages.


Jessica Bullock's Bible Journal and Junque Journal

Jessica is Bible Journaling in her ESV Interleaved Journaling Bible using June’s ABORIGINAL stencil and acrylic ink.


"I created a cover for a new junk journal using an old book cover covered in white gesso and stenciled with June’s monthly stencil in acrylic paint," Jessica says. "I then collaged and added bits of ephemera." 


Carol Baxter's Cards


I wanted to stick with a neutral, earthy palette for these cards. The small stencil has so many interesting design details. I believe it will fast become one of my go-to stencils. I thought I was going to make an offset sun as the focal but it evolved into an eye. And, I do like that mini's boxes!


Thanks again to our marvelous StencilClub Voices for May and June: Jessica, Carol, and Debbie!

Need these 3 exclusive Aboriginal-inspired Stencils sent to your mailbox? Watch her Reveal video or sign up for StencilClub HERE by June 15, 2019.

Like June Pfaff Daley's stencil aesthetic? See more of her designs via this link.