Showing posts with label Peg Robinson. Show all posts

Tuesday, April 27, 2021

Heartfelt Thanks to Our 20-21 Creative Team!

Greetings and thanks for stopping by today! 

Throughout the unexpected hardships of this past year, these skilled artists put stencils and paint to the surfaces of fabric, paper, wood, and plastic, sharing art projects filled with beauty and grace.

They are the real deal and let their love of art shine brightly for all to partake.

I'm Carol Baxter and I am privileged to manage the team. If you have been reading StencilGirl Talk for the past year, you may be able to match the artwork in the thumbnails below to one of our talented Creative Team members.


Did you guess? A) Sunila & Aditi Mahajan aka Dots 2 Lines, B) Linda Edkins Wyatt, C) Sue Plumb, D) Shel C, E) Peg Robinson, F) Natalie May, G) Geri Beam, and H) Wendy Baysa.

Here's a recap of my favorite projects from each of them. Don't worry. The stencil project links open in new windows so you won't miss a post as you dive into art.

Art journaling and scrapbooking together, Sunila & Aditi Mahajan are the mother and daughter duo who bring us stenciled projects replete with layers bursting off the surface. Their Shadowbox Keyholder is a lovely example of their art.


Prancing hooves, the caress of butterfly wings, a tulip on fire with color, and clown to gather it all in. Linda Edkins Wyatt has a gift for color as you'll see in her art but Circus 19 Dream: A Mixed Media Pastiche is a fine composition.


I do believe I would recognize Sue Plumb's style in a blind show. I finally had to toss a coin between what I finally chose and Art is Good for You because projects for StencilGirl made choosing a fave practically impossible. Graceful blooms adorn many of Sue's artworks but I think the way she treated a single stencil as the focal in The Real Deal is magical. Her process is stepped out beautifully too.


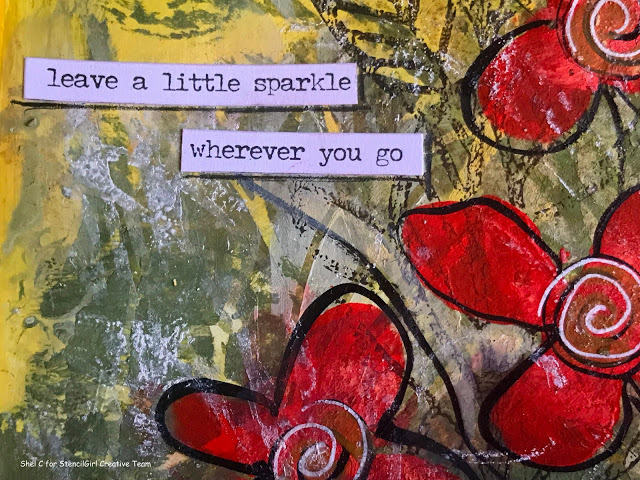
When asked to interpret a theme, I felt pure delight to open an email and find out what the duo of Shel C and Peg Robinson (Art Joy of Sharing) dreamed up using the same stencils.

What Do You Have to Wear to Feel Dressed Today? Shel C had my heart at earrings! If earrings make you feel ready to take on the day, look no further than this post.


One of the best things about looking at art is falling in love with the details, how Peg Robinson was able to make me feel as if the heart was paused between beats by the way she shaded and texturized it in her art journal spread. Check out Passages - Doors to New Experiences.


We Carry You, Natalie May's homage to her grandmother moved me to tears. I love the idea of writing a little story on the back of artwork such as this so when it is handed down it sparks even more memories. Get carried away here.


Whist I adore Geri Beam's fabric and mixed media play, her Circus Tea Cart caused my jaw to hit the floor and stay there for some moments. How she stenciled it is stepped-out right here.


My Pastiche by Wendy Baysa is Wendy doing Wendy and I applaud her! There's a lot of fun to take in as you soar through her art journal spread that gives the viewer permission to grow and isn't that one of the pleasures of art journaling?


Mary Beth Shaw and I give our heartfelt thanks to Sunila, Aditi, Sue, Shel, Peg, Geri, Wendy, Nat, and Linda for always bringing their A-Game. 

You'll see them back as StencilGirl Talk guests!

Happily, you can always find them creating something new on their own platforms. 

Discover Sunila & Aditi Mahajan:

Discover Sue Plumb:
Instagram
Facebook
Blog
YouTube

Discover Peg Robinson: 

Discover Shel: 

Discover Linda Edkins Wyatt:


Discover Geri Beam:

Discover Natalie May:

Tuesday, March 2, 2021

Mixed Media Pastiche - We Honor Each Other

Hello Friends,

Shel Cee writing to you today :)

Our newest challenge from the StencilGirl® Creative Team was to create mixed media pastiche art. Art made in a way that honors another artist. A fun and creative challenge for sure as we are always developing our own style each time we work. And always hoping and wondering if our personal style shows through in what we do. 

Peg and I discussed what we would like to do for this challenge and we decided that since we work as a duo for the team, we would make art pieces that imitated and honored each other. Peg and I have often collaborated in many different ways throughout the years. We have sent each other materials to create with to see what would happen. We have started an art piece and then sent it to the other person to finish. We have done journal pages in round-robin journals. Currently, we do a YouTube livestream show each week as a duo. However, our styles are not the same. We do not use the same color palette or always grab the same favorite tools. We might do the same prompt challenge at the same time on our show, and our pieces come out completely different! We think this is why we work well together. Not exactly opposite, but not exactly the same either. It is more interesting that way!

So, how do you figure out how to duplicate someone else's artistic style while also honoring it? My take on this idea started with thinking about a color palette. Peg and I constantly joke that I do not like brown as much as she does. Concurrently, she does not favor purple and that is my confessed favorite color. So to figure out Peg's color palette was my first thought. I chose colors I know she likes, brown, golds, green, teal, and a bit of shimmery copper. 

Next, I thought about what are her favorite StencilGirl stencils? Well, I actually know that her #1 go to favorite is the Stone and Mortar designs by MaryBeth Shaw. We both have that design in multiple sizes...it's awesome! I also know that Peg enjoys Seth Apter stencils and she is really in love with a recent StencilClub® design by Rae Missigman. So these were the stencil choices I made. 

Next came the thought of what are Peg's favorite tools or products. I knew for sure the gel plate. Who does not LOVE a gel plate. I also thought about alcohol inks and distress inks. Some of her most used products. Lastly, I looked at Peg's Instagram account photos to pick a theme or motif. I noticed she uses lots of natural elements and seems to enjoy drawing leaves and vines. So, my plan was set! And here is what I made in 'Peg style' on a 5X7 canvas panel. I think it fits right in with her art!


S375 - Stone and Mortar, Version 2 by Mary Beth Shaw 

L185 – Unfinished by Seth Apter

StencilClub Sept. 2020 Modern Botanicals by Rae Missigman 


If you would enjoy watching the process of Shel making this art piece:


Without any discussion or planning, Peg started her pastiche piece exactly the same way as Shel did. She wanted to work in a multi-step way and needed to create printed painterly paper to use for collage. Of course, our favorite way to do that is with a Gel Press Plate.


Once Peg has her pile of collage materials, she broke them down a bit and adds them into a box she can rifle through to find just the piece of color and texture she wants to glue down.


Peg says - Shel has a fantastic method for collage so I am going to utilize her method to create a collaged animal image. I don't even know how many journals, tags, and canvases she has created this way but all of them are stunning. She was doing an animal monthly and many of her abstract pieces are also collage.

Don't you love all that yummy texture created by the paint and stencils? So I use these papers to glue to a piece of deli paper that contains my initial sketch. You can male multiple layers because the deli wrap is easy to see through and trace your drawing. I don't spend much time on this but I want it to be the right size for the substrate.


So it is all glued and collaged with layers and final stenciling to create a cute purple kitty. for complete instruction, you can find the video process here:


StencilClubMash-Up June 2020 by Mary Beth Shaw & Valerie Sjodin

StencilClubMash-Up August 2014 by Mary Beth Shaw

Small and Large Triangles S425 by Andrew Borloz

ATCMixup #1 by Mary Beth Shaw L543

ATC Mixup by Mary Nasser L763

SoulfulScribbles Dots and Dashes L605 by Traci Bautista

Boro S705 by Kristin Williams

Sidewalk2 of Puerto Rico S782 by Mary Beth Shaw


I am always fascinated When Shel Cee starts to glue papers down. I am never quite sure where the process is going to take her. Anyway. I can see influences from all three of these artists in this piece. Seth's layering techniques show up in the background while Mary Beth's love of the geometric and stitching play a part too. I hope you give this process a try. It is a lot of fun! 

Thanks for the visit. Peg


Tuesday, January 5, 2021

Let's talk about "stencil masks."

Hi and welcome!

It’s Peg and Shel. We are so glad you found us today! Let's talk about masks.

Shel says, "Rather than thinking about face coverings like we did all of 2020, or making masquerade masks or Mardi Gras masks, or even talking about the figurative masks we all hide behind in our daily lives. Peg and I decided to talk about the definition and unique properties of 'stencil masks'. 

We get LOTS of questions and need for clarifications between what is a stencil vs what is a mask. I like to describe it this way. Think of a stained glass window. The stencil is the black part. The mask is the colors. Inny vs outy. And masks are probably my favorite type of stencil! So I made a quick and easy art journal page using several of my favorite masks from some favorite designers like Trish McKinney, Valerie Sodjin, and Traci Bautista.


Peg is glad you are here because she wants to share a canvas painting she did using Stencil Masks from StencilGirl®. Both Shel and Peg love masks and These are some of the best we have seen.


For the canvas, the masks are all are designed by Trish McKenney and have the look of all things found in nature, intertwining vines and leaves. So beautiful!  

Peg used the large wisteria mask to create the background and filled in with a few dripping moss masks. She followed up with a club set of leaf masks to create the grapevine look. using the leaf masks she then added outlines in white to enhance their visibility on the canvas.


Then several layers of iZink glazes were used to add depth and additional color.

If you don't like the shiny surface that you achieve using the glazes, add matte medium to the surface. I happen to like it on this piece although it make it hard to take pictures. Anyway, it would be fun to try this using different colors and make a seasonal choice in a spring and summer pallet.
Here is a short video shot in the studio while working on this.


StencilGirl® Stencils:

Tangled Beach Grass S660 
Leafy Doodle Verge S714
Scalloped Border Small Mask S644
Deconstructed Chrysanthemum S295
Garden Swirl L147
October 2019 StencilClub - Lacey Leaves
Wisteria Giant Product Code G026
Dripping Spanish Moss Product Code L684
Petals and Ripples Product Code L429
Lacey Spanish Moss S662


Tuesday, November 10, 2020

What Do You Have to Wear to Feel Dressed TODAY?

Hello Stencil Enthusiasts!

It is Peg Robinson and Shel C on the blog today.

Our world is a different place these days. With so much going on outside our homes we wondered...what do YOU need in your daily attire to feel dressed to go outside your house?

One thing that is very new, but very important, is a face covering or mask. So, if you have to wear it why not make it beautiful? With a few great StencilGirl stencils and some paint, you have the tools to make it so! It’s also fun to have a few extras on hand to hand-out to service people who may visit you at home and forgot to bring a mask. Peg will show you what she is talking about.


Peg chose to use spray media for quick and easy results.

To see the whole process here’s a video showing how these were created:


Shel had a different idea of what she needs to feel dressed..or dressed up..before going out these days. Some of you probably need perfect hair or make-up. Others the exactly coordinated outfit, shoes, and purse. For Shel, she really doesn't feel dressed to go outside without jewelry. Yoga pants and a t-shirt with hair in a ponytail is perfectly fine...but no jewelry? No way! So Shel used some stenciled shrink plastic pieces to make these shiny earrings for going out.


Why shrink plastic you may ask? Well, if you LOVE a StencilGirl stencil design but it is just too big to make something like earrings...why not just shrink it??? An important tip when you are trying to use shrink plastic and make it fit into something that is a certain size is to make yourself a measuring tool. Simply mark a strip of your plastic like a ruler with a permanent pen and then shrink it. Now you have a shrunk ruler that you can measure your bezel with and that gives you the proper size to cut your piece to be stenciled.


Another important thought when using shrink plastic is to remember that the color you stencil on is going to get darker and more intense as it shrinks down. So a pretty red color may look black once shrunk. Use pastel colors and they will be darker when done. Pigment-based ink as well as archival dye ink both work well as do alcohol inks.


A finishing touch is some sort of dimensional sealer or resin to make a shiny level coating on the top. I used a common product, Mod Podge Dimensional Magic, to glue the plastic into the earring bezels as well as adding a layer over the top. A few beads added in the right colors to the hooks and my earrings were done!


Watch how Shel C made these earrings in this video.


Stencils used to make earrings:

Words to Live By, L209, Designed by Carolyn Dube 

Small Figures People, S707, Designed by Valerie Sjodin 

ATC Mixup Apter #2, L750, Designed by Seth Apter

StencilClub November 2019 

StencilClub September 2020 

Butterfly Wings of Whimsey, S727 Designed by Jennifer Evans 


Tuesday, October 6, 2020

Botanical Home Decor from Shel C and Peg Robinson


Our StencilGirl® Creative Team challenge for this month was to use our stencils to create something pretty to use in our homes. Shel C decided to repurpose a wall clock from her kitchen into a wonderful showpiece that can still keep time! She used some gel print collage and focal point stenciling with acrylic paint colors in payne's grey, light olive, warm grey, and white.


Peg and Shel agreed to use stencils with a botanical theme for this challenge. Shel picked stencils designed by Rae Missigman such as Botanical Stem (L773) and Botanical Wildflowers (L774) Also chose Longwood Florals Mask (L675)  and Winter Berries Mask (L677) by Cecilia Swatton. For Shel's clock, she used Alpha Jumble Large (L592) by Carolyn Dube for the numbers.


Peg thought of lots of different ideas for her home decor project but ultimately settled on this one: A beautiful wood cutting board with herbs. The stencil she chose was Herbs (L422) designed by Jessica Sporn.


Here are some helpful tips for working with food-safe materials like a wooden cutting board from Peg.

First, let me give you a few facts. Because I plan to work on a wooden surface that is going to be around food, I wanted to make sure that I gave you good information about safety. Here are the 4 main project types you should consider using a food-safe wood finish on:

  • Kitchen utensils (bowls, spoons, platters, etc…)
  • Raw meat prep surfaces (Cutting boards, butcher blocks, etc…)
  • Eat-on surfaces (bar tops, tables, counters, etc…)
  • Children's Toys
With that said I have a few recommendations for your products and finish. First, you will want to consider the paint you use. Milk paint is a good choice. I just googled food-safe paint and found quite a few to select from multiple places including Amazon.

What I think is most important is the sealer and I have several suggestions For you about that too.

Shellac

This is a surface sealing, natural finish that comes from the Lac bug. You can bet it’s safe to consume, they coat candy with it after all. Shellac is a film-forming finish and provides good protection from moisture. It leaves a glossy finish if applied thick enough and buffed out.

Pure Tung Oil

This one actually hardens as it cures and has water-resistant properties. And contrary to popular belief, pure tung oil does not affect those with “nut” allergies.

Food Grade Beeswax

This literally comes from the honeycomb of honey bees. There is a process used to refine it, but once complete, it’s safe for consumption. It’s commonly used to glaze fruit, as well as in the production of gel capsules and chewing gum. Avoid using it on surfaces that will get hot.

Carnauba Wax

This is plant-based, and is considered safe for consumption because it is inert, non-toxic, and cannot be digested by humans. It’s often used for it’s “Shiny” properties and can be mixed with beeswax to add water-resistance.

Food Grade Mineral Oil

This is a non-toxic, non-drying oil that is commonly used on butcher block tables and cutting boards. It must be re-applied as often as monthly and will become brittle and crack if not maintained, so be sure to keep a bottle on hand.

Raw Linseed Oil

This drying oil comes from flax seeds and offers protection from sun and water damage. It’s not refined so it literally goes from seed to container, to your project. It does however take a really long time to dry, as long as a few weeks, and even up to over a month.

Coconut Oil

This is a food-safe finish good for butcher blocks and cutting boards. Be sure to get the “distilled” so it won’t go rancid.
The main difference between penetrating oil finishes, and surface sealer finishes, is probably pretty obvious. The penetrating oils soak down into the wood and stay inside. They provide less protection, but they are easier to apply, and leave a more natural-looking finish.


A surface sealer, also known as a film finish, remains on the surface and leaves a layer that can be built up for added protection. And as you probably expect, it’s more protective than penetrating finishes. If you are highly concerned about toxins in things like wood finishes, then you’ll be much more comfortable using the finishes on the list I’ve provided you above. you can check with your paint center and the FDA for cautions. so with that out of the way let’s work on our project. I have created a video for you so you can see the whole process.


Tuesday, August 4, 2020

Passages, Doors to New Experiences with Shel C and Peg Robinson


When thinking about this month's theme for our StencilGirl Creative Team 'Passages' Peg and I talked at length about the idea of passages through time and into experiences. About how each leap forward in our lives seem to take on a certain framework. We wondered about how we could express these thoughts and ideas using StencilGirl stencils. Then we came up with the idea of using stencils that have doors or window frames. How moving through our experiences is like moving through openings in time. We decided on stencil designs from Pam Carriker and Carolyn Dube.


I made my mixed media collage on a 11X14 canvas flat panel using papers made while gel printing with Pan Pastel and acrylic paint and royalty-free photos that I altered and printed in black and white. 

After collaging on all the various layers of paper made with the stencils, I added the photos on the top. I then finished the piece with pan pastel tinting over the black and white photos and background. 

I also did mark making and blending using various black and white pens and pencils. I added a quote I thought fit the piece perfectly using a white acrylic marker.

To see the process, watch my video here - 


Peg had a great time with this challenge. She created a number of passages, windows, and doors using Stencils from Carolyn Dube, Pam Carriker, and the StencilClub.

First, she created a background on a two-page spread. Then she stenciled the passageways.

By adding products from the distress line and Izinc pigments from Seth Apter she was able to achieve the look she wanted.

Here is a video of the process:


Discover more about Shel & Peg.


Tuesday, June 9, 2020

Typography with StencilGirl® and Art Joy of Sharing Collaboration


Hello and welcome. Thanks for the visit. Today we are talking about Typography.

For this month Shel worked on using kraft colored handled gift bags to create wall art. Of course, they can be used as gift bags as well...but they hang up on the wall so easily with just a thumbtack! 

She used a gel plate to make some monoprints onto thin papers with 'coffee and tea color' paint like Sienna and Umber. She used the stencils Alpha Jumble Large and Letter Mania for the prints. 


Next, she collaged and layered different gel prints into a square on the front of the bag for an interesting and graphic background. 

To create the focal image, Shel used the ordered alphabet half of the Alpha Jumble Large stencil to make words that related to coffee like Latte, Americano, Expresso. She cut out the paper into a coffee shape and glued it over the background. After some shading and highlights with some pens, the piece was done and ready to hang!


Today Peg is working on a journal made from the backside of napkins or serviettes. In this blog post, she is also sharing a stepped-out video tutorial that shows how the cover is created.


Peg says, "I peel off the plain paper and use the pretty prints for collage but do not wish to discard all of that tissue, so I needed a plan to use it up. A bit of topstitching and embellishment and my cover is complete. Then I simply stitch in a signature from stenciled watercolor papers."