Showing posts with label mask. Show all posts

Thursday, December 15, 2022

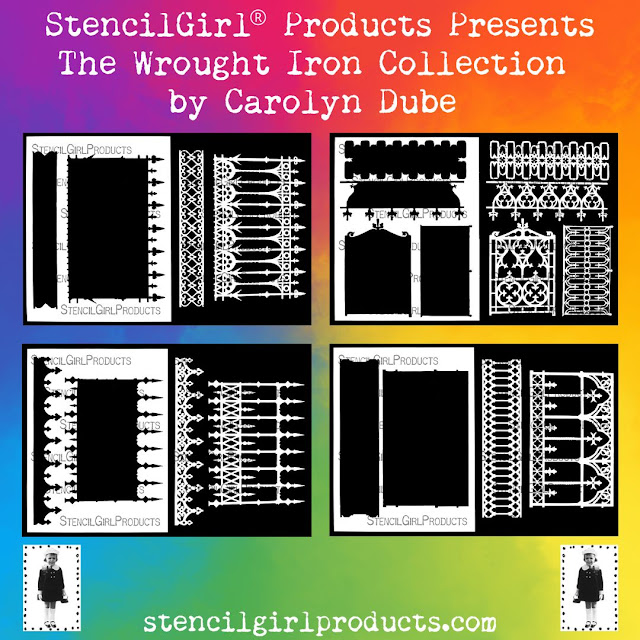
Introducing the Wrought Iron Collection by Carolyn Dube


The Wrought Iron Collection by Carolyn Dube was inspired by the wrought iron of Savanah, Georgia. The moment she saw the artistry of the railings and fences, she wished she could grab some paint and use them to make gel prints. Since that wasn’t possible for so many reasons, she created these stencils so she could create with them!


There is a bit of mystery around the wrought iron of Savannah. According to the tour guide, wrought iron is a lost art because our modern-day skills and technology cannot duplicate the quality and craftsmanship of the 1700 and 1800s!


Use these stencils in your collages, mixed media art, on your gel plate, in an art journal and much, much more!


Carolyn's Stencils are available now at stencilgirlproducts.com

Thursday, December 16, 2021

Get Ready for Bullet Journaling with New Stencils from Valerie Sjodin

Are you making pages in your artistic bullet journals and planners for 2022?

Oh good!

Valerie Sjodin has new stencils and Masks on a Mid Century Modern theme that are perfectly fun for journals, cards, and mixed media art. 


The Mid Century Modern Circle Patterns Stencil and Mask are divine layered or not. Your choice!

They celebrate stars and florals in such a fun way full of possibility! It can add modern pizazz to a plain journal page, be a background pattern, or central focus of a piece of art.


Watercolor on A5 Journal page


Tip: Visit Valerie’s Stencil page to mix and match these stencils with others like the Mid-Century Modern Banners to title your journal pages in a Retro style.

Up next, Bead Swag!


This is a lovely stencil also meant for layering. with itself or other stencils.

Valerie says, "This fun Mid Century Modern Bead Swag Stencil dances across your artwork either simply with the shapes and circles, delicately with the beaded garland, or layered with a stencil of your choice as a pattern underneath. It can also be used to trace around for collage garland."

Medium: Watercolor. Extra stencil used to layer: Spirit Wind, S578

Of course, it is not necessary to layer it. Imagine this elegant pattern on a wedding guest book or used to create invitations. 


Use Circle Sticks as a Mid Century Modern bird nest or stick pattern to decorate your journal page or any artwork. 


There are three chicken wire patterns in the Chicken Wire Mask AND they’re even repeatable patterns so you can cover your art with consistent patterning. 


You can mix and match these with other Mid-Century Modern style stencils and masks on Valerie’s Stencil page.


Thursday, July 23, 2020

Mask Making with Stencils by Laurie Mika

When my four new sets of stencils were recently released, I was originally planning on doing my blog post about how to use these stencils on polymer clay but that post will have to wait for the future! I became obsessed with using my stencils to create masks not only for myself but for friends and family. Not being a seamstress by any stretch of the imagination I knew I would not be sewing masks but still wanted to create some in response to the unprecedented coronavirus pandemic. I have a neighbor who gave me a little stash of the mesh KN95 masks and thought I would try out my stencils on those.

I have outlined the steps that I used to create my masks. The first step is to NOT do what I did in my demo…..I stenciled on my mask when it was upside down!  Make sure to have the area for your nose in the right spot facing up. 
Once you have the proper orientation, it is time to audition which stencil will fit. I chose to use two small sacred heart stencils from my StencilGirl® Mixup Mika Sacred Hearts.

You may want to add a piece of a paper towel or wax paper to the inside of the mask so that paint doesn’t bleed through. I used acrylic paint out of the tube and mixed up a batch using magenta and red/orange paint. It is a bit tricky to stencil on the mesh material, you have to hold the stencil in place with one hand while applying the paint with a make-up wedge in the other hand being careful not to move the stencil.
You will have to use a fair amount of paint and press down hard with the sponge. I like to peek before lifting off the stencil to make sure I have enough paint on it.
Let this side dry before moving onto the other side.

Repeat the same process using a different heart design if desired. I used a crowned heart because the crown has come to symbolize the “corona” in the coronavirus in much of the work I have been doing during the pandemic.
The other thing that I often do is to come back and touch up areas of the stencil that aren’t dark enough and fill them in using a paintbrush. 
Let the stencil dry before moving onto the next step which is filling in the background with color.

I like to do a wash of color to get rid of the white “clinical” look of these masks.
To do this I mixed up a batch of turquoise deep and white paint, I also added just a dab of my favorite Quinacridone Nickel Azo Gold paint….this will turn it into a light greenish color like a patina. Use a paintbrush and water down the paint so that it goes on like a wash. I do leave some white in and around the stencil design showing.
Note that because the paint is watery, it tends to bleed up the elastic bands…but I like that, but if you don’t like that, just don’t add as much water to your paint.

I left the border area around the mask white so that I could further embellish the mask by doing a black and white check border. I did this by using a small flat paintbrush and black acrylic paint. I made sure I had a paper towel in the middle so I didn’t have to worry about the black paint hitting the opposite side.
While I have the black paint ready, I will often go back with a paintbrush and just add a bit of a shadow to outline the heart and give it some dimension.
Let dry.

An optional step to add further interest to your mask is to add text. Make sure the wash of paint in the background is dry!
I used a small set of alphabet stamps and black Staz-On ink and stamped the words Love on one side and Protect on the other.
When I used Staz-On ink to stamp the words, I realized that I could add additional design elements using rubber stamps. Using a small stamp with a floral cross design, I stamped a random pattern and liked the way this looks. 
The Staz-on dries right away, so you can then flip over your mask and finish the opposite side.
I have attached a few other designs for inspiration using my other sets of stencils:
The two stencils on the left and right sides are the larger sacred hearts stencils from my

Much of my work is inspired by Mexican folk art. I love milagros, (miracles) the tiny tin charms used to give thanks for miracles and cures. They are often in the shape of body parts that need healing.  
Here I have used one of my hands from StencilGirl® Milagro.

The other influence that has recently shown up in my work is the imagery associated with alchemy, the Medieval forerunner of chemistry.
I know a few people who do not wear bright colors so I wanted to make a few masks in a more subdued palette and knew the stencils from StencilGirl®Alchemy would be well suited for this purpose.

There are so many possibilities to use stencils and stamps to create your own unique masks. I like that they can be personalized for the special people in your life. Realizing that we will probably be wearing masks for a very long time, it is nice to be able to put your own creative spin onto this new fashion accessory!
Thursday, October 18, 2018

Make art for the holidays or everyday with Musical Backgrounds, Wildflowers, Bells and Ornaments Stencils

What music do flowers make waving in the wild breeze? You can use the new stencils by Jennifer Evans and Valerie Sjodin to stencil your very own answers.

Jennifer's Bells and Ornaments as well as her two floral stencils, and Valerie's musical background stencils are ready for you to make art for the holidays or everyday!


You can make bells ring and ornaments sparkle with the quarters of the Bells and Ornaments Greeting Card Set Stencil designed by Jennifer Evans. 

This 9"x12" stencil is the perfect tool for creating quick and yet complex holiday greeting cards. You can use the silhouette versions of the two designs (bells or ornaments,) to lay down the base color, then use a contrasting color or even a texture paste with the detailed versions of the designs for a lovely layered effect. This stencil is also great for creating borders on scrapbook pages or art journal spreads.


acrylics


watercolors

The Wildflowers 6"x6" and 9"x12" Wildflowers and Grasses stencils by Jennifer Evans is a beautiful row of whimsical wildflowers all lined up and ready to be added to your art journal, scrapbook layouts, or even for use with encaustic paints. You can repeat the design to create a border, mask off areas to use select parts in your work, or use bits and pieces for texture in your mixed media artwork.


watercolors


Musical Backgrounds


Put on your favorite music and express yourself with musical backgrounds that celebrate the meaning and mystery of music in our lives.


Valerie Sjodin designed this Music Score Mask so your notes will stand out in whatever color paper or paint is beneath them. Perfect to cover an entire page or canvas when you want to base your artistic creation on a song.


art journal with Gelatos


Boldly stencil the notes of Valerie's Musical Staff Stencil in traditional black or rejoice in the fact that you are free to make artistic decisions in any and all colors!


art journal with acrylics


Make a note of that with Valerie's Music Notations Stencil. You have so many options with this stencil. It makes a wonderful background stenciled as is or choose the parts that work the best for you. Go for cacophony or harmony and have fun humming along as you create your mixed media canvas, art journal or encaustic work.


art journal with acrylics

art journal with acrylics

Mix the musical backgrounds up and expand your creative options with other StencilGirl® Products music stencils including Musical Roundabout s608 by Sandee Setliff and Nancy Curry's Clef stencils.