Showing posts with label Needle Felting. Show all posts

Wednesday, June 15, 2022

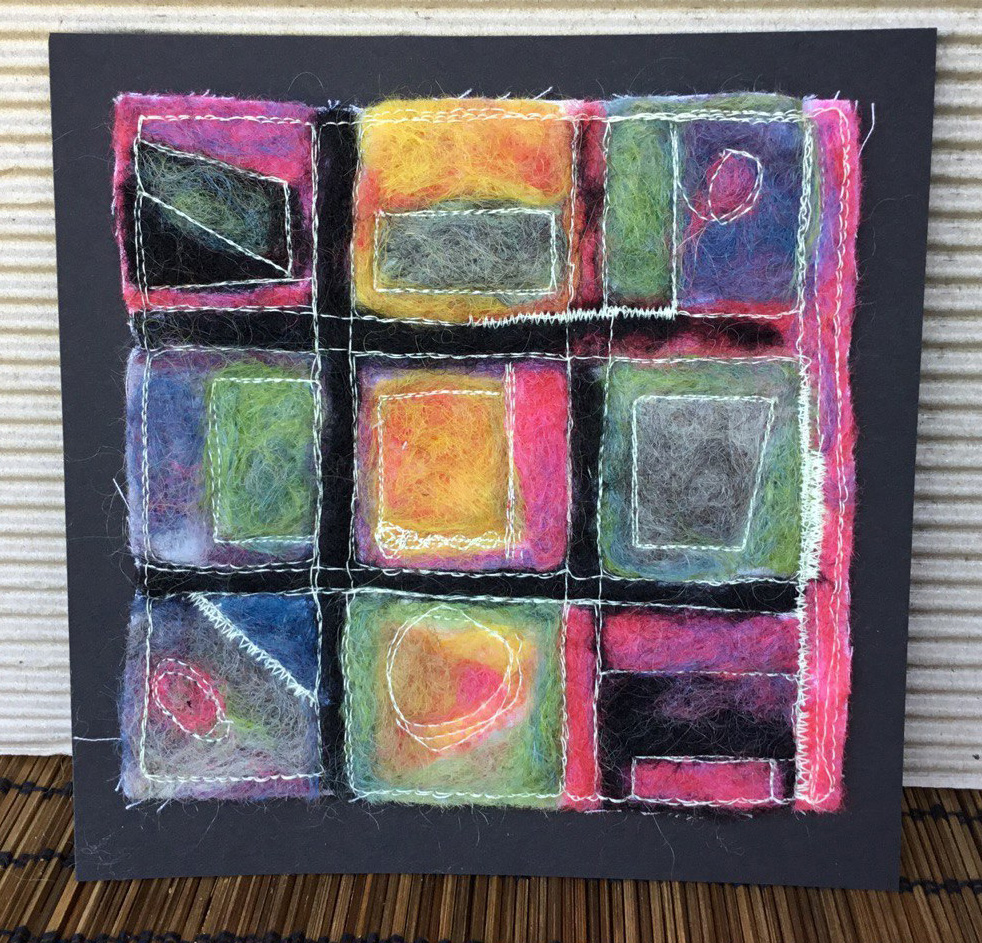
Needle Felted Stencil Design by Cynthia Silveri

Hi, everyone! Cynthia Silveri here! What I love so much about stencils is that they give me a much-needed start to design, no matter what type of craft I’m working at; that blank page or canvas can be so intimidating! In the case of needle felting, I’ve always wanted to explore it, but I always thought of it in three dimensional terms (which is so hard in my opinion). But after seeing other needle felted flatwork pieces, I finally I bought a felting kit and ventured into 2-D needle felting. Of course, I reached for stencils for inspiration—to overcome blank canvas paralysis! These two finished pieces stemmed from stencils as a starting point, a “prompt” if you will, and I really like the end results. I had a lot of fun doing these and I hope you will consider giving it a try!

Materials:

StencilGirl® Stencils (chose simple and/or large shape designs, unless you are very patient!) 
I used my Hi-Rise Window Shades S680 (abstract) and my Prairie Style Window L709 (figurative) stencils.

Canvas or other heavy cloth to felt onto; slightly larger than your stencil
Marker or pencil
Wool roving in various colors
Needle felting needles (size did not matter for this project)
Needle felting “pad”
Sewing machine

Method:

1.     Gather your materials and begin by tracing the stencil design onto the fabric with a marker or pencil. The design will be fully covered with wool, so don’t worry about how dark the tracing is, it won’t show when you are done. I added a few connecting lines to the design to complete the shapes but depending on how you freely you want to work with your design, this is not necessary.


2.     Before you begin felting, also trace the stencil on paper and experiment with colored pencils to define a color palette. Then, using fairly small pieces of wool roving, start working it into each area of the design until the entire piece is covered completely. Mix colors as desired and consider adding colors on top too.


3.     Once you are satisfied with the felting results, take the piece to your sewing machine to add some stitching for depth and, I think, a nice finishing touch. I am not that great at free motion stitching, but I like the way my wobbly stitches look organic. I think that the stitching helps define the design. If you don’t have a free motion foot, you can use a straight or zig zag stitch with a regular machine foot instead. (PICTURE 6 and 7)

Wednesday, June 11, 2014

Stitching in a Art Journal with Stencils


Hi, Maria here today to show you what I did with the EXCLUSIVE June 2014 StencilClub stencils from StencilGirl designed by Jamie Fingal.

Yes, I know that this doesn't look like an art journal...but I wanted to show you TWO things I did with the stencils. This first project is just me needle felting and stitching with these stencils--the perfect theme don't you think! Hopefully, this will turn into a bag or some sort in the future. If you would like to see a video of how I Needle Felt, click HERE.

Okay, now on to my second project!
The day I got these stencils in my hands I was prepping a page for my DLP (Documented Life Project) journal. The prompt or challenge for that week was stitch in your journal. I said PERFECT
This is what I did.
I took a small piece of deli paper and traced the stencil and started stitching. Deli paper is so much stronger than you think it is.
I used both blue and gold (the colors of my daughters High School) and when I was done I "glued" it into my journal with Matt Medium. The photo on the left shows it wet and the photo on the right when dry.
Now I had the perfect start to my layout for the week!
How did it turn out? 
I think great!
I also used the new Nature Notes stencil designed by Roxanne Evans Stout for the bird.

As you can see, there are SO many possibilities with these stencils! 

Are you a member of StencilClub
Why not join us? You can join right here on the blog on the right hand side or if you would like more information, just click HERE.

Tuesday, February 4, 2014

Art Quilt with February StencilClub Release


Hi Everyone! Maria here...
Boy oh BOY...did I LOVE using the February 2014 StencilClub release designed by Mary Beth Shaw from StencilGirl! Not only are they incredible stencils for paintings on canvas, art journaling and papercrafting I was immediately inspired to do dome needle felting and stitching!

Here are what the stencils look like:


Let me give you a little peek into my process with them:

I started on a piece of 100% wool felt and used a kitchen cereal bowl to draw circles with a Stabilio white pencil.


Then came the stenciling part. I used gesso and a cosmetic sponge to put each of the images within the circles. Not much gesso is needed--just a little dab.


Then I began my needle felting. It is almost a little weird how much I enjoy needle felting. It is VERY relaxing to me. It is a very inexpensive way to make me smile!


Here is a video (that I have posted here before) on needle felting basics.
If you can't see the video click HERE.


So...that is where it all began. Needle felting....stitching....more stitching = Art Quilt. I have a feeling this will turn into something else at some point, but for now it makes me HAPPY!

Here are some close-up shots for you. 
If you would like to join our family of StencilClub Members we would LOVE to have you!
What better than 3 EXCLUSIVE stencils 
automatically arriving in your mailbox every month! 
One of my favorite parts of the club is our Secret Facebook Group that is a benefit of the club. So many people sharing, inspiring and encouraging each other. Just to see how each person interprets the stencils so differently each month is so exciting to me.
You can see all of the benefits of StencilClub HERE.


Thursday, November 7, 2013

StencilGirl StencilClub November 2013 Inspiration!


Maria here today to show you what I did with the EXCLUSIVE November 2013 StencilClub stencils designed by Joanne Sharpe!

Joanne's artwork is so free and loose--I LOVE it! I decided to use the 6" x 6" stencil and make an embroidered patch for a project I'm working on.


I started out with a piece of 100% wool and used acrylic paint to give me guides.


Then the stitching began! 
I used a satin stitch and an outline stitch to go over everything I had stenciled on the wool. I love to stitch on wool. For some reason it seems to go faster to me :)


After the stitching was done (it went very quickly) I started needle felting.


I thought I'd add my needle felting video I did a while back here for you again to see how really quick and easy it is.


I hope this showed you how quick and easy you can have a embroidered patch to add to your next project!

Want to learn more about StencilClub so you too can have these FUN stencils?? Y
ou can find out all about it on our NEW WEBSITE

Remember StencilClub stencils are only available to members and will never be sold on our website to the general public.

Ready to sign up and join us every month? You can subscribe right here on our blog at the top on the right hand side.

Only a few days left and then we will be moving on to the December stencils!!!!


Thursday, August 8, 2013

Needle Felting Video Tutorial and a StencilClub Giveaway


Good Morning StencilGirl Fans!
Maria here...
A Tutorial, a GIVEAWAY! It is a good day!
Today I wanted to show you a little bit about how I made my journal the other day with our EXCLUSIVE StencilClub stencils for August designed by Mary Beth Shaw
These are the PERFECT stencils for this technique!


For the journal I started out with a piece of Duck Cloth I purchased at the fabric store. 
No measuring, I just cut and folded it around the journal to make a "jacket".


Then I cut two 1" long strips of black duck cloth the length of the white jacket and ironed them in half.


I used FabriTac (just a little) to tack the black binding in place until I had time to do the embroidery. Then I traced the stencil onto the cloth with a pencil. Don't worry you will not see it later.


Then I started felting as I showed you in the video. This is really a fun project that anyone can do! After all my needle felting was done, I did a "wonky" blanket stitch over the black binding.  This formed pockets for me to insert my journal into.


Ready to find out about the GIVEAWAY??
There was a GIVEAWAY on the StencilClub Reveal the other day you might have missed! 
We are giving away a set of the July 2013 StencilClub Loose Woman stencils 
by Sue Pelletier away to one lucky winner. 
Do you have to join StencilClub
No, but we sure would jump up and down if you did! 
We think you would too! 
What better than have exclusive stencils automatically show up at your door every month!
What do you have to do to be eligible to win the stencils? 
Go back and comment on 
and you will be entered to win!!!
Good Luck and hope to see you in StencilClub!
You can find more information about StencilClub in the comment post or on our website.
Sign-up for this month's StencilClub closes on August 12!

Before you leave to enter the giveaway...I would love if you also left me a comment here too and told me what unique ways YOU have used stencils.