Showing posts with label PaperArtsy. Show all posts

Wednesday, December 6, 2023

Carol Ponsford - December 2023 StencilClub - PaperArtsy Infusions with stencils


Hello stencil lovers! Carol Ponsford here today to share one way to use 
PaperArtsy Infusions with your stencils. I will be using my gel plate along with the 
December 2023 StencilClub set "Faraway Gardens" designed by the talented 
Rae Missigman. Rae's stencils lend themselves so well with this technique to achieve some 
beautiful papers you can use in your journals, as collage papers, or the perfect
backdrop to add a sentiment to for a greeting card anyone would cherish.

I have created a video that you can watch and follow along to create some of these
beautiful papers for your own use. Just click the link below to go to the video.

https://youtu.be/6L5_Pe0W50M


The supplies I am using are my 8" x 10" gel plate, a brayer, several colors of 

PaperArtsy Infusions, 4 sheets of watercolor paper, spray bottle filled w/water, a couple 

sheets of deli paper or thin copy paper to pick up excess color on plate, and a roll of paper towels.


To begin, I laid the stencil onto my gel plate and pressed it down to create good contact 

with the plate to prevent the color from seeping under the stencil too much.


I then began sprinkling the Infusion colors on top. Start with a small amount 
because these powders are very highly pigmented and it is easy 
to put too much pigment, you can always add more if you choose.


Once you are happy with the amount of pigment on the plate, spritz the whole thing 
with water until it is lightly moistened (hint: spray the water from a 
distance so that the water is evenly applied). You want enough water to activate 
the pigments but not so much to cause it to run heavily when you lift it off of the plate.

You can spray again after the stencil is removed. Before removing the stencil, set a blank sheet of

watercolor paper to the side of the plate and spritz an even coat of water on the paper.


Gently lift the stencil off of the plate and lay upside down on the moistened

 paper. This will allow the reverse image to be printed on this sheet. 

Leave the stencil on the paper while you pull the print off of the plate.


Lay a second sheet of watercolor paper on the gel plate to pick up the remaining pigment.


While this doesn't show the pattern of the stencil, it turns out to be a beautiful 

vivid paper to add other elements onto. You could even roll acrylic paint on 

the gel plate, lay the stencil back down on top of the acrylic and pull a print leaving 

the background in the spaces where the stencil is a solid image.


Using a thin piece of paper, I laid it on the plate and soaked up the remaining color.

I will use this as collage paper of add other images on top of this.


Before removing the stencil from the other paper, I use a paper towel 

roll and rolled it over the stencil to pick up and water remaining. This will help keep the 

image crisp and keep the pigment from bleeding into the white area.


If you want the pigment to spread a little more after you pick up the stencil you can 

lightly mist it again with water remembering that the color may spread into the white areas 

so be sure to use a light mist, let it do it's work, and then add more in small increments.


The two images above were done with the same technique using the second stencil 
from the set. This had a floral pattern so as I sprinkled the pigment on, 
I tried to place colors in a more specific areas to get the flowers pink and leaves green, etc.


Thank you for joining me today and I hope you enjoy trying this technique.

I look forward to sharing projects with you in the future on the StencilGirl® blog.

Thank you StencilGirl® Products for providing me with this free StencilClub set so 

that I could play in advance and share what I create each month with you.


Join StencilClub by December 15th to receive these exclusive stencils, an accompanying 

video tutorial with PDF (both downloadable!), and 25% OFF STENCILS EVERY DAY!!


Happy Creating!


D6859F19-84FC-4D41-9C31-F614553BCBAD_1_201_a.heic.jpg


To see more of my work please visit my Instagram page.


Sunday, October 17, 2021

5 Step Collage Fodder... With Stencils!


Hi all! It's Gwen back this month with another installment of my Paint & Texture column. 

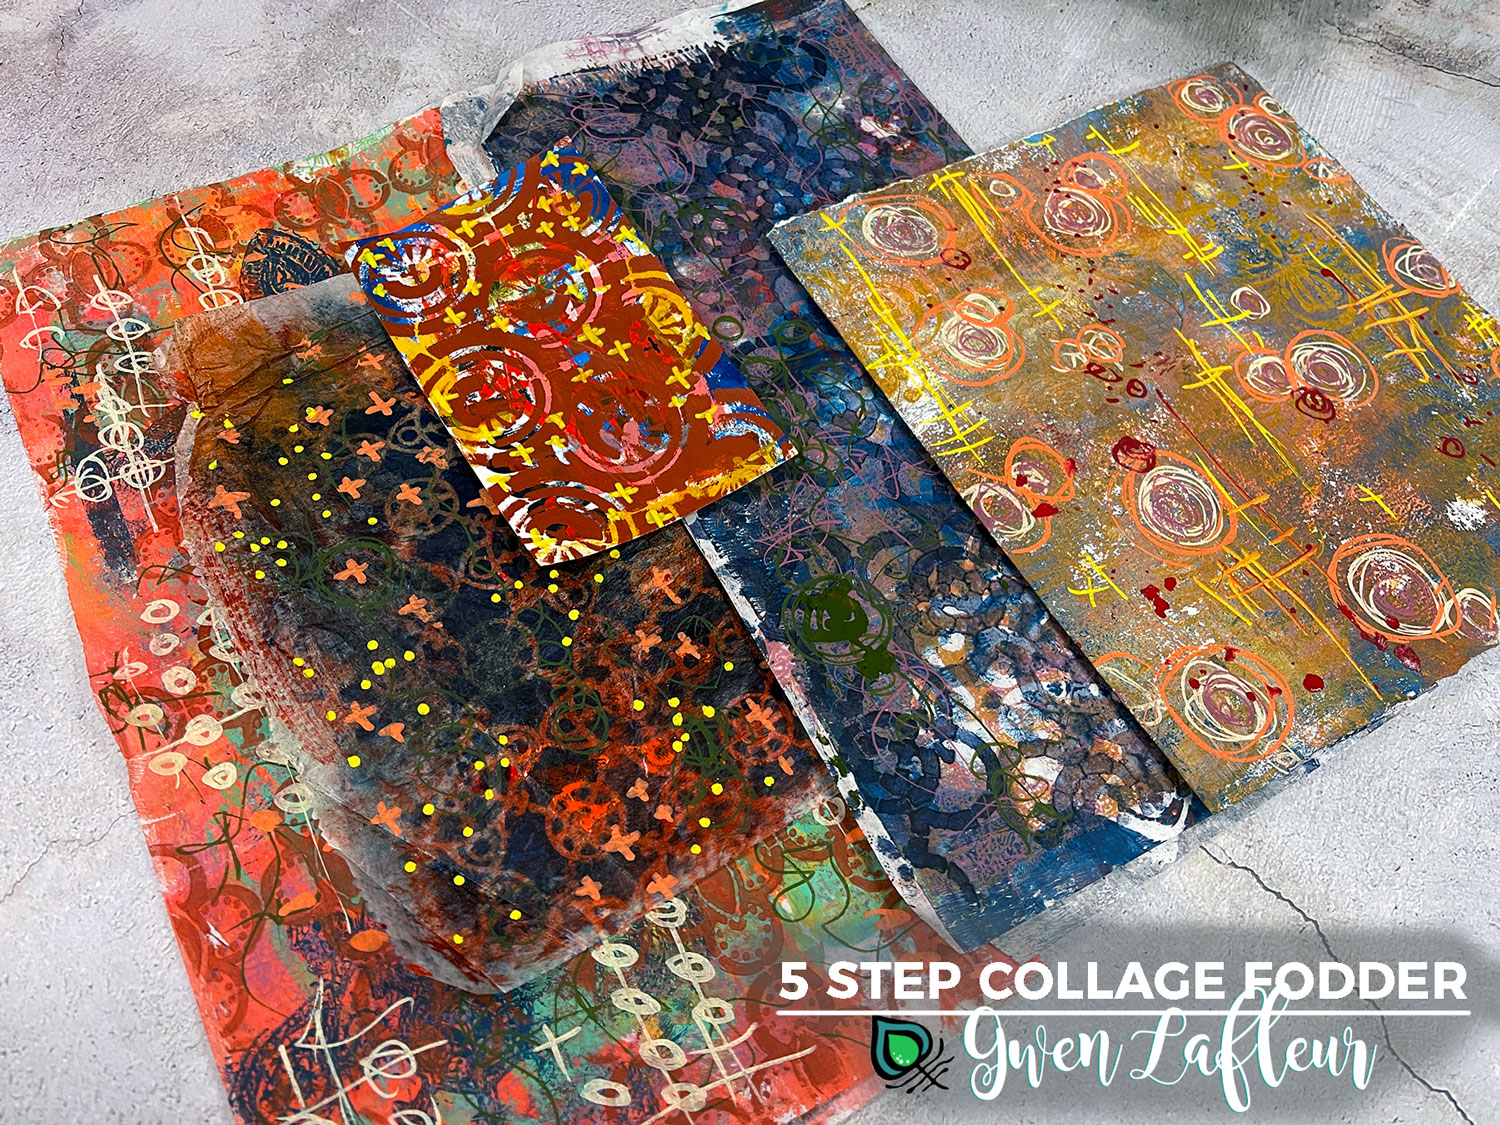
DIY collage fodder has been all the buzz on Instagram lately, so I thought it would be fun to add another technique into the mix and share Five Steps to Collage Fodder... with stencils!

5-Step Collage Fodder with Stencils - Tutorial by Gwen Lafleur

I know that a lot of us, which definitely includes me, have piles of papers that we can't bear to throw away but haven't found a use for. They're either too busy or not the right color or, I'll just own it, downright ugly. 

5-Step Collage Fodder - Pile of Scrap Papers - Gwen Lafleur

To start my tutorial for today's post, I browsed through my pile of less-than-pretty collage and background papers as well as a few failed gelli prints and pulled out a few of them to turn into collage fodder. With those selected, it was just 5 easy steps to a great collage! Ready to see how it came together?

Step 1. Tame & Tone

5-Step Collage Fodder - Step 1 Tame and Tone - Gwen Lafleur

The first of the five steps in this process is what I call "Tame & Tone." For this, I took a dark, opaque color of acrylic paint and a nice all-over stencil pattern to tone down the color and tame the crazy. In the image above, I used my Collage Textures & Patterns, Circles stencil and you can see on the left where I also used the 6x6 from Jill McDowell's December 2000 Block Prints StencilClub collection.

Step 2. Make Your Mark

5-Step Collage Fodder - Step 2 Make Your Mark - Gwen Lafleur

For the next layer I added some marks. For this step I pulled out my trusty Posca paint markers, but you can use whatever you'd like or use your favorite mark-making stencils for this step.

Below you can see all five of the pieces I worked on here and how just the first two steps have already transformed them quite a bit!

(Here you can see three more of the stencils I used in step 1, including my Decorative Flower Stamen Medallion, Ornamental Compass Screen, and Ornamental Circle Cluster Screen stencils.

5-Step Collage Fodder - Step 2 Make Your Mark Samples - Gwen Lafleur

Step 3: Lighten & Brighten

5-Step Collage Fodder - Step 3 Lighten & Brighten - Gwen Lafleur

Step three is a bit of a cheat since it's kind of two steps in one, but whether you do one, the other, or both is up to you. Here I used a color tint (Titan Mars Pale in the sample above) with a smaller scale all-over pattern and then stenciled with white in the top layer to lighten and brighten the papers. This also pushes some of the busyness of the previous layers into the background.

Below you can see the result of this step on all five papers. Additional stencils used on this step include the 4x4 from my February 2021 Feathered Tribe StencilClub collection as well as part of the 9x12 from my December 2016 Heraldry set. I also used the Patterned Circles and X Rows stencils by Michelle Ward.

5-Step Collage Fodder - Step 3 Lighten & Brighten Samples - Gwen Lafleur


Step 4: Cut it Out

5-Step Collage Fodder - Step 4 Cut it Out - Gwen Lafleur

These papers are still quite busy, but that changes when you cut them into smaller pieces. If you have shapes that are go-to elements, that's a great place to start. I know that I will always use circles, squares, and leaf shapes, so I cut out several of each of those.

5-Step Collage Fodder - Step 4A Cut it Out w/ a Stencil - Gwen Lafleur

If you aren't so keen on just freehand cutting into your collage papers or if you want a bit of a different shape, you can pull your stencils back out again. Above you can see where I used my Ornamental Circle Clusters Screen stencil to trace the outline of the base shape on the back of one of my collage papers and then cut it out.

Here you can see the shapes I cut from all five sheets (and I also have some paper leftover to use later.)

5-Step Collage Fodder - Step 4 Samples - Gwen Lafleur

Step 5: Collage It!

5-Step Collage Fodder - Step 5 Collage It - Gwen Lafleur

The last step... collage it! Pull out the glue or matte medium or whatever you want to use and collage your new bits and pieces into your work. Above you can see that I painted rectangles on some Canson drawing paper and then collaged all or half of my petal shaped pieces into the center of each rectangle and then colored and smudged around them with some of my handmade art crayons. 

On the rectangles with the half petals, I took some of my stenciled cut-out shapes and cut those in half and added them on the other side to create some visual interest. 

5-Step Collage Fodder - Step 5 Collage Sample - Gwen Lafleur

When I first started working on the painted rectangles, I'd envisioned that as the final piece. But once I collaged the pieces on and then stepped back, it just called out to me to cut them into individual rectangles... so I did! Sometimes collaging the collage fodder just makes more fodder. lol. 

I pulled out some stamped and colored images from my EGL19 Build-A-Collage, Birds stamp set with PaperArtsy and layered them on top, then added a few marks and adhered it onto a previously completed background in one of my mini art journals. I finished the page with a fun little clip and some washi tape.

5-Step Collage Fodder - Final Art Journal Page - Gwen Lafleur

So just that quickly and easily, I have a completed art journal page, five more fun collage pieces, more fodder shapes that are cut and ready, AND some more paper ready to cut into new shapes.

5-Step Collage Fodder - Final Page with Extras - Gwen Lafleur

So that's it! I hope you enjoyed today's tutorial and that you have fun making your own 5-Step Collage Fodder to use in your projects.

Until next time, happy stenciling!
Gwen Lafleur Headshot


Sunday, July 18, 2021

Printmaking with Stencils


Hello all! It's Gwen back again with another project tutorial focusing on paint and texture. This month I wanted to share a quick and easy way to create a layered mixed media piece by doing some printmaking with several of my stencil designs and a gelatin plate.

Printmaking with Stencils - Mixed Media Project - Gwen Lafleur

To start, I took a piece of 9" x 9" watercolor paper (140lb / 300 gsm) and covered the background with two colors of PaperArtsy Fresco Acrylic Paint (Twilight and Azure,) let it dry, and then stenciled layered patterns from three of my stencils using ink and a blender brush. 

I started with my Collage Textures & Patterns - Medieval Cyrillic stencil (with Cobalt Archival Ink,) then added sections of one of the designs from my Art Deco Borders stencil (Sepia Archival Ink,) and in the top layer I repeated my Suzani Circle Flowers stencil (Jet Black Archival Ink.) 

I was just looking for layers of pattern to create a sense of texture since this was just going to be the background and a lot would get covered up. 

Printmaking with Stencils - Tutorial Step 1 - Gwen Lafleur

Now for the printmaking part... you can do this with a stencil, but for the effect I wanted on this piece I chose to use a mask (you paint or ink around the design rather than through it.) 

I pulled out my Ornamental Peacock mask and positioned it where I wanted the shape to show up on my piece and then used my brayer to coat an 8" round gelatin plate with paint (I used PaperArtsy Fresco Acrylic Paint in Truffle.) I left one of the acetate sheets on the plate to use as kind of a stamp mount for printing.

Printmaking with Stencils - Tutorial Step 2 - Gwen Lafleur

With the paint still wet I quickly but carefully flipped the gelatin plate upside down (holding the acetate as much as possible to keep my fingers out of the paint,) and laid it down over my mask centered on the page. I rubbed firmly all over to make sure the plate completely printed before carefully peeling it back off.

Printmaking with Stencils - Tutorial Step 3 - Gwen Lafleur

I stamped the gelatin plate again on a piece of black cardstock (why waste the paint?) and got a bit of a peacock design that I can use later in another piece and then lifted my peacock mask off of the background. (If you do that quickly enough and the paint is still wet, you can print that too.)

If you have any details that didn't completely print (like the wing on my peacock,) you can always replace the mask and go back over the details with more paint and a stencil brush or sponge.

Printmaking with Stencils - Tutorial Step 3A - Gwen Lafleur

When my print was dry, I pulled out my Chinese Garden Buddha stencil, my Palmistry Hand stencil, and the 4" x 4" from my February 2021 StencilClub Feathered Tribe set and added some marks onto the printed circle.

Printmaking with Stencils - Tutorial Step 4 - Gwen Lafleur

For the final details I took one of the designs from my EGL-10 stamp set from PaperArtsy (I call this my Japanese Patterns set,) and stamped a bit of a cruciform pattern to fill in and anchor the design and then used a pen and colored pencil to outline and add a few more details. 

Last but not least, I edged the borders with brown and black ink to frame and finish the piece. 

Printmaking with Stencils - Tutorial Step 5 - Gwen Lafleur

I really love the deceptive simplicity of this project - it's quick and easy, but the layers and details made with a few basic tools and supplies make it look a lot more complicated than it actually is... one of my favorite types of projects!

Printmaking with Stencils - Mixed Media Project Closeup - Gwen Lafleur

Here's another peek at the finished project... you could follow the same process on a canvas or panel, in an art journal, or even on a handmade card or tag just using different sizes of gelatin plates and masks. 

Printmaking with Stencils - Mixed Media Project - Gwen Lafleur

Hopefully you enjoyed today's project and tutorial as much as I did! And if you try this yourself, make sure to link me up so I can see how it turns out.

Until next time, happy stenciling!
Photo of Gwen Lafleur


Sunday, January 17, 2021

Textural Art Journaling with Stencils


Hi all, it's Gwen with a new project and tutorial featuring different ways to use paint and texture with stencils in your work. This month I've created a heavily textured background using found fibers from around the house to create a background that's the perfect place to insert little nuggets of stenciling, journaling, and embellishments.

Textural Art Journaling Tutorial - Gwen Lafleur

Ready to get started?

For my first step, I prepared some uncoated tissue paper by stenciling all over first with my Collage Textures and Patterns - Medieval Cyrillic stencil and then with my new Suzani Flower Medallion stencil. I followed up by stamping a few of the coordinating images from my EGL12 stamp set with PaperArtsy to add a bit more detail. I used Archival Ink for both because you want it to be permanent and I wanted something quick-drying. (Other inks will work - just be sure to let dye inks dry completely and I recommend heat setting pigment ink so it doesn't smear later.)

While I used uncoated tissue paper, you can use other thin papers... uncoated will collage best, but regular tissue paper is fine and I also frequently use rice paper or thin mulberry paper for this type of work. For a different look you could also try deli paper or another thin paper, but the texture and appearance will vary.

Textural Art Journaling with Stencils - Tutorial Step 1 - Gwen Lafleur

Now to start on the background...

I picked a blank page in my art journal (my paper was dark gray) and then put down a quick coat of paint - I used PaperArtsy paint, but you can use other brands or a colored gesso or skip it altogether if you just want the tone from the substrate. You could also use this technique out of your journal on paper, canvas, a panel, etc...

To create the basis of my texture, I took scrap pieces of hemp twine and adhered them onto the background in a grid with a few large circular openings using Tacky Glue - you can see a peek of how that looked below. You could also use string or a thick yarn or other, similar fibers. I like the hemp because it gives me very obvious texture without being too bulky - this added a depth of just under 1/8." 

When the twine grid was dry, I took my stenciled and stamped tissue paper and collaged it onto the background with matte medium. As you can see here, I crinkled up the sheets so that it wasn't perfectly straight so that I could mix up the background pattern a bit and work in some more texture.

Textural Art Journaling with Stencils - Tutorial Step 2 - Gwen Lafleur

As I went over the top of the tissue paper during the collage process, I made sure to really work my brush into the seam along the hemp to make sure that the paper got down in there and created nice, clean square wells. (This is why it's important to make sure the glue is dry on your fibers so that it doesn't move them around while you collage.)

Textural Art Journaling with Stencils - Tutorial Step 3 - Gwen Lafleur

At this point I let the collage dry completely and then came back in to start adding color and images into the different openings of my grid. First, I used some ShinHan water soluble metallic pigment powder along with painting glue to put some gold accents in some of the squares. You can also use metallic paint or a paint pen for a similar effect or skip metallics completely if that's not your thing.

Textural Art Journaling with Stencils - Tutorial Step 4 - Gwen Lafleur

Next I used just a touch of gouache paint (which is a kind of watercolor but generally more opaque) and put just a bit of pure color straight from the tube into the corner of one of my squares and then spread it out to fill the whole area by getting my brush damp, but not soaking wet. I continued to spread and thin it out until I liked how it looked. You could use acrylic paint as well (regular consistency or thinned with water,) but I like gouache because you get vibrant color and a bit of opacity but you still have the translucency of watercolor, allowing the patterns from the background to show through.

I continued to add different colors until I felt like I had a balanced mix of hues and I liked the way they filled out the grid. I didn't fill all of the spaces, but you could certainly do so if you wanted to.

Textural Art Journaling with Stencils - Tutorial Step 5 - Gwen Lafleur

I built a few large circular openings into the background thinking that first, the circle would be a fantastic contrast with the grid and that second, it would create some great larger openings where I could put in some focal images. I did this using my new Boho Daisy Mini stencil. 

I continued to add some more stenciled imagery into the smaller openings using my Suzani Circle Flowers and Suzani Circle Medallion stencils (and I only used one of the Circle Flowers and the center of the medallion stencil - I love using just bits and pieces of stencil designs in situations such as this.)

Textural Art Journaling with Stencils - Tutorial Step 6 - Gwen Lafleur

With all of the basic components of the page in place, it was time to start adding details and creating a bit more depth. I put a few pieces of collage into the circular areas, including some scraps of papers that were stamped with some more of my PaperArtsy stamp designs to create centers for the flowers.

I also took a black Stabilo All pencil and a water brush and used them to create some shadows that emphasized the texture of my background. (The Stabilo All is a must-have for me - it's a water soluble pencil that dries permanent, so it's great for creating quick and easy shading in your work.)

Textural Art Journaling with Stencils - Tutorial Step 7 - Gwen Lafleur

I love to add writing to my art journal pages (even if you can't read it,) both because I like the process of freeing thoughts and feelings in the moment to become a part of my page and because I love the look of text as a design element. In this case I wrote illegibly - I got the catharsis of writing what I was feeling at the time but the look of asemic writing. (And if you're curious, that's an Easterbrook fountain pen with some red ink - it's a dye ink so I new it wouldn't be permanent in the next steps, but I'm okay with that - I like the look.)

Textural Art Journaling with Stencils - Tutorial Step 8 - Gwen Lafleur

Next I pulled out a few pieces of scrap paper - in this case collage papers left over from other projects. These particular papers were made with deli paper and various marks with my stamp and stencil designs. I tore out a few small pieces to add into the background for a bit more visual interest and color. I just adhered with an Avery glue stick.

Textural Art Journaling with Stencils - Tutorial Step 9 - Gwen Lafleur

I wanted to highlight the texture on this page just a bit more, so I got out some gold wax just used my finger to lightly rub it across the raised surface of my grid and the circular openings. I love the effect that created and how perfectly it brings out the dimension and ties in with the metallic powder I used in some of the squares.

Textural Art Journaling with Stencils - Tutorial Step 10 - Gwen Lafleur

Finally, I wanted to turn those circular openings and a few of the smaller squares into windows. To do that, I made sure the page itself was resting at a flat level and then took some Judikins Diamond Glaze and filled each of the selected openings to the brim, using a toothpick to try and pop any bubbles (if you don't, they'll dry that way.) 

This is basically a clear glaze (very similar to Ranger Glossy Accents which also works great here) and it contracts as it dries and the water evaporates out of it, so I poured the openings as full as I could without overflowing so that the final coat is still nice and thick. I set it aside to dry for 12-24 hours. Once it was dry, I bent the pages to crack the glaze and get some nice subtle lines in the windows. It's hard to see the impact of this in the photos, but the camera picked up a bit of the glare so you can see what a nice contrast it creates with the other elements on the page.

Textural Art Journaling with Stencils - Tutorial Step 11 - Gwen Lafleur

That's it! Here are a few more photos so that you can better see the dimension and how everything plays together on the finished art journal page.

Textural Art Journaling with Stencils - Closeup 1 - Gwen Lafleur

Textural Art Journaling with Stencils - Closeup 2 - Gwen Lafleur

And here's the finished page again so that you can see it all together:

Textural Art Journaling with Stencils - Tutorial by Gwen Lafleur

So there you go! I hope you enjoyed today's project and tutorial - I certainly had a lot of fun coming up with this one and putting it all together for you. Make sure to link me up if you try this at home so that I can see how it came out... this is one of my favorite paint and texture tutorials so far and I'm sure you're going to love it just as much if you give it a try.

Until next time, happy stenciling!
Gwen Lafleur