Showing posts with label TAP Transfer Artist Paper. Show all posts

Friday, December 18, 2020

Homage to Emily by Lesley Riley

I’ve been transferring photos to fabric since 1999. I’m particularly in love with early photos, like tintypes, ambrotypes and daguerreotypes. I call my fabric collages, Fragments, and consider them to be color studies and story sketches. I guess I’m a storyteller at heart and fabric is my medium.

This past year, I’ve done several projects using one of my favorite photos of the poet Emily Dickinson. Poets are writers and I have a StencilGirl® stencil with writing instruments on it, so off I went to create yet another homage to Emily.

I chose to do my stenciling on TAP Transfer Artist Paper, an iron-on transfer paper that I brought to the market about 10 years ago. “Why transfer a stencil?” you may be asking? Inks can bleed into fabric, giving the stencil a fuzzy edge. By stenciling onto TAP and ironing that onto fabric, I get a nice sharp edge.

Using the pen with nib from my Pen and Ink stencil, I taped paper over the two adjacent brushes so I wouldn’t have any accidents. But I did in spite of my carefulness! I was about 1/2 way through when I got a phone call. When I picked up the stencil to resume, I laid down the wrong, inky side. Yikes! Looking for the positive in the situation, I decided it made the stenciled image look like a block print. I knew I was going to be layering Emily’s photo on top as well, so I finished up my stenciled background and transferred the page to a vintage textile from my stash.

I transferred my photo of Emily to a pale blue polka dot fabric to give it added interest and spiced up the image background with my 6” Night Sky stencil. The stars looked like daisies to me, so I added dimensional gold paint to the centers to complete the look. Based on her poem, The daisy follows soft the sun, I know Emily would approve of the daisy wallpaper.

The daisy follows soft the sun,
And when his golden walk is done,
Sits shyly at his feet.
He, waking, finds the flower near.
"Wherefore, marauder, art thou here?"
"Because, sir, love is sweet!"
We are the flower, Thou the sun!
Forgive us, if as days decline,
We nearer steal to Thee, —
Enamoured of the parting west,
The peace, the flight, the amethyst,
Night's possibility!

A writer needs her ink, so using the ink bottle stencil from Pen and Ink and my Derwent Inktense blocks, I painted the ink bottle onto a piece of the vintage fabric, wetting the Inktense block with a wet brush to a creamy consistency. After it dried, I applied iron-on fusible, cut it out and fused it onto the fabric collage. Everything was machine-stitched in place. I couldn’t resisted hand-stitching a real pen nib onto the collage.

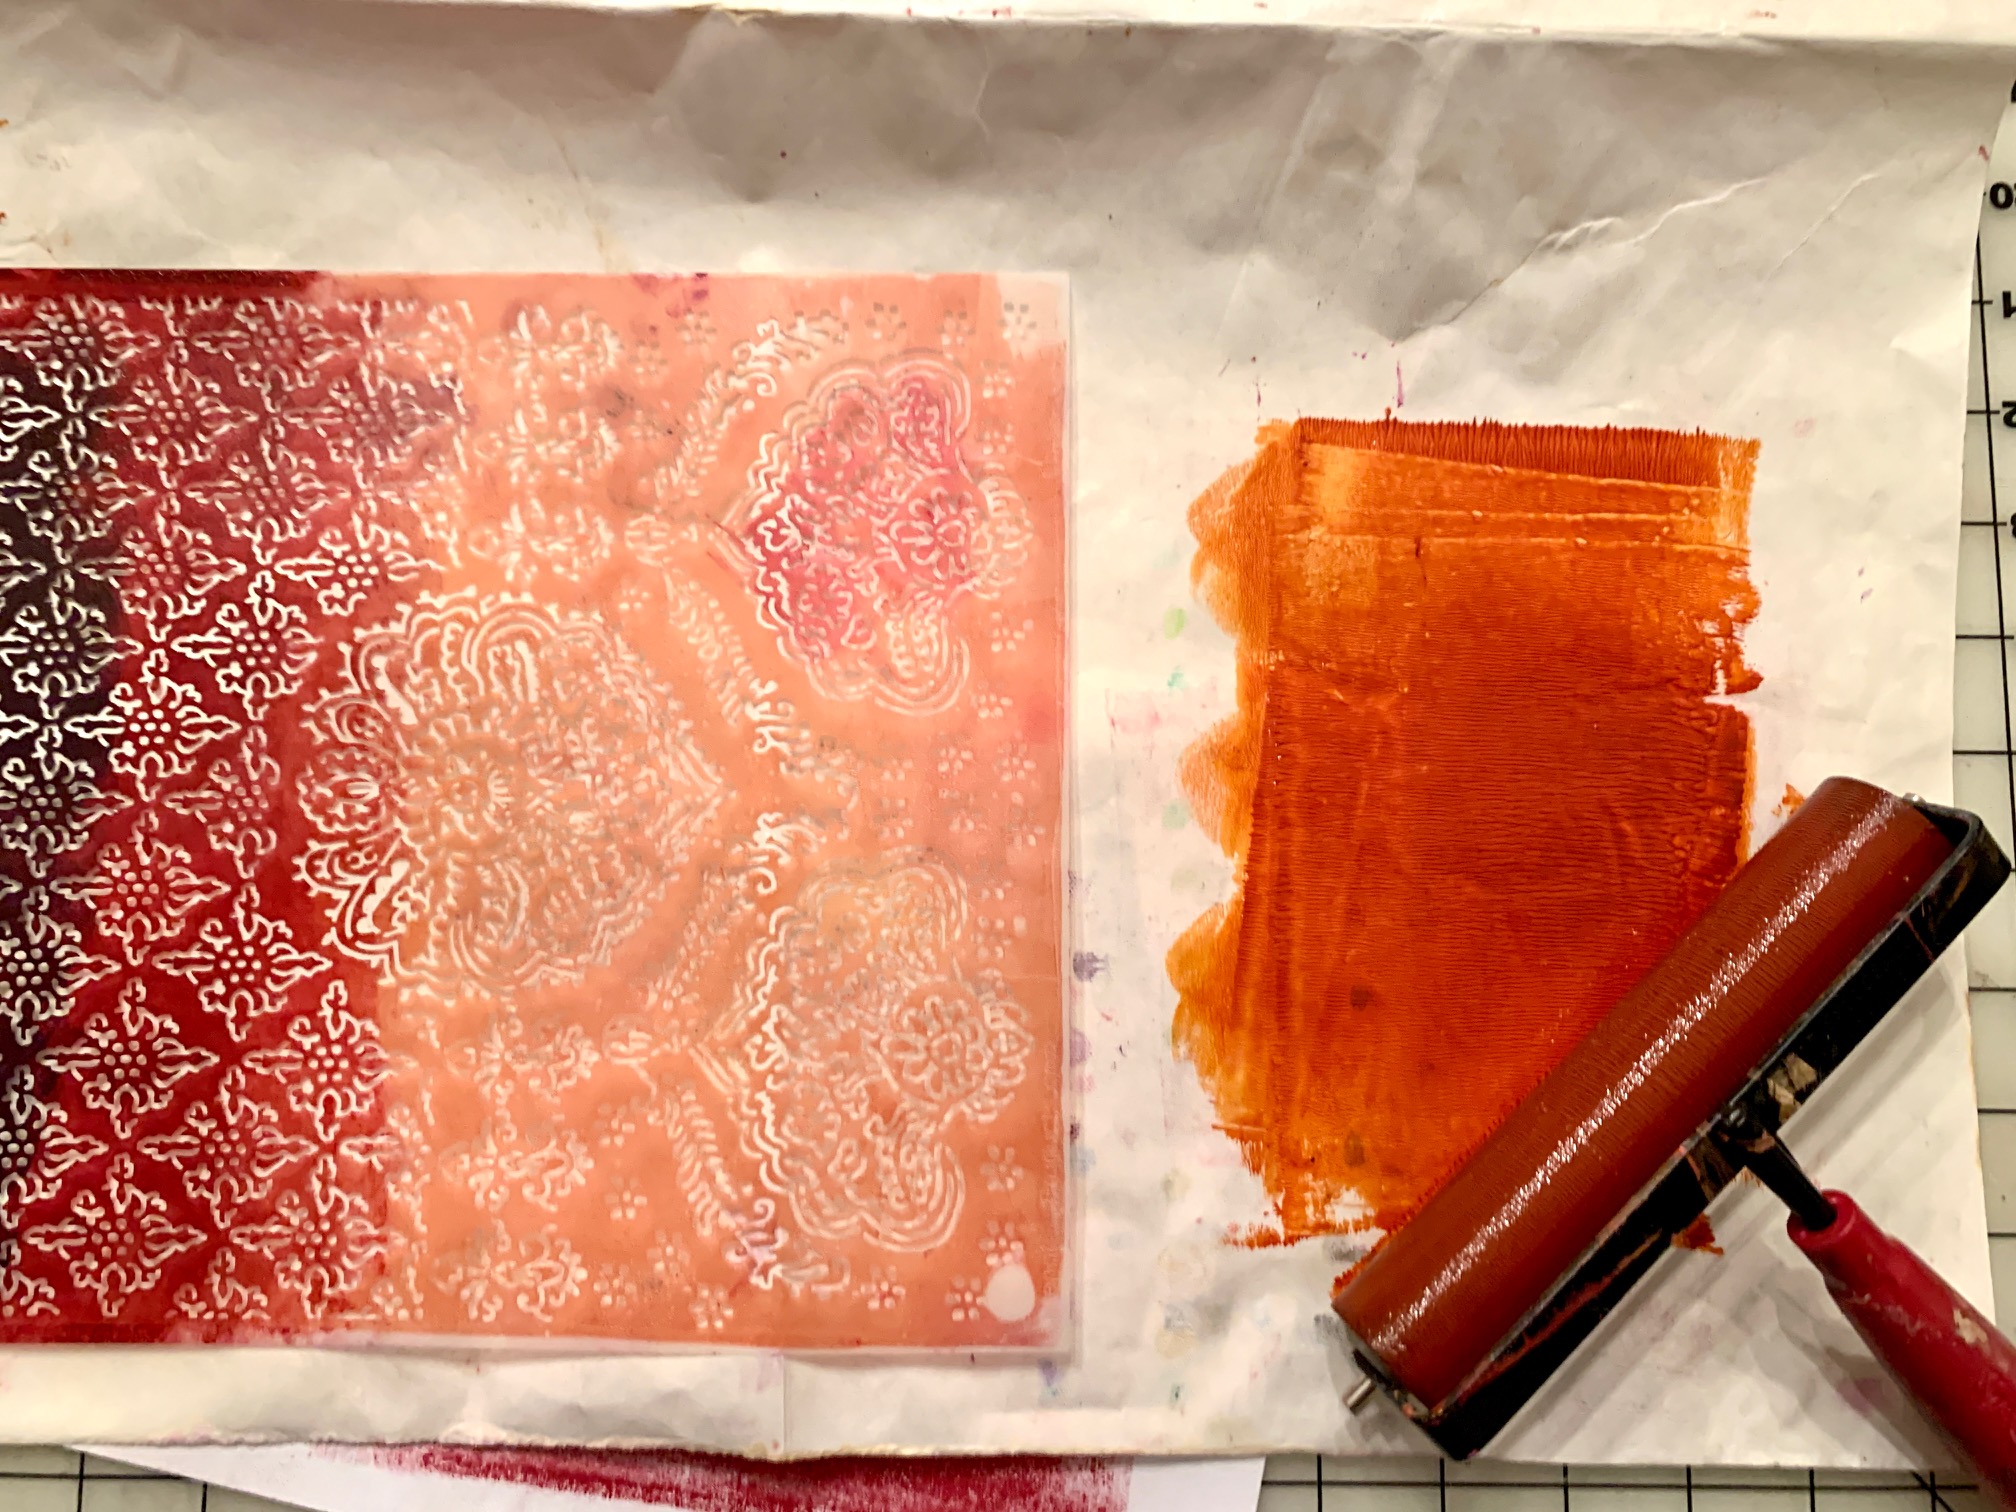
While I was in stencil mode, I decided to create a couple of small one-off of fabrics with Kate Thompson’s Floral Waterfall stencil. I kept it easy-peasy and applied two of my favorite Golden fluid acrylics (Quinacridone Nickel Azo Gold and Alizarin Crimson Hue) directly to the stencil with a brayer and burnished the “inked” stencil onto a sheet of TAP paper. Once it was thoroughly dry, I ironed it onto a pale green print fabric, ending up with a nice sharp pattern on pattern, just perfect for one of my Civil War fabric collage series.

I hope you’ll give my stencil techniques and stenciling on TAP and fabric a try. You can also find TAP and check out more of my favorite tools and more in my Amazon shop. Please let me know if you have any questions. I am always happy to help -  lesley@LesleyRiley.com.  And please be sure to visit Instagram, where I post inspiration daily, and my website for even more inspiration and ideas - LesleyRiley.com


Saturday, April 25, 2020

Kabuki Haiku: ISO Toilet Paper with TAP


It’s Jill McDowell here with you today. I hope that this post finds you well as we navigate through these incredibly crazy and stressful times. I’m sure that I’m not the only one craving a little levity to help alleviate some of the tension we’re feeling. Case in point, early on in this crisis I found myself in the grocery store staring in total disbelief at the paper goods aisle. Such absurdity! The entire row was empty except for one ‘gynormous” package of Huggies Snug and Dry smack in the middle of where the toilet paper should have been. Then it struck me that evidently one of my neighbors must have a really “dry” sense of humor.... The more I thought about that package of diapers the more I chuckled. And instead of being outraged, I found myself feeling just a little lighter than before. Sometimes you just have to turn and laugh.


The theme for this month’s StencilGirl®️ Creative Team project is Stencil Poetry.  So I’m using my ISO toilet paper experience as inspiration for a little Kabuki Haiku in my new Dina Wakley Mixed Media Journal (It’s the new blue edition with denim pages and I’m really excited to get to use it.)

ISO Toilet Paper

    Towers of cold steel
Long empty paper cupboards
    Huggies aisle fifteen


I often search the Metropolitan Museum of Arts website for images to use in my journals. If left alone, I could spend hours perusing that site. I’m partial to images from 18th Century Japanese Ukiyo-e prints of stylized Kabuki actors and other characters. They make perfect subjects for little satirical Haiku journal pages. I think this Geisha befits my utter exasperation whilst I quest to find a source of toilet paper.  Who else is with me on this one?


I upload my images into the ProCreate app where I crop and flip them horizontally to get a mirror image.  When working with text it is essential to work with a mirror image so that the text is readable after it’s transferred onto your substrate. 


I‘ve been having lots of fun printing my images onto Lesley Riley’s TAP Transfer Artist Paper. It’s made to work with inkjet printers, (a huge plus) and the iron-on method of transferring the image is quick and easy.  


To transfer the TAP image, fussy cut it out and then place it face down onto a 100% white cotton fabric. (I’ve gotten the crispest results using solid white tightly woven 100% cotton.) While continually moving the iron, press the back side of the image without steam on the highest setting suitable for your fabric. It should take between 20 and 30 seconds of continually moving the iron over the image of this size to transfer it onto the fabric.

Peel back a corner of the backing paper to check if the image has released onto the fabric. If not, place the paper backing back down over the image and iron again. Be careful as the image will get hot.  I usually give the image about 30 seconds to cool down before peeling off the whole backing. (FYI: The paper backing makes a great mask for your stencils - but that’s a post for another day....)


For my journal page, I used Mary Beth Shaw’s Large Hall Stencil from StencilGirl®️ to represent an aisle of empty toilet paper shelves.  Are you feeling it yet?


Since I love to upcycle, I stenciled on a piece of cloth ripped from some old linen curtains I found at the Goodwill Store a while back. (Ripping gives me so much satisfaction.) The pattern on the curtain doesn’t fit in with my design, but the back of it works fine.  And besides, who doesn’t enjoy the feel of stitching on linen?


I used Nautical Blue MentoLuxe pigment ink to stencil the design.  And for a hint of authenticity, I stenciled with a hand made Japanese stencil brush.  The brush is made with deer hair and I’m smitten with it. 


Rrripppppp!


I got out my stitching supplies and went to town.  For this kind of stitching, I never use a hoop.  I prefer to freestyle it instead.  FYI, my favorite needle is a #5 embroidery needle. (I found these two packages of vintage needles in a thrift shop - I think I paid 20 cents for both packs. SCORE!)


I choose a double page journal spread with blue denim on the left side and heavyweight cotton paper on the right side. I had a great piece of vintage blue bamboo kimono material in my starship that I used to cover the paper side. Since I wanted to minimize the amount of stitching that I need to do in the book itself, I pinned everything down without piercing the pages. Then I sat down and began stitching. 


I stitched on top of my Geisha Girl’s robe and then outlined her using a backstitch.  I left  the edges to fray.


I used a blanket stitch to attach the Haiku poem to the soft stenciled cloth collage and then to attach the cloth collage to the journal. 


My finished Kabuki Haiku journal page:


LOL. I’m still on a quest to locate some toilet paper. Fear not though, things have not gotten desperate yet.  We have enough rolls to last us two or three weeks so please don’t worry for us. My ISO Toilet Paper is really all in good jest.   

Before I close this post though, I want to thank you all for letting me share just a little bit of your day. And I want to give an especially big shout out to all of our caregivers out there everyday during this time. Those of you on the front line and those of you who are supporting us each and every day are our hero’s: Doctors, nurses, hospital administrators, Veterinarians, grocery store and retail clerks, mail handlers, custodial and security staff, and all those other dedicated essential individuals working and volunteering out in the public each day. You are all heroes and I am thankful for your care. I owe you big time.  But for now, I’m committed to staying home as long as it takes to help keep you safe.

Stay well,

Post Epilogue:  
The other day my masked husband ventured out to the grocery store. When he returned he said that they’d finally gotten a shipment toilet paper. But since it was the cheap store brand he didn’t buy any....  LOL. You just can’t make this stuff up. Sometimes you’ve just got to turn and laugh. 

Monday, January 19, 2015

Musical Canvas Pouch

Hi! Mary Nasser here! For today’s project, I wanted to share what I made for my sweet niece!
I used Carolyn Dube’s Now Is The Time smallNow Is The Time large and Uplifting Words stencils,

I purchased a canvas pouch from the local craft store and found royalty free clipart images of cellos on the internet,
since my niece is passionate about playing her cello!


First, on my laptop, using Microsoft Word, I inserted the three clipart cello images I wanted to incorporate into this project.
I enlarged the images, reversed the images, then printed them out onto my TAP paper.

I trimmed the excess paper away from the images while I had my iron heating up to its highest setting.
I placed the images face down onto the canvas – the transparency of the TAP paper makes this a cinch – then ironed straight down onto the images. I love that you cannot over-iron the TAP paper! My TAP paper slid right off once the images had transferred.


Next, I used Carolyn Dube’s stencils and a mini sponge dauber to add lettering in red acrylics – my niece's favorite color!
I chose inspiring words to encourage her new passion. The transparency of the stencils made it really easy to lay out the lettering.


 You can use Post-it notes or artist tape on the stencils to mask off words before pouncing paint through, too. 


I also removed the lobster clasp and strap,


For the other side, I used Nancy Curry’s stencils and a mini sponge dauber to add a treble clef and notes and the word Allegro.
Using a red colored pencil, I traced the bass clef in the upper right corner.


Then I added another shade of red acrylic with a small brush.


Lastly, I used Carolyn Dube’s stencils and a mini sponge dauber to add more inspiring lettering
and a black Identi-pen on the musical notes and word Allegro.


I hope my niece enjoys this half as much as I did making it!
She's going to use this to keep her allowance in!

Happy Stenciling!

Wednesday, December 10, 2014

December StencilClub Preview

Hello Stencil Lovers!
Janet here from Happy Reminders!
I wanted to show you what I have been doing with the
exclusive December StencilClub stencils
designed by Mary Beth Shaw.


I started out here with a previously done background...
stencils and washi tape.
The purply gray colors looked like the snow laden clouds
during a recent November snow storm.

I used the larger stencil and the diamond section from the smallest stencil.
Perfect! 

This was a fun one.
 I used the Transfer Artist Paper from a previous hop...
I had copied 2 of the same drawings on the same TAP paper
and transfered the extra image on to regular gesso covered paper.

I played with layering the medium sized stencil for the background...
And then the diamonds again for some details.
My message to myself is still...Find Your Voice....and Do Art Every Day!


 I also used the Circle Rays 6 and the Hands Stencil in this spread.


I think the 9x12 stencil in this set makes for a fabulous background.
I love using numbers and letters anyways...so this stencil is awesome!

I started with mod podge and yellow ink, mixed them up 
and spread them across the page...one side thicker...to see how it differs.
I love the experiments and the "what if" aspect of art.
Hmmmm...what if I made one side really heavy and one side really thin?


 I started with mod podge because it is so ...slippery..
It makes for a different surface for other mediums to grab on to.
I played with drips and inks... putting on...taking off...
I used the 4x4  club stencil from August 2014...love that little crosshatch!


A little too intense...so I wiped some off...

Added a meaningful word...

A great beginning...

I want to add a quote or scripture...not sure what yet...
But it still needed something on the background... 

 I have been wanting to try this ....
I laid the stencil down and stamped over one section of it....
Because it is a Clear-Mount stamp it is flexible and can be pressed onto the stencil.
I have tried wood mount stamps this same way
and it doesn't leave enough of an impression.

Just a nice little touch!


Yes. I am grateful.

Thanks so much for visiting with me today.
I hope you enjoy your StencilClub exclusive stencils.
Not a member yet? 
It's a fun club to be in!