I love making little books that will let me record quick memories. I love taking photos with my phone at random moment and using them in these little books.
This month the StencilGirl crew is team up with Canvas Corp to feature projects from both brands. For my project, I chose to create a fun mini album to record some of those random moments. I wanted to keep the palette very neutral to play up the kraft cover and to look very sketchy. The finished stencil design looks complex and detailed but is so easy to create in a few simple layers.
Dry brush Tan High Impact Paint to create a light neutral base. The base will help future layers stand out more. Use a heat tool to dry the paint.
Randomly mist over the cover with Ivory Baseboard Spray to add additional base coverage. Use a dry cloth to blot any excess and then dry with a heat tool.
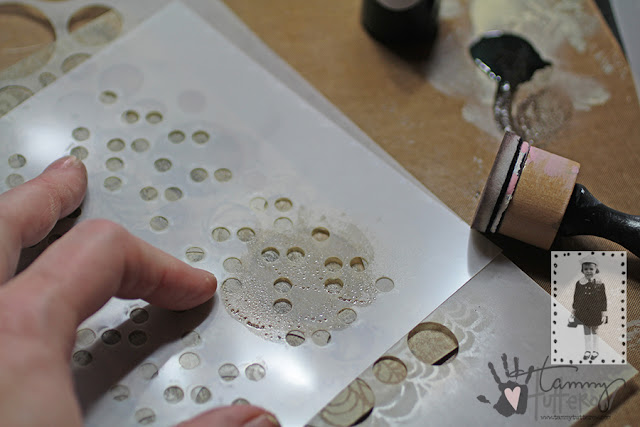
Lay the Large Bubbles Stencil L007 over the cover. Use an ink blending tool with foam to dab Boardwalk Glimmer Mist randomly onto the cover through the stencil.
Tip: Tap the foam onto your craft sheet before dabbing onto the cover to help remove excess ink. You don't want to apply too much of the fluid ink at one time, it is better to use less in multiple layers. Heavy applications could seep under the stencil.
Gently blot any excess ink with a dry cloth and dry with a heat tool.
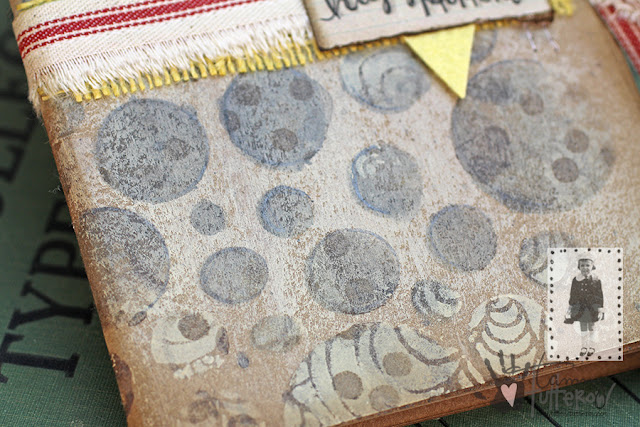
Place the Large Bubbles Stencil back in place. Use an ink blending tool with foam to dab Coconut Shell Glimmer Glaze randomly to the cover. Apply the glaze in some of the same areas as the Boardwalk Glimmer Mist and also some areas the were not previously inked. This will create three shades of color. Use a heat tool to dry the cover.
Mist some of the Boardwalk Glimmer Mist onto your craft sheet. Use a water brush to pick up some of the color. Brush the color onto the top edges of some of the bubbles. I focused on the bubbles in the upper left and left side of my cover. Use a heat tool to dry the ink.
Place the Large Bubbles Stencil in place again. Use a graphite pencil to outline a few random bubbles. You can outline them completely or just along the left edge.
Smudge over the pencil lines with your finger to help blend and soften them.
Place the Large Bubbles Stencil in place again. Place the Doodle It Tornado Bloom Stencil on top of the Large Bubbles Stencil. Use an ink blending tool with foam to apply Tan High Impact Paint to the cover through the two layers of stencils.
 The bubbles stencil will act like a mask allowing you to add the doodled design to only the bubbles on the cover. Dry the paint with a heat tool.
 Place the Large Bubbles Stencil in place again. Place the Mini Dots Stencil on top of the Large Bubbles Stencil. Use an ink blending tool with foam to apply Coconut Shell Glimmer Glaze to the cover through the two layers of stencils. Use a heat tool to dry the glaze.
Fold a one yard piece of Red Ticking from Canvas Corp Products in half. Sew along the raw edge of the fabric to create a long tie for the journal. Layer the ticking tie with a scrap of yellow burlap. Adhere both to the center of the front and back covers of the journal.
Add machine stitching along the edges of the covers to secure the tie in place.
Tear a journaling card down to about 1" x 2". Use an ink blending tool to add Gathered Twigs Distress Ink to the edges of the card and journal cover.
Add a hand written title to the piece of journal card. Layer the journal card with a small die cut heart. Adhere both the cover over the journal tie.
I simply love how the different layers of stenciling combine to create such depth. There are so many variations to the colors, all from using only 4 colors! I love how applying the different layers randomly make them flow in and out of each other.
Tammy
www.tammytutterow.com
Supplies:
Stencils:
L007 Large Bubbles Stencil
S267 Doodle It Tornado Bloom Stencil
L113 Mini Dots Stencil
Canvas Corp:
Naturally Aged Paint System- Peeled Paint (Tattered Angels)
5x7 Naked Starter Journal (7gypsies)
Canvas Fringe, Ticking Fringe Red (Canvas Corp)
12x12 Burlap Sheet, Wheat
7gypsies Moments Cards: Du Day
Other:
Gathered Twigs Distress Ink (Ranger Ink)
Ink Blending Tool with foam (Ranger Ink)
Distress Paint Brush (Ranger Ink)
Craft Heat Tool (Ranger Ink)
wool felt die cut (die Tammy Tutterow/Spellbinders)
graphite pencil
water brush
sewing machine


Lovely journal cover!
ReplyDeleteAbsolutely adore that - and that bubble stencil! #SGPCCBmatchup
ReplyDeleteCfrailey64(at)gmail(dot com) 😊
DeleteLove it!
ReplyDeleteFun neutrals
ReplyDeletePinecone (at) Cybermesa. Com
DeleteI fell in love with this as soon as I saw it! The depth of all the layering and those circles and the tornado pattern, then the polka dots inside them....honestly I think I have looked back at this four times on IG already. I just HAD to check out the blog! I have never considered using glimmer mist with a foam afflicator but what an amazing effect. THANK YOU for sharing you special journal. Really awesome.
ReplyDeleteFantastic project. Love the colors and stencils used. Thanks for the chance to win. #SGPCCBmatchup
ReplyDeleteI really like how you layered the stencils to get additional effects and depths. Great project and lovely subtle colours!
ReplyDeleteThank you for the tutorial.
#SGPCCBmatchup
ecgronroosatgmail
Love this. Great to see the process.
ReplyDelete#SGPCCBmatchup
ljoehlinmapes (AT) gmail (Dot com) #SGPCCBmatchup love the metalic circles as a background!!
ReplyDeleteLove the album. it's not bright
ReplyDeletebut very subdued and pretty.
The big ribbon pops off the
page. I've taken some of
Tammy's classes and the finished
product is fantastic.
thanks for sharing
#SGPCCBmatchup
txmlhl(at)yahoo(dot)com
I'm loving all of the layers! It makes those dots look three dimensional. garciacoach (at)gmail (dot)com
ReplyDeleteThank you again for all the knowledge you distribute,Good post. I was very interested in the article, it's quite inspiring I should admit. I like visiting you site since I always come across interesting articles like this one.Great Job, I greatly appreciate that.Do Keep sharing! Regards, https://puffingbird.com/products/puffing-bird%E2%84%A2-core-reactor-quartz-banger-for-20mm-heating-coil-enail-extra-thick-bottom
ReplyDelete