It’s Jill McDowell here with you today with my take on the current StencilGirl®️ Creative Team challenge; Fill it with Circular Shapes. This month I’m heading down another creative rabbit hole with a project that’s been on my bucket list for some time. A few years back I attended a quilt show that left me aghast. Ever since then I’ve had dreams of making an art quilt but the size and scope of the project was just too daunting for me to start. Fortunately for me, a recent purchase sparked some ideas about how I might actually tackle the project.
I bid on this vintage lot of linens in an online estate auction. My plan was to use the fabric for eco printing. I was pleasantly surprised when I got the lot home and found that I’d scored three large tablecloths, 90 napkins, several table runners, and a few dozen doilies. It was really a good lot and I found myself swimming in linens. But I knew I’d never be able to use them all up with just eco printing. They were destined for bigger things. That’s when I realized that the napkins could make a great substrate to build a quilt block on. It was time to overcome the art quilt intimidation factor.
To color the background I spritzed the napkin with water and left it to sit for a few minutes so that all the fibers had a chance to dampen. Then I mixed together GAC 900,(fabric painting medium), a few squirts of Quinacridone/Nickel Azo Gold, a touch of Iridescent Gold Fine, and Glazing Liquid to make a wash the consistency of the creamer I put in my morning tea. I applied the wash all over the napkin with a large paint brush.
This left me with a cloth that was soft and had a vintage feel that I knew I would enjoy stitching on.
I used a layering technique with VersaFine Clair ink to lay down my design. Layering stencils expands the versatility of your stencil collection and it’s super simple to do. With only two stencils you can add a multitude of cohesive designs to your art.
Here’s how I layered two stencils:
I bid on this vintage lot of linens in an online estate auction. My plan was to use the fabric for eco printing. I was pleasantly surprised when I got the lot home and found that I’d scored three large tablecloths, 90 napkins, several table runners, and a few dozen doilies. It was really a good lot and I found myself swimming in linens. But I knew I’d never be able to use them all up with just eco printing. They were destined for bigger things. That’s when I realized that the napkins could make a great substrate to build a quilt block on. It was time to overcome the art quilt intimidation factor.
I choose a 17” X 18” napkin for my first block and prepped it for quilting by soaking it overnight in Oxi Clean Odor and Stain Remover. (You can find this detergent in the laundry section of your grocery store.) The next morning I rinsed it out thoroughly and then set it outside to dry in the sun.
To color the background I spritzed the napkin with water and left it to sit for a few minutes so that all the fibers had a chance to dampen. Then I mixed together GAC 900,(fabric painting medium), a few squirts of Quinacridone/Nickel Azo Gold, a touch of Iridescent Gold Fine, and Glazing Liquid to make a wash the consistency of the creamer I put in my morning tea. I applied the wash all over the napkin with a large paint brush.
Then I wrung out the napkin to get rid of any excess moisture and hung it up to dry.
This left me with a cloth that was soft and had a vintage feel that I knew I would enjoy stitching on.
For the background, I choose three stencil designs from StencilGirl® Products' vast collection: my own Crest Stencil, Carol Wiebe’s Asian Character Impressions 3 Stencil, and MaryBeth Shaw’s Hunab Ku Stencil.
 |
I used a layering technique with VersaFine Clair ink to lay down my design. Layering stencils expands the versatility of your stencil collection and it’s super simple to do. With only two stencils you can add a multitude of cohesive designs to your art.
Here’s how I layered two stencils:
- I positioned a circle from the Crest Stencil, (or any other stencil with an open shape) over an interesting area of the Asian Character Stencil, (or any other busy stencil).
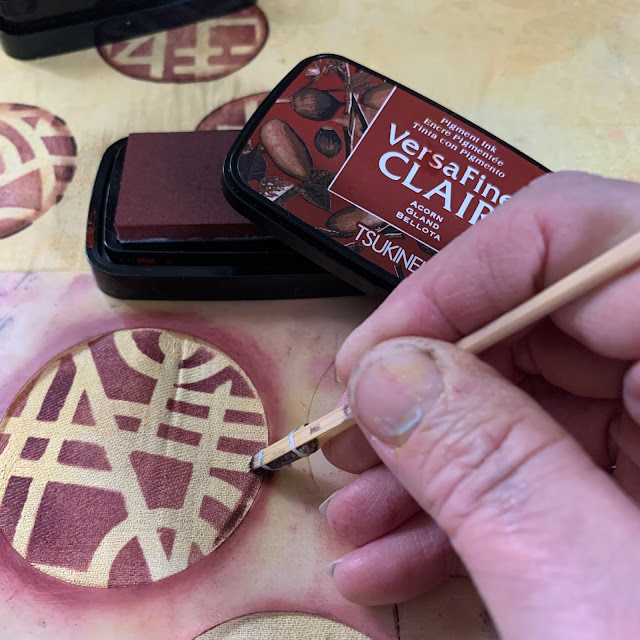
- Using a stiff brush, I scrubbed Chianti VersaFine Clair Pigment Ink through the stencil sandwich.
- I slipped the Asian Character Stencil out from underneath the Crest Stencil leaving just the open shape on the cloth. Using a smaller stencil brush, I scrubbed Acorn VersaFine Clair ink around the edge of the stencil to add depth to my design.
- With the Crest Stencil still in place, I traced the outline of the circle with a black fine tip fabric marker.
Here’s what a finished circle looks like.
I continued to use this technique to create more circles on the cloth and then generously sprinkled some Crests and Hunab Ku through out.
I kept going until I was happy with the overall design.
I put the napkin in my dryer on high for 40 minutes to set the paint and the inks.
I made a different quilt sandwich with a square cut from an old sheet as the backing, and low loft batting in the muddled, topped with my stenciled napkin. Then I basted all three of the layers together to keep them from shifting.
Next, I added my focal point; an image I found in an old 1920 Japanese Block-print book. I had altered the image in ProCreate, printed it with my inkjet printer onto Transfer Artist Paper, and then ironed the image onto another piece of vintage linen. I hemmed the edges and then whipped stitched it onto my stenciled napkin block base.
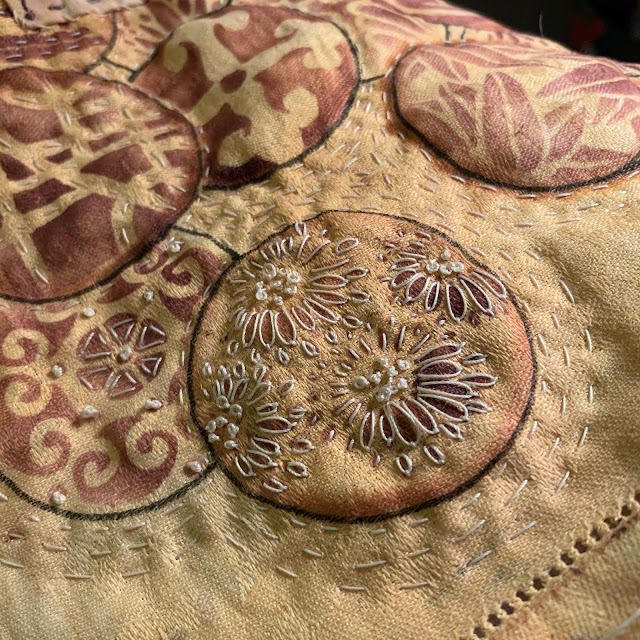
I decided to quilt the non-stenciled areas of my block by hand. I outlined each circle with a running stitch and then radiated the circles outwards until all the spaces were filled in. Although not perfect, I was happy with my stitching considering that it was my first time quilting.
I used a water-soluble marking pen to trace extensions of the background circles onto my focal point fabric and then stitched around the edges. It was easy to wipe the pen marks off later with a damp cloth.
I love to embroider with plain old spool thread. I like the texture it adds and the play of the delicate knots and lines against the rustic stenciled designs. I used French knots and lazy daisy stitches to embellish some of the circles.
I love to embroider with plain old spool thread. I like the texture it adds and the play of the delicate knots and lines against the rustic stenciled designs. I used French knots and lazy daisy stitches to embellish some of the circles.
So far I’ve spent about 8 hours stitching on this block and although it’s not completely finished I think it’s close.
My art quilt block has been a perfect lap project to work on. It’s so relaxing to stitch while watching tv or visiting with friends. I’m so glad I traveled down this rabbit hole and I’m planning on staying here a while. I’ve got just a few more blocks to stencil and stitch.....
Are there any projects in your bucket list that you’re too intimidated by to try? If so, I hope I’ve inspired you to break a small piece of it off to try.
Hugs until next time, Jill
For more inspiration:
Blog


What a fun and amazing project! I'm glad you challenged yourself and shared it with us!
ReplyDelete