Hi!
Tracy Villaume here from Cork & Brush Studio with another fun and easy stencil project that I think you are going to love!
Here are the supplies you will need:
- StencilGirl Stencil with Mask set of your choice. I used Rae Missigman’s Imaginary Botanical Mask and a few of her other botanical stencils; as well as Carolyn Dube’s StencilClub set, Art House
- Fabric to dye. I originally wanted to use these fabric pouches, which I think would be great, but my local Michael’s store had these little canvas-covered notebooks in their clearance section so I scooped up the last few!
- A tie-dye spray kit in colors of your choice. I used this set from s.e.i.
- POSCA Markers or other fabric-friendly pens
- Copy Paper (or other paper for blotting)
- Iron
- Optional: Sari ribbon
STEP 1:
Read your tie-dye instructions to see if your item should be laundered first. (I am so used to mordanting fabric for eco-dyeing that I automatically did prewash mine, but not all kits will require it.)
STEP 2:
Give a little spray of a light color or two just to get some color down. Then use the stencil part of your set first with one color. Spray through the stencil and cover with a piece of copy paper to remove the excess dye before removing the stencil. Keep the paper to the side to reuse - these make great collage papers for other projects!
STEP 4:
Repeat Steps 2 and 3 until you have your desired coverage. Sometimes I will give a light spray around the borders of the piece to randomly fill in white space.
Let the piece completely air dry then iron it to set the dye (per the tie-dye spray instructions). If working on a pouch, flip and repeat the above on the other side!
STEP 6:
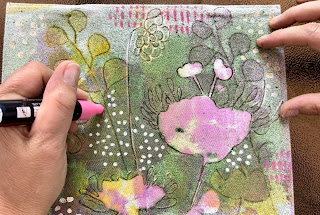
Finish by using your POSCA or fabric markers to outline your first stenciled image then add interest with different marks of your own.
STEP 7:Finish by using your POSCA or fabric markers to outline your first stenciled image then add interest with different marks of your own.
Add additional embellishments as you wish! Some ideas might include stitches, buttons or ribbon closures. I just wrapped mine with coordinating Sari ribbons, but may sew them in later on.
That’s all, you are done and now have completely unique little notebooks or pouches to give for gifts…or keep for yourself!
Here's a closer look at the one I created with the Art House Set!
For more inspiration from me, please find my on Instagram @tracyvillart or go to corkandbrush.com
Happy Stenciling!
Tracy
Video Tutorial:
.jpg)


Beautiful notebooks and very inspirational. I just bought some fabric yesterday, I think I’ll be playing today. The quality of video is beautiful as well. Thank you for sharing.
ReplyDeleteI enjoy the soft edges that they sprays create with the stencils. Thanks for sharing! Love-ArtyLadyMsD
ReplyDelete