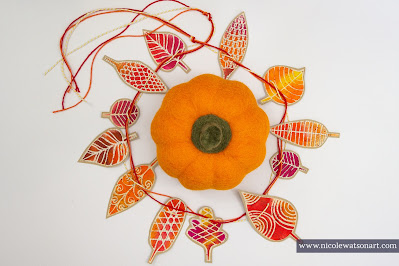
Hello stencil friends! Nicole here with an easy little project (or three!) to add a touch of fall to your home. I don’t know about the weather where you are, but here in Central Texas we recently had three days of amazing, fall weather. It was glorious! I made chicken soup, my favorite pumpkin bars, and had the most amazing (cold!) morning walks while dreaming of wearing pants and long sleeves.
Unfortunately, it didn’t last long as our temps went back up to near 100. Ugh! However, despite our rise in temps, I officially declared it fall. I bought all the new fall things from Trader Joes and put out my fall décor.
One of my favorite things about fall, besides the weather, is the changing of the leaves and fall colors.
With leaves and the colors of fall on my mind, I thought it would be fun to make something new for fall. I grabbed the Autumn Leaves stencil and began blending colors to create leaves.
First, like most of my painted paper projects, I began by adding watered-down gesso to some old book and ledger pages. This does a couple things. It adds some integrity to the sometimes-brittle pages and allows for a better surface to paint on. Since I don’t want to cover up the text and I don’t need a thick layer of gesso, I water it down. You can also use clear gesso.
Then, I grabbed all the fall colors of paint, an applicator and began to play. This is a fun, simple process but does require some patience. The Autumn Leaves stencil is a bit more delicate, so sometimes you have to hold down parts of it while you stencil.
I love how fall colors blend together, especially purple and orange (trust me, try it!).
A couple ideas and tips:
1. Less is more! Don't over-saturate your applicator.My favorite fall leaves are the ones with spots of color, so when my leaves were finished, I splattered leftover paint on them.
After the splatters dried, I cut them out and grabbed some kraft-colored card stock to give them some strength.
I stuck them down with matte medium, front and back, and then also added another layer on top for extra protection.
Then, once they dried, I had to cut them out again! I chose to leave a border each time, one with the original paper and one with the kraft paper.
Check out the beautiful pile of leaves!
Now that you’ve made some amazing leaves, what can you do with them?
Create a Garland
Grab some bakers twine or thin jute and string them up! I am putting together a fall-themed thank you basket for a friend, and adding a garland to it is the perfect final touch. I’m also going to hang a small one in my house.
All you have to do is punch a couple of holes in each leaf and add them to the string of choice. I added some extra colors of twine by weaving it around my original one after I added the leaves.
Make a Mobile or Wall-hanger
Similar to the garland, string some leaves to dangle from a branch, old paint brush, vintage wooden spoon, or anything you can think of! You could add some beads or other fall-themed items.
Start a Thankful Tree Tradition
Use bakers twine or string to create single, hanging leaves. Place them in a container with a pen or makers.
Then, find a fun branch and add it to a vase or other container. Each day leading up to thanksgiving, write something you are thankful for on the back of the leaf and hang it on the tree. You could use multiple leaves for each family member, or all write on the same leaf each day. After the fall season, save them in a special container for a fun keepsake from the year.
More Ideas
For the garland, mobile, or wall hanger, if you think your leaves might twist in the wind, you could always make them double sided. All you need to do is add a back-side leaf after you cut them from the Kraft cardstock. This will take a bit more planning to match up your leaves so you have a front and back one (stenciled from each side of stencil).
I have a few leftover leaves even after the three projects. I’m going to scatter some on our Thanksgiving table, tuck them inside letters and packages, maybe make a card or two, and I think I might add a couple to my door wreath. I might even need to make more. They are so fun to create!
-Nicole
Connect with me on
Supplies for the leaves:
- Gesso
- Vintage book and ledger papers
- Matte medium
- Fall colors of acrylic paint (I used Golden's SoFlat)
- Scissors
- Kraft card stock
- Palette paper
- Round applicator
- Bakers twine or another string of choice
- Twig (and anything else you want to add to your mobile)
- Branches, Vase, Bucket, Marker, etc... for your tree
- Hole punch


No comments:
Post a Comment
If you are entering a GIVEAWAY, please add your email address in the event we need to contact you.
To avoid SPAM, please write it like this:
marybeth (at) stencilgirltalk (dot com)
Thank You!