Showing posts with label stencil a garland. Show all posts

Friday, October 4, 2024

Autumn Leaves Three Ways


Hello stencil friends! Nicole here with an easy little project (or three!) to add a touch of fall to your home. I don’t know about the weather where you are, but here in Central Texas we recently had three days of amazing, fall weather. It was glorious! I made chicken soup, my favorite pumpkin bars, and had the most amazing (cold!) morning walks while dreaming of wearing pants and long sleeves. 


Unfortunately, it didn’t last long as our temps went back up to near 100. Ugh! However, despite our rise in temps, I officially declared it fall. I bought all the new fall things from Trader Joes and put out my fall décor.


One of my favorite things about fall, besides the weather, is the changing of the leaves and fall colors.  


With leaves and the colors of fall on my mind, I thought it would be fun to make something new for fall. I grabbed the Autumn Leaves stencil and began blending colors to create leaves.


First, like most of my painted paper projects, I began by adding watered-down gesso to some old book and ledger pages. This does a couple things. It adds some integrity to the sometimes-brittle pages and allows for a better surface to paint on. Since I don’t want to cover up the text and I don’t need a thick layer of gesso, I water it down. You can also use clear gesso.

Then, I grabbed all the fall colors of paint, an applicator and began to play. This is a fun, simple process but does require some patience. The Autumn Leaves stencil is a bit more delicate, so sometimes you have to hold down parts of it while you stencil. 

I love how fall colors blend together, especially purple and orange (trust me, try it!). 


A couple ideas and tips:

1. Less is more! Don't over-saturate your applicator.

2. However, if paint seeps under the stencil, don’t stress! Just go back and stencil again a bit when it dries. This creates a cool shadow look. 

3. Lift the stencil to peak at your leaf before completely removing it. Then, set it back down if you need to add more paint.

4. Use one color on several leaves, lifting the stencil each time, and then go back with another color, for more of a two-step approach (or even three). The paint blends a little less this way for a different look.


5. Try an ombre palette, or a candy-corn one. 


6. Start with a lighter color, add a darker one and then go back and blend more with the lighter color.

7. If you don’t like how one turns out, stencil over a bit with a darker color. 

8. Don’t forget a few solid leaves, too!  


9. Flip the stencil over half-way through for more variety (or to make your leaves double sided in the end, more below) 

10. Put your favorite fall movie on a screen and have fun!

My favorite fall leaves are the ones with spots of color, so when my leaves were finished, I splattered leftover paint on them.

After the splatters dried, I cut them out and grabbed some kraft-colored card stock to give them some strength.

I stuck them down with matte medium, front and back, and then also added another layer on top for extra protection. 


Then, once they dried, I had to cut them out again! I chose to leave a border each time, one with the original paper and one with the kraft paper. 


Check out the beautiful pile of leaves! 

Now that you’ve made some amazing leaves, what can you do with them?


Create a Garland 

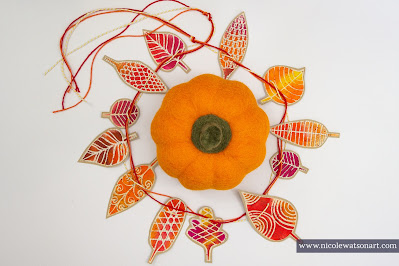
Grab some bakers twine or thin jute and string them up! I am putting together a fall-themed thank you basket for a friend, and adding a garland to it is the perfect final touch. I’m also going to hang a small one in my house.


All you have to do is punch a couple of holes in each leaf and add them to the string of choice. I added some extra colors of twine by weaving it around my original one after I added the leaves.


Make a Mobile or Wall-hanger 

Similar to the garland, string some leaves to dangle from a branch, old paint brush, vintage wooden spoon, or anything you can think of! You could add some beads or other fall-themed items. 


Start a Thankful Tree Tradition

Use bakers twine or string to create single, hanging leaves. Place them in a container with a pen or makers. 

Then, find a fun branch and add it to a vase or other container. Each day leading up to thanksgiving, write something you are thankful for on the back of the leaf and hang it on the tree. You could use multiple leaves for each family member, or all write on the same leaf each day. After the fall season, save them in a special container for a fun keepsake from the year.


More Ideas

For the garland, mobile, or wall hanger, if you think your leaves might twist in the wind, you could always make them double sided. All you need to do is add a back-side leaf after you cut them from the Kraft cardstock. This will take a bit more planning to match up your leaves so you have a front and back one (stenciled from each side of stencil).


I have a few leftover leaves even after the three projects. I’m going to scatter some on our Thanksgiving table, tuck them inside letters and packages, maybe make a card or two, and I think I might add a couple to my door wreath. I might even need to make more. They are so fun to create!


You can watch how I made the leaves + the projects following in the video below


Happy fall!

-Nicole


Connect with me on


Stencil

Autumn Leaves


Supplies for the leaves:

  • Gesso
  • Vintage book and ledger papers
  • Matte medium
  • Fall colors of acrylic paint (I used Golden's SoFlat)
  • Scissors
  • Kraft card stock
  • Palette paper
  • Round applicator
Extra supplies for projects:
  • Bakers twine or another string of choice
  • Twig (and anything else you want to add to your mobile) 
  • Branches, Vase, Bucket, Marker, etc... for your tree
  • Hole punch


Thursday, December 26, 2019

New Year Garland created with StencilGirl® Products

Hi, everyone! Cynthia Silveri here! I've always thought it would be really fun to be in New York City on New Year's eve, but I've never done it. All these years I have watched it on TV, but watching the ball drop in person would be pretty awesome! Inspired by that big silver ball, I created the Drop Your Own New Year Ball Garland. This garland design is understated and modern, and easy to make-perfect for a new year celebration. (And you might have just enough post Christmas Day time to make one before the year ends.) I hope you enjoy this project, and I wish everyone a wonderful, art-filled New Year!

Materials:
8 (or more) sheets of black cardstock
8 (or more) sheets of white cardstock

StencilGirl® Products used:

Feel free to use your favorite stencils for this project, keeping mind that all over patterns on 9” x 12” stencils will work best.

Ironlack Sugar acrylic spray paint  in Fads (white-grey), Giggles (dark blue) and Liquorice (black) Or you can use regular acrylic paints in any color you like.
Sizzix die-cut machine and circle Frame lits in 4 sizes (4”, 3.5”, 2.5” and 2”).
Sewing maching and heavy duty needle and thread

Optional: Marvy Uchida DecoColor Paint Pens in silver and gold & Marvy Uchida Just Glitter Markers in silver and gold

Note: You may not use every circle to create the balls. Depending on the thickness of the cardstock you may use 5 or 6 per ball. The garland I made has 20 balls and is approximately six feet long.


Instructions:
1.      Stencil both sides of each piece of cardstock. I used black and blue Sugar Spray on the white cardstock, and the white-grey on the black cardstock.

2.      After the papers are completely dry, use your die-cut machine to cut out the circles. Fold the paper in half lengthwise to be able to cut the two largest sizes of circles-or 4 total. Use the remaining part of the paper to cut the 2.5” smaller circle (getting 2 circles from it). Use the remaining scrap by folding the paper open to cut out the smallest circle (to get 2 more from one sheet). Thus, you get a total of 8 circles from one sheet of cardstock. It will take a little bit of time to cut them all out.

3.      I originally intended to edge each circle with gold and silver markers so the garland would appear really festive and shiny, but I after decorating enough circles to make three “balls”, I realized that it was going to take too long to do this on 128 circles...and then double that to do back and front...I would not be able meet my deadline for this blog post! You can see in the video what the three decorated balls look like. If you had a group of people making this garland together, everyone could decorate 2 or 3, and you'd have your fabulous shiny garland in a jiffy. Or maybe you have more time and patience than I did to complete all 128 circles!  

4.      Next make stacks of each size circle and then count out 6 of each size to sew together-with one caveat...I learned the hard way that the black cardstock I had was too thick to sew 6 layers together, but 5 layers worked on my machine. The white cardstock I had was thinner, so it was not a problem to sew a stack of six layers. You may have to test this on your machine before you can really get sewing!

5.      Lay out the different size circle stacks, alternating the black and white ones, to create a pattern you like before sewing them. Make sure you can reach all of the circle stacks from your sewing machine because you are going to sew continuously-do not break the thread between each stack of circles. Be sure to sew a bit beyond each stack before placing the next stack at the presser foot. There should be about 3/8” to 1/2” of thread between each stack of circles. Leave a good long tail of thread at the beginning and end of your garland, or alternatively, you could hot glue a ribbon onto each end for hanging.

6.      Once everything is sewn, it takes a bit of patience and time to open up each circle stack to create the “ball”. Crease the stack back and forth along the stitching line, and then as you open it up to create a “ball” you may have to crease each individual paper half. The ball will not be perfectly round as it is difficult to make each part stay open the same distance apart, but it will still look great!

7.      Hang where you and your party peeps can enjoy...Happy New Year!

Tuesday, July 23, 2019

Stenciled Paper Garland by Heidi Smith for StencilGirl® Creative Team


Hi there!

This is Heidi Smith with the StencilGirl® Creative Team sharing a stenciled paper garland for today’s blog post! 


Well, I am happy to say that I just recently moved in to a new studio space and have been super excited to decorate it and try to make it my own! 🙌 That is what has inspired me this month! The StencilGirl® Creative Team challenge to “texture it or make marks on it” made me want to create some texture on my bare walls by hanging some stenciled-paper garlands and I was excited to use some of my favorite mark-making stencils to give my new studio space some much-needed personality!  

My goal was to create something colorful and special... something that would make me smile when I looked at it. 😊 So that’s where my inspiration came from .. and I am quite pleased with how it turned out!!!!!


This is my supply list:

18”x24” 140lb cold press Strathmore watercolor paper
Found paper text ephemera
Acrylic gel medium
Flat Taklon brush
Golden fluid acrylics
6” ruler
Scissors
Golden heavy body acrylics
StencilGirl® stencils
Stencil brushes
2 1/2” circle punch
X-Acto knife with a fresh blade
Self-healing cutting mat
Baker's Twine
Heavy duty needle (mine is 3 5/8” long)


To start, I chose some cold-pressed watercolor paper so that my garland would be sturdy and last a long time. I took three large sheets of the watercolor paper to make 3 garlands. (One sheet makes about a 14-foot garland that has around 50 circles). I began by collaging some paper text ephemera onto two of the sheets. I used acrylic gel medium to apply the text papers.


After the gel medium had dried, I used Golden Fluid Acrylics to paint on some foundation color washes on both sides of my papers. I also let this dry thoroughly before moving on.


Next, I used a ruler & pencil to measure & mark 3” sections along the edge of my paper. Then I "freehand"-cut my paper into 3" wide strips. I chose to cut up my paper before stenciling because I wanted to work with smaller sections. Plus, this way the paper will feed through the circle punch a lot easier!


Finally, it’s time to break out my stencils!!! I had a wonderful time sorting through my vast collection of StencilGirl® stencils and picking out the ones that I thought would compliment (as well as contrast with) each other to make the garland dynamic! I chose stencils that had good "mark-making" qualities.

I admit,couldn't stop at just a few... 😬


I used:


Once I'd chosen a "few" (ha!) stencils, I went ahead and used my favorite stiff stencil brushes and Golden Heavy Body Acrylics. I used a bunch of my favorite colors and applied paint to stencils in sections along my strips.

After my paint had dried, I used a 2 1/2” circle punch to cut out a TON of circles for my garland. It took a bit of muscle to punch through the thick watercolor paper, but the punch was definitely up to the task!


After I finished cutting out a total of 150(!) circles..... I played with them as if they were confetti!!!! Haha! :) I mean, how could I not?! Can you say: "giant stencil confetti?!?"


But then back to business, I needed to string up my circles, so I used an X-Acto with a fresh blade to cut out two 5-7mm (-ish) slits in each circle to allow my twine to be threaded through. (I just “eyeballed” my measurements).


Finally, it was time to string up this bad boy! I used a heavy-duty needle to thread my baker’s twine through the slits of my paper circles. I found it was helpful to tie my twine onto my needle so that it didn’t keep slipping out.


After I strung about 50 circles onto a length of about 16 feet of baker's twine, I arranged them so that there was about 1/2-3/4" between each circle (again, just "eyeballing" things) and left about a foot of twine on either end. In all, I made 3 garlands and had a blast (!) playing with them once they were finished.


I really enjoyed making this garland!!!! It was super fun! I really think I will make some more to decorate my house and also use special colors for various holidays!!! This project is super-versatile... you can try using smaller sizes of circle punches (using thinner-weight paper for smaller punches) and create any length you desire!!! There are tons-tons-TONS of StencilGirl® stencils to completely customize this project!

If you decide to make some stenciled garlands, be sure to share your pics with us! You can hashtag #stencilgirl or #stencilgirlproducts to share your creations on social media! I cant wait to see what you create!!! 😍😍😍

Heidi

Heidi Smith is a mixed media artist and painter and a member of the 2019-2020 StencilGirl® Products Creative Team. You can find her work on Instagram and her newly-launched YouTube Channel.


https://www.instagram.com/stencilgirl_products/