Showing posts with label #stencilledart. Show all posts

Friday, August 22, 2025

Layers of stenciled tissue collage


Hello beautiful creatives it’s Tina here from @tinahoisart.
Today I will share a frugal arty tip that use in my art journals~ tissue!

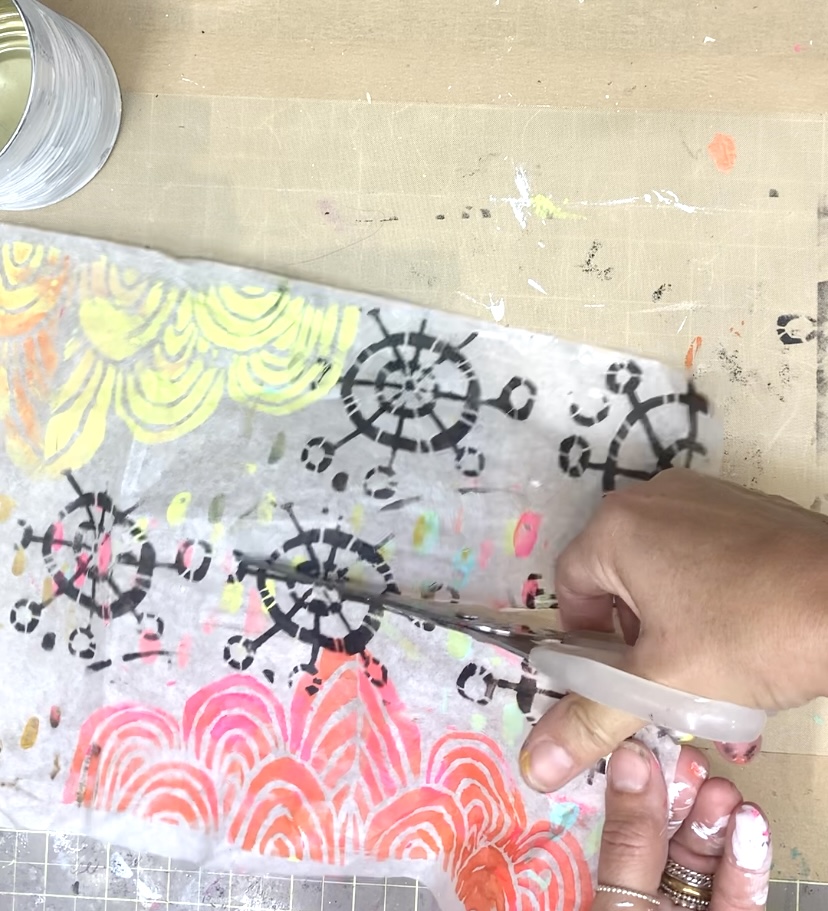
I love stencilling on tissue paper.  The translucency of the tissue is perfect for creating layers and a simple way of adding depth and texture to your art.

I am using two varieties of tissue one from a napkin and one from gift packaging~this technique also works wonderfully with coloured tissue papers.

The stencils I am featuring and using here are:

Little Painted Rainbows created by Carolyn Dube 
Pressed Leaves created by  Cecilia Swatton
I AM Words mask created by Cat Kerr
MB Makes Marks created by Mary Beth Shaw


Tip:Using an assortment of shapes and stencil styles creates a unique and interesting collage.


The Process:

Step 1:

Using a makeup sponge rub it on an ink pad, select your stencil and apply the ink.
TIP: Using ink on tissue will ensure that tissue doesn’t tare.  If acrylic paint is being used be mindful of how much is being used. Less is more.


 Step 2
Apply a thin layer of gesso to your art journal- this will work as a base for the layers that we will be building


Step 3:
Now this is the fun part and the opportunity to create the layers as you prefer 
Cut up the tissue paper and with mod podge or matte medium adhere to the journal pages 


Step 4

I added some white acrylic paint for the eye to rest as as to add some lightness to the page 


Supplies:

Stencils
Distress INks
Makep sponge
tissue papers
Gesso
White Acrylic paint

Thanks for stopping by.
Enjoy creating your own tissue paper collage.


Tina


Friday, December 20, 2024

Fan~Tastic paper folding


Hello friends, 
Tina here with another creative stencil idea not only for the holidays but for any celebration (or just because they are so fun to make!)  

Below I will guide you through the steps of creating stencilled layered papers using just one stencil, a gel plate and a simple folding technique to create quick paper fans that can dress up a tree, gift or made into a garland.  Please don't stop here, use these papers in your art journals, cards and tags!

I am using acrylic paint in the same colour family ~ I love that slight contrast of tone and adding gold acrylic for some shine.

The stencil I am working with forthis project is Stone Stack by Jane Monteith.
I love the organic stone formation and when used with the tequinique below it creates gorgeous layers.

The Process:

Apply paint to the gel plate and with a plain piece of printer paper lift this first layer


Apply a contrasting colour to the gel plate, lay the stencil on top and with the same piece of paper lift the second layer


Remove the stencil and wait for a few seconds then apply the gold paint.  Lay the same paper on top (rotate the paper so that the stones are not laying over the negative image on the gel plate. Lift this final layer.


Fold the paper in half and cut down the center so you have two equal pieces.
Take one of the pieces and create the first fan fold (2.5cm) continue until the entire piece is folded.


Fold it half and trim the edges~I snipped them to a point but feel free to snip as desirre
d.
Note: Folding the paper vertically will create a longer fan and horizontally a wider fan. I made both!


Lay the piece flat with the painted side facing up and with a piece of string tie a double knot in the center


Turn it over and glue the two flat sides together


Once the glue is dry unfurl the folds 


To add a festive touch I am adding glitter to the tips (optional) . For this a glitter glue or glue and glitter can be used. I had the later on hand.


Add a wooden bead (optiional) for a finishing touch 


ALL DONE!

Check out the full process video here Tina Hois Art

Thank you for stopping by, have fun creating your personalised festive fans!


Wishing you all a Fan~Tastic holiday!

          ~Tina


Let's connect here:


Supplies:    

Stencil Stone Stack by Jane Monteith
Printer paper
Acrylic paint
Gel Plate 
Brayer
Glue stick
String
Glitter glue
Wood bead
Scissors


Friday, May 10, 2024

Up~cycled tin can containers


Hello creative friends, 

How my spirit is lifted when spring arrives.  
The sun is out, the birds are singing and it’s also the time of year we celebrate Earth Day.

In honour of Earth Day today we will be creating a little project that has so many wonderful possibilities ~ yes the tin can up~cycle! 

So gather your tin cans plus the supplies from the list below and let’s begin transforming. 

Today I am using Wheel in the Sky stencil designed by Kate Pea. 
Check out this blog post for more inspiration with this stencil https://www.stencilgirltalk.com/2023/07/heal-grow-art-journal-page.html


The Process:

Paint tins with gesso or acrylic paint of your choice and set aside until completely dry.


Transfer stencil pattern onto tissue paper


Measure the height and diameter of the can and cut the tissue paper


Apply some ModPodge or matte medium to the can or the tissue and adhere until the entire surface is covered.


TIP: Cut a piece of plastic wrap - (enough to cover the can)and wrap it around the can. This will ensure we don’t overwork the tissue and allows us to press it into the grooves.
Once you are satisfied place the can aside to completely dry.

Once the container is dry seal it with a coat of ModPodge and allow to completely dry.


The containers can be left as is or embellished further.
I used my crop-a-dile to punch holes and added a wire handle one one.  Some string, fabric and glued wood legs for height variety.
I will be creating a few more with live succulents for the front porch.   Just love how they turned out.


Enjoy and let’s connect!


Supplies:

Tin cans
Tissue paper
Acrylic paint
Paint applicator 
Scissors
Modpodge
Plastic wrap
Paint brush 


Tuesday, November 14, 2023

Nesting Doll Journal and Tags


Hello friends, 
Tina here, and I’m so thrilled to share this project with you. 
Today I will be creating and assembling a little journal and some tags using a main stencil that brings me back to childhood and the endless moments I spent playing with my first set of Matryoshka Dolls/Nesting Dolls.  To my delight both of my daughters relished in the same joy and I hope you do as well.

Before I start lets talk about the stencil: Nesting Dolls was designed by Valerie Sjodin and it comes with 6 nesting doll stencils and masks.  For more ideas on how to use and cut these little beauties refer to the item description in the StencilGirl shop.
I love that each doll has it's own unique little face and embelishment identity, but please feel free to stray and mix it up.  As you will see below I did just that.

Step 1

Grab the Nesting Dolls stencil and remove the masks.  Trace the outline with a gel marker or pencil and then cut.  For the journal cut a front and back cover as well as filler pages (all the same size) and as many as you like!


Step 2

Working on the front and back covers~
With a pencil or gel marker outline the dolls face and dress outline.
For the facial features I used black paint.
Reapeat so that there are now 2 Nesting dolls~ one front cover and one back cover.


Step 3

With the Lemon Button Fern stencil I used yellow oxide and some black to add some stems to her gown and with markers or paint fill in the heart and leaves.


Step 4

With a watercolor pencil ( I am using Stabilo aquarellable) outline the facial features and the body.
With a wet brush trace over the outline to give it a soft watercolor effect. 
Once dry I outline around the head, face and body with a gel marker creating loose lines. 


Step 5

I selected bits from the Nesting Doll stencil for extra embelishment and used the Broken line column stencil to create some contrasting marks.


Step 6

On the reverse side of each doll I am gluing some hand made papers and stenciling on the face and some flowers that can be found on the Nesting doll stencil. 
NOTE: I am not adding the body mask on the inside pages. The pages will hold art and images.


Repeat step six to all your inside pages or smaller tags


Step 7

Attach a piece of fabric or paper strip to any inside pages you would like to have dolls nesting.
I added fabric and ran it though the sewing machine (feel free to used gle or hand stitch).


Step 8

For the nesting doll tags I puched a hole on the tallest doll and added some fibres.


Step 9

The dolls are now ready for your art!!


Note: To create a Nesting doll journal follow all the above steps, add as many pages as you prefer.
Add a hole to each page and secure with a key ring.


Attaching a little video flip through of my little journal for inspiration. Nesting Doll Journal Inspo


Supplies

Stencils:
Lemon Button Fern designed by Rae Missigman
Broken Line Columns designed by  Cynthia Silveri
Nesting Dolls designed by  Valerie Sjodin

Acrylic paint
Scissors
Gel marker
Watercolor pencil
Small paint brush
Small sponge
Patterened papers
Fabric 
Glue
Needle and thread or sewing machine


      Let's Connect;