Showing posts with label art supply storage. Show all posts

Monday, February 13, 2023

To See or Not to See...Your Art Supplies


To See or Not to See...Your Art Supplies

Hello! I am Kristin Williams and, like you, I have too many #$@^ art supplies. 


Amiright????? 


Recently I culled through, gifted, sold, tossed, and essentially liquidated the contents of my 2.500 s.f. shop & studio, Ephemera Paducah. For about 3 months I felt like I did nothing but make 87,532 micro-decisions each day. 

  • Do I toss it? 
  • Do I keep it? 
  • Does it work?
  • Does someone else want this?
  • Where will I put it? 
  • What will it go with? 
  • Am I ever going to touch it again? 
  • Do I want to touch it? 
  • Will I remember where I put it? 
  • Don’t I have another one of these?
  • Is this the good one??
  • Repeat. 

At the end of the days in December and November when my husband and I would have the dreaded “what do YOU want for dinner conversation,” I would be in the fetal position in the corner mumbling, “you pick you pick you pick you pick.” Actually, I was probably yelling, "A MANHATTAN!” but the incoherent mumbling makes for a better story. 


I survived and am on the other side. 
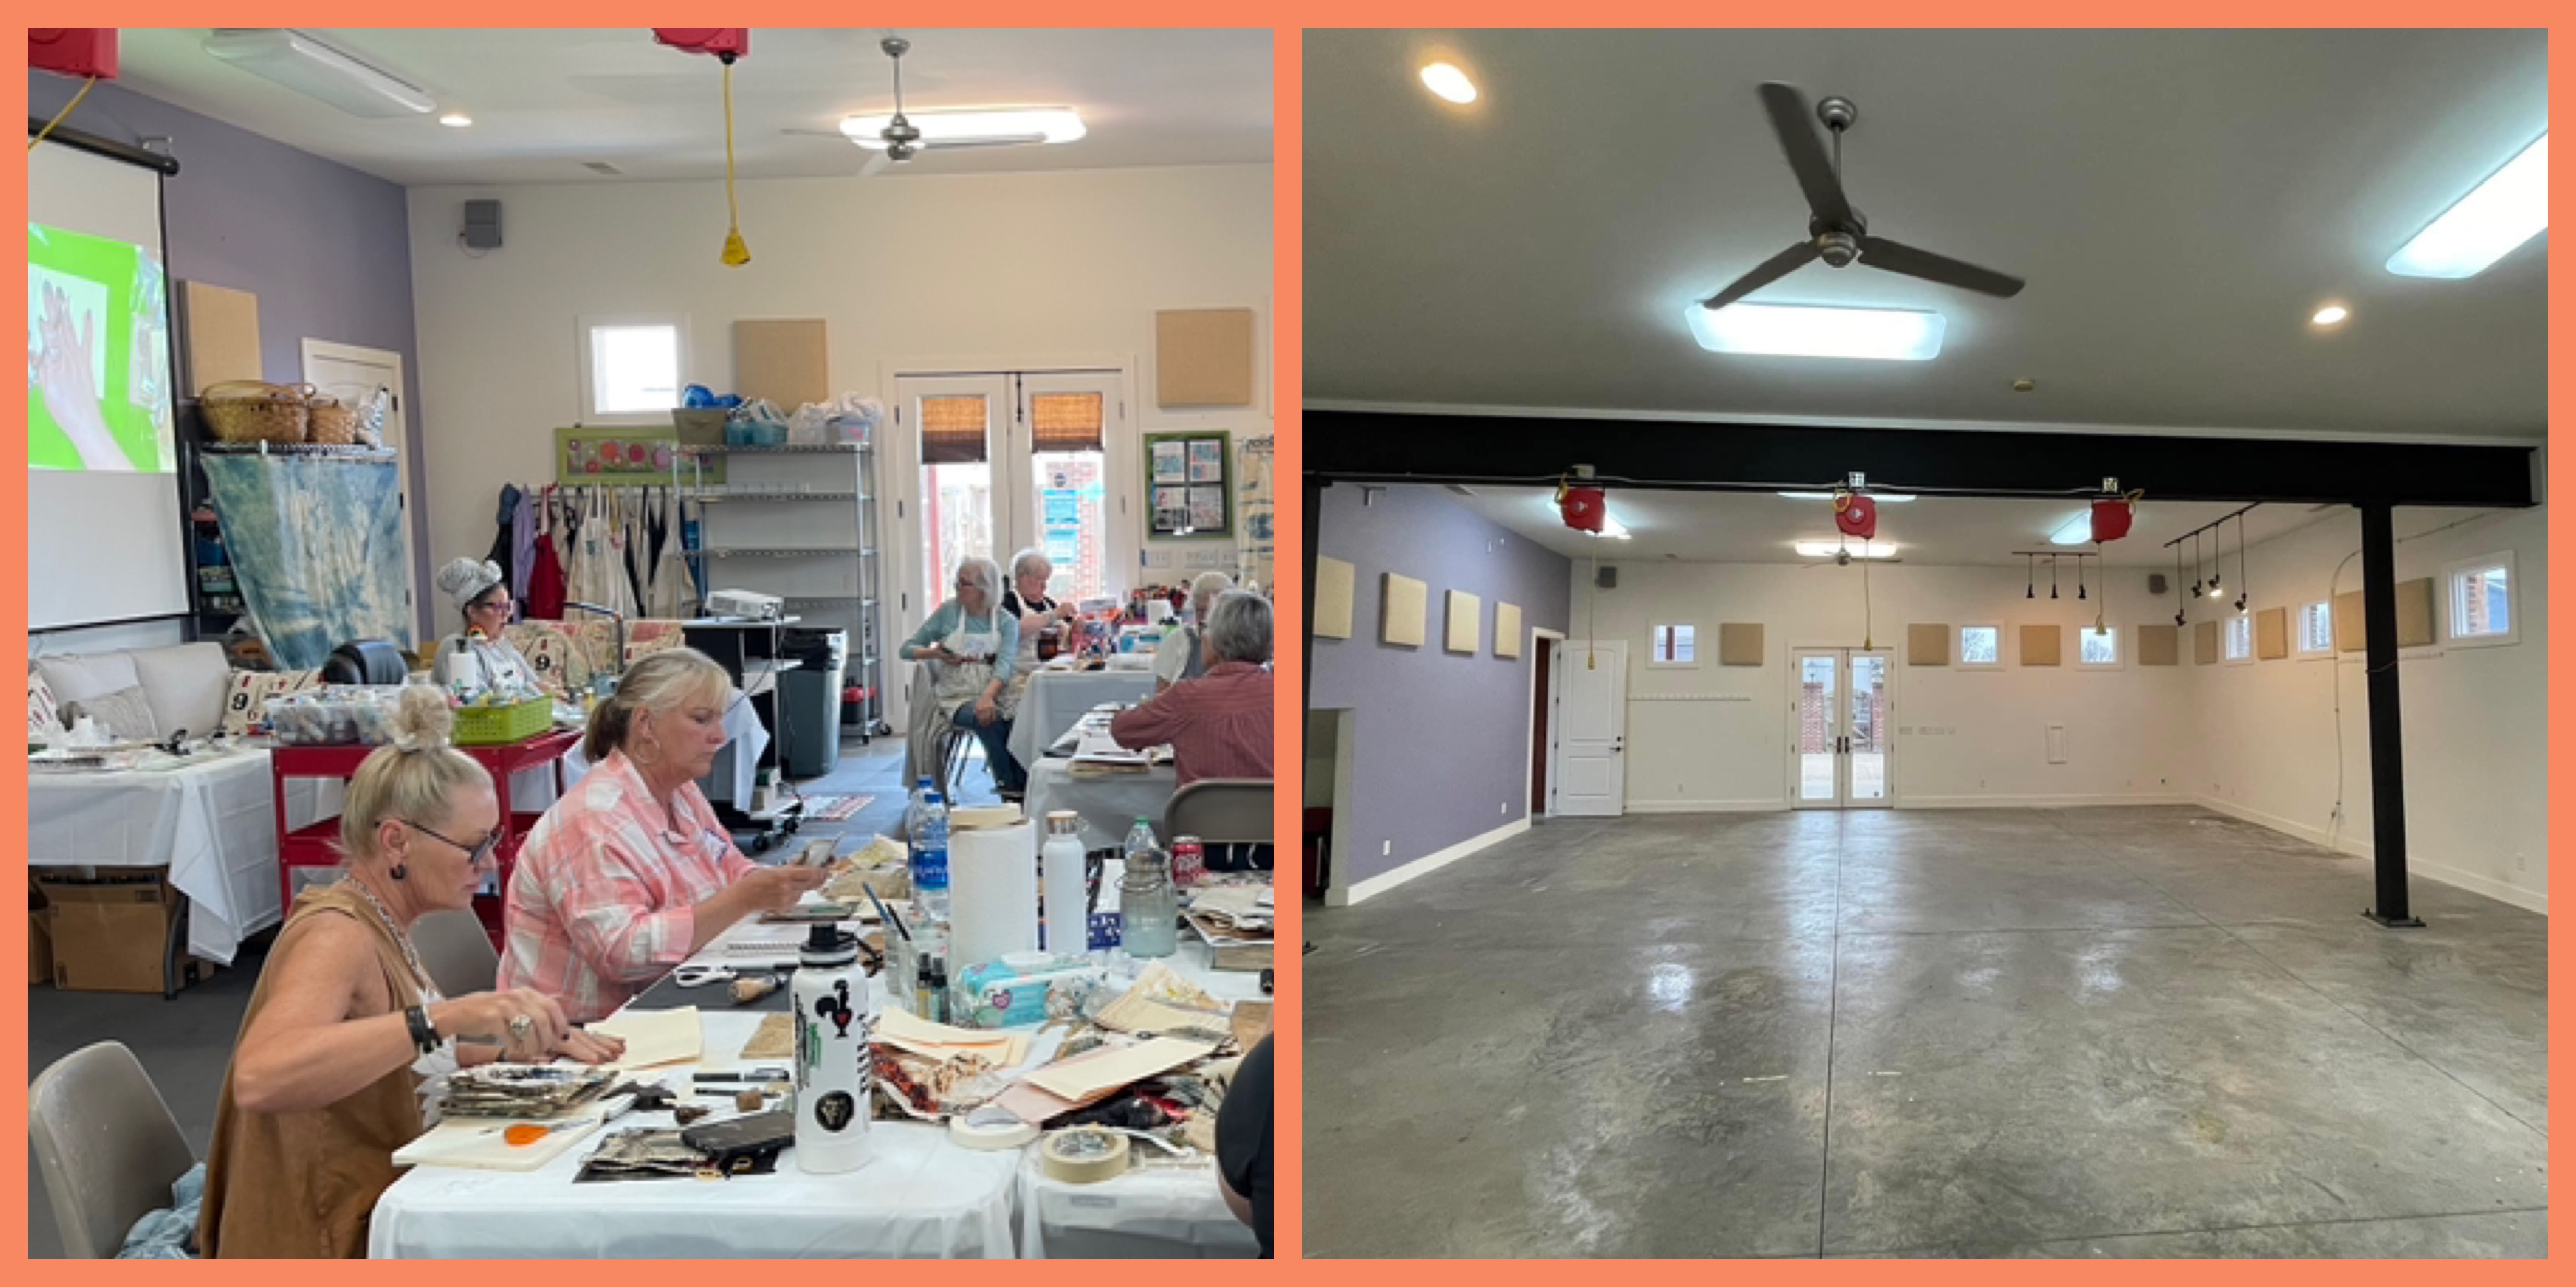


Thankfully I had great helpers, and wonderful customers who enjoyed a heck of a sale, and, just in time, two enterprising folks appeared out of the woodwork and purchased what was left lock, stock, and barrel. By early December the place was cleared out except for what I kept for personal use. 


Yeah, more micro-decisions. Where to put all the supplies I wanted to keep?


I ignored the piles as long as I could, but when my big dog TeeJay decided to snack on a tray of Acrylic Inks and took the title “Blue Dog” to a realistic level. I had to get busy. 


Sidebar — I don’t know about you, but I have to have something mindless going on in the background while working in my studio. A TV is an art supply for me. I am not ashamed. And, thankfully, as I was doing the business of integrating a gazillion supplies into my home studio in December, I was incredibly thankful for Hallmark Christmas movies. They got me through sorting pens and pencils by color and lifelessness because you can tune out and pick up in the next movie but not miss a thing.  


At first, I thought I needed either everything either out of sight, shoving bins into existing furniture and closets, or arranged in cute carts I could rotate as I needed. Since TeeJay is head level with the top of the carts, and art supplies are so delicious, I had to scrap that concept. 


Also, I know myself. If I can’t see it when I am working, I am not going to use it. Having all the acrylic paints boxed up in a piece of furniture across the room from my desk was not going to work for me. 


Mary Beth Shaw to the rescue! She had gone through the exact same mental exercise of “to see or not see” her Art supplies (prior to the horrible incident of frozen pipes bursting in her studio in December). I hopped in the truck and ran up to St. Louis to see her organizational methods for myself, and fell in love. 


Off to The Container Store we went for clear stackable drawers, (which she reported to me post studio flooding, stayed dry inside). Once home I rearranged the existing furniture in my home studio and created a nest around my desk where I can twist in my chair and grab 90% of what I will use for mixed media — art crayons, paints, pens, brushes, etc. all at hand in a cozy, well-lit space.
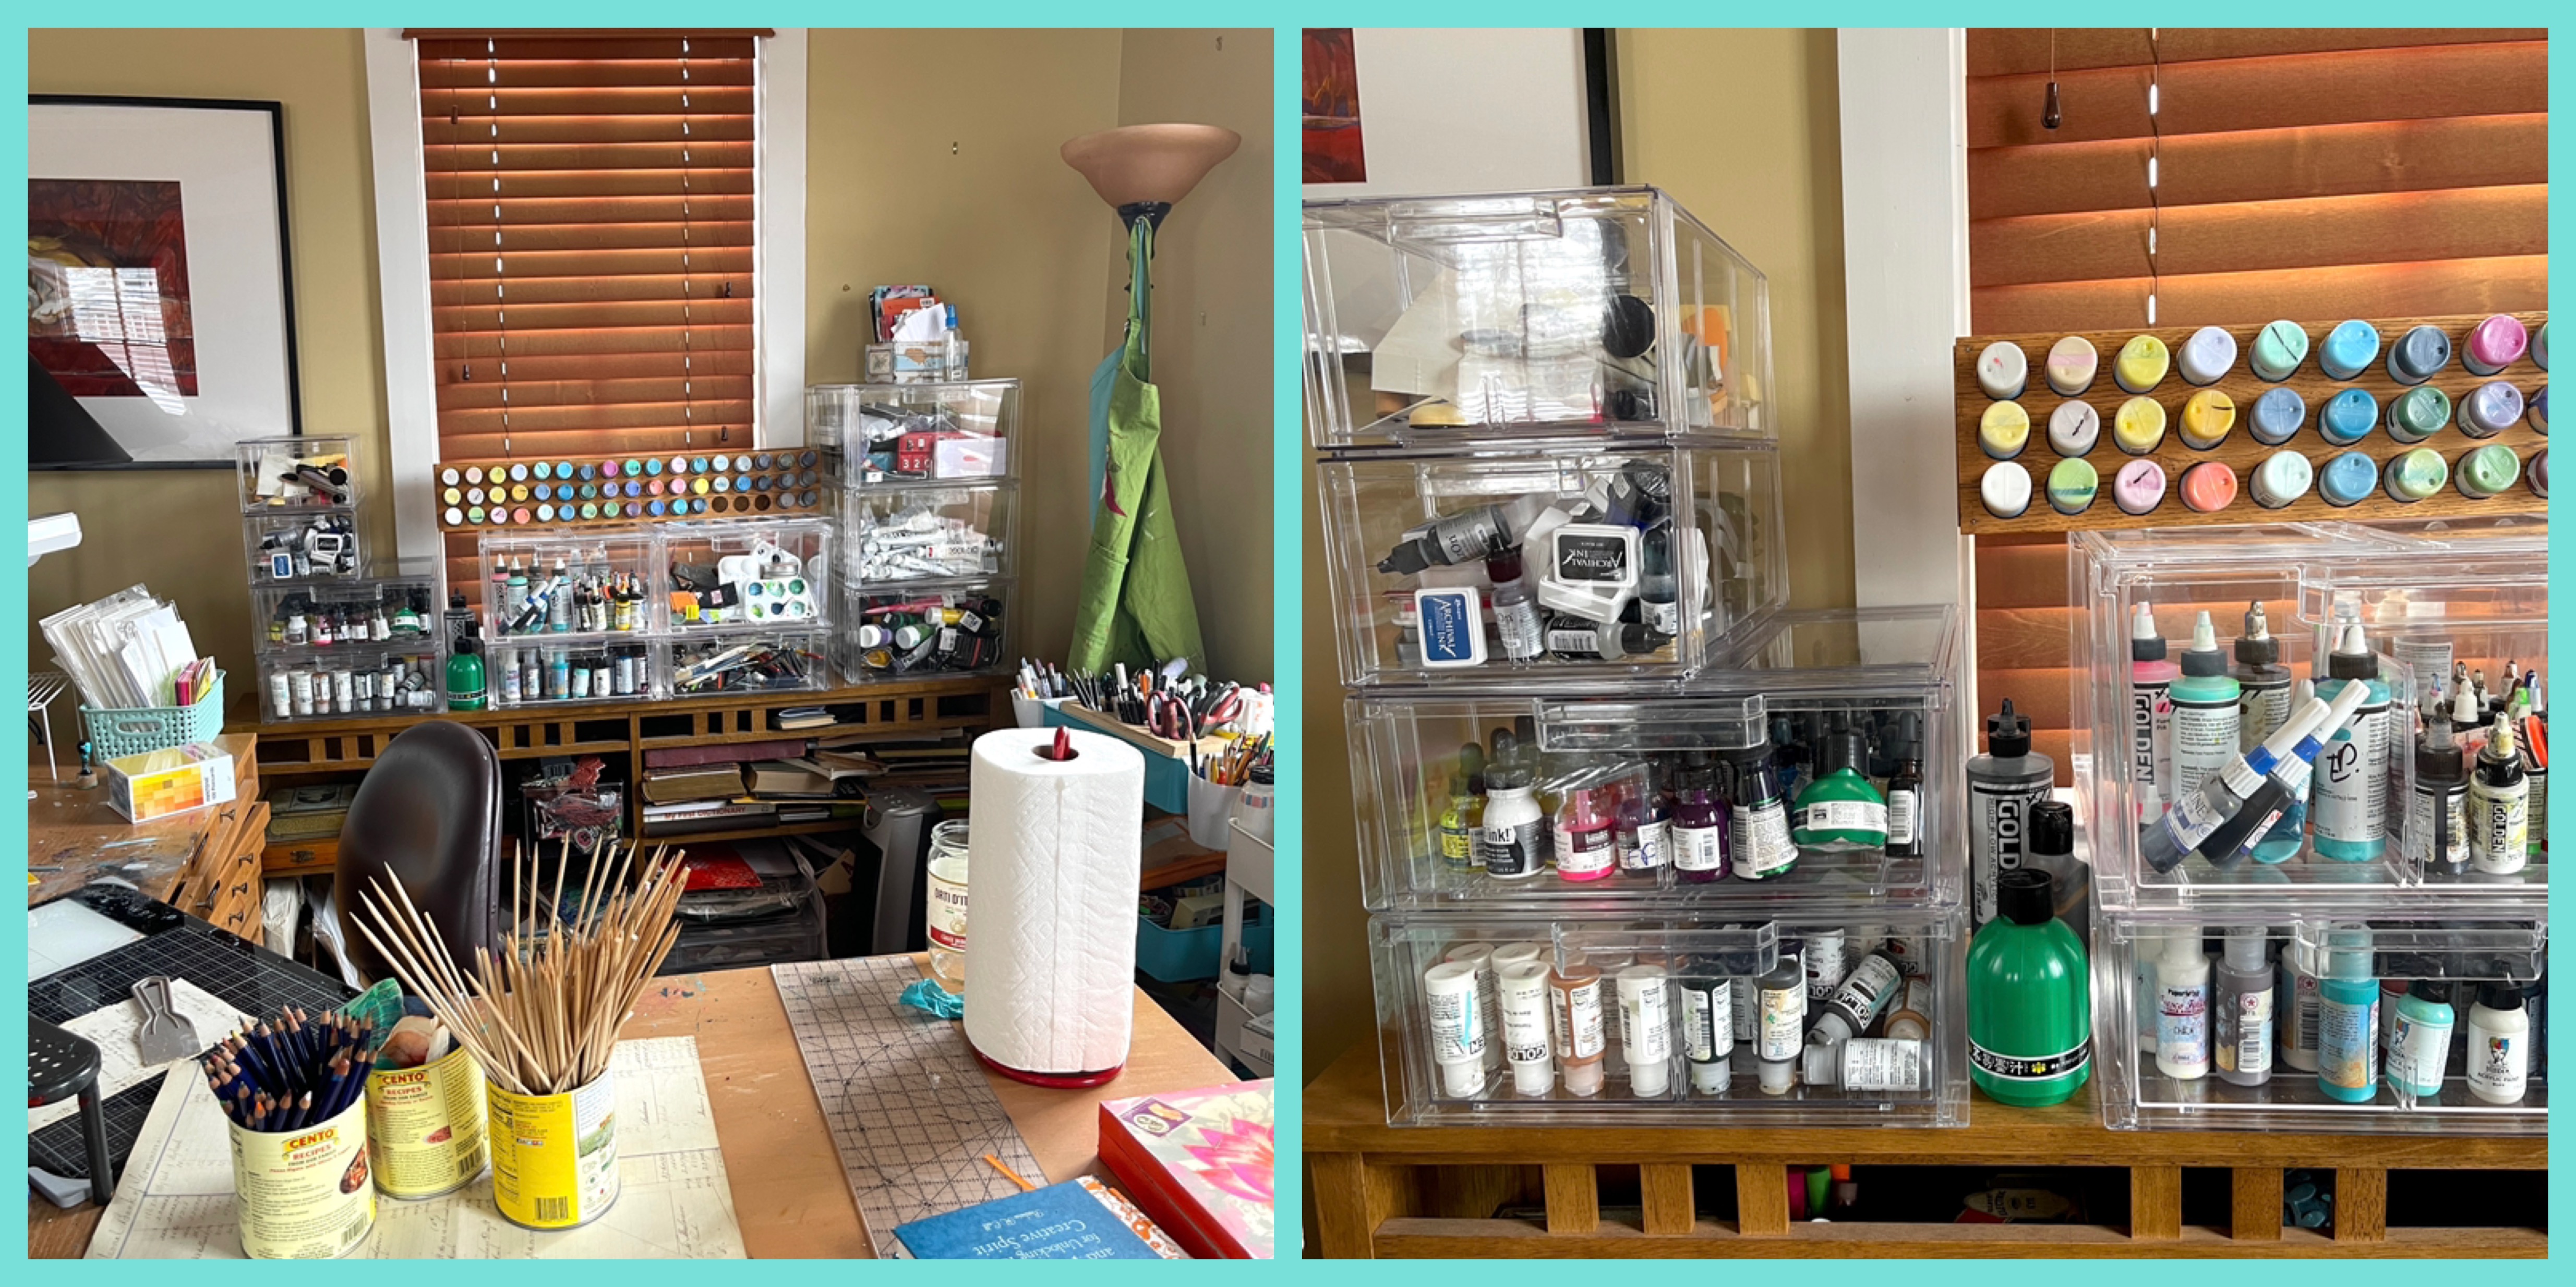


I set up my sewing machine in a separate area and moved another piece of storage furniture to house everything fiber. — fabric, thread, notions, and tools. Sorting fabric is my next big thing but I am happy to report that I am still in love with my thread sorting system incorporating the Target felt baskets. 


Using the 12” x 12” clamshells always on sale at Micheals or clear zippered pouches, I have my “specialty” packs together stored in furniture rather than out. For instance, I keep all the items needed to carve stamps together. And, I incorporated my favorite re-use of big cans of tomatoes for quick-grab or stuff items on my desk. One of these cans is a fabulous choice for those paper bits you can’t bear to throw away. 


I am more compact in my Tennessee Studio. I love looking at this piece and have diligently labeled the drawers with a Signo Uni-ball and blue tape. It obviously is the opposite of “to see” but I can read what’s in each drawer. I also try to limit the number of supplies there as the space is so much smaller. I end up packing what I am working on back and forth to the two locations.


As for stencil storage, I do what works for me which is a giant drawer in Kentucky and a clamshell box in Tennessee. I swear the process of culling through them with my hands is part of my creative process. I love it when I sort through them and trip across the perfect stencil -- something that happens every time. I keep a ratty baggie of my favorite ATCs, Minis, and 6x6s together for travel and couch art journaling. 


Other than some of the obvious things like keeping ‘Likes with Likes,” gifting or tossing something as soon as you realize you are not going to use it, having a place for all categories of supplies to live, and labeling as you need to, I don’t have any other words of wisdom other than "to thine own self be true!" I wish I could be creative in a beautifully curated studio, but that intimidates me more than inspires me. 


Thanks for reading! If you’ve got a favorite Art Supply Storage tip please add it in the comments!!


Thursday, December 24, 2020

Mary Beth's Must Haves

Hi, everyone! Mary Beth here!
I'm often asked during my Facebook livestreams about art supplies I'm using in my videos.
I keep a list of all my favorite art supplies here.
And today I'm sharing five more of my favorites!


I have four of these that I use for marker storage. Super quality!
See these in action in my Markers & Stencils livestream.


I love making my own washi tape with this blank tape!
It's perfect for using with acrylic paint and stencils
and can be collaged into journal pages or other mixed media projects.
See how I create my own washi tape in this video tutorial!


Golden Iridescent Bronze Acrylic...just call it magic paint as you watch the separation of color, so gorgeous!!
QoR Watercolors: I love this 12 half pan tin for travel!
See these two supplies together in my art journaling livestream here.


This is "bleeding" tissue. Sounds weird but it is super cool and you are going to want it!
See how I use it with stencils in my video here.


I love using a variety of art crayons with StencilGirl® Products!
See a comparison of these water-soluble crayons in my video here.


Thanks so much for joining me on the blog today!
I hope you love my favorite things as much as I do!
Mary Beth Shaw, Founder of StencilGirl® Products

Monday, November 16, 2020

Junking - the Perfect Artist's Date!


An artist's date is a way to devote time to your creative self. It should be done solo, and the time is just for you. Julia Cameron, the author of The Artist's Way, describes them as assigned play. It may be walking through an art supply store or visiting a museum—anything you find creative and enjoyable.


Last week I was able to go on an Artist’s Date doing one of my most adored thing to do, JUNKING, at my favorite place in west Kentucky. If you love StencilGirl® Stencils, you probably love Mixed Media. And if you love Mixed Media, I’m pretty sure things like old ledger pages, cool art supply storage tins, rusty bits, and all kinds of goodies like that make your heart go pitter-pat. 


Anything Goes Trading Company in Boaz, KY is about a 15-minute drive off of I-24 taking Exit 7 in Paducah. It’s a remarkable destination who’s owner always accommodates folks taking classes at Ephemera Paducah. I’ve incorporated field trips into class weekends, called to ask them to stay open late and send anyone in the shop wanting to find cool old stuff to it. I call it “the most well-organized junkyard” you will ever trip across. You shop outside first and make a pile. The owner or shopkeeper will price it for you. Then you move inside where everything is priced, but generally, there is some kind of sale going on.


I grew up following my mom around to antique stores, flea markets, and monthly shows at the civic center in east Tennessee. My mom was an antique dealer and the consummate haggler. True story. I was with her once when she picked up a Cherokee Indian Basket she well knew was worth a good bit of money and couldn’t read if the price tag was $50 or $60. When she brought it to the shop owner he took a look at it and said, “$5.” Her reply was, “would you take $4.50?” I kid you not. 


Since I’ve been doing this for, yikes, half a decade, I’ve figured out a thing or two to make my expeditions fruitful, and thus, more enjoyable! Enjoy the photos from my junking adventures from the last couple of months!


Here’s my list of Top Junking Pro-Tips:


#1 Know what you are looking for and articulate it

This helps when a store is overwhelmed with merchandise, not well organized, or you are on a hunt like the 400-Mile Sale and there is just so. much. stuff. Have a list of items you want to find and look specifically for them. I think by doing this you are also asking for help from the Universe to manifest your desires, but that’s a whole other book.


The past few months I’ve been looking for hinged tins that could house art supplies or watercolors, green tins in all shapes and sizes for my home studio, and dip pens. I am always on the hunt for red or teal toolboxes (not tackle boxes, big difference), old ledgers filled with cool writing, bundles of letters, and metal letter stencils.


#2 If you are shopping with a buddy, tell them what's on your list 

Two sets of eyes are better than one. This is also a great way to give your spouse a job if they're tagging along. ahem.


#3 Know what you should spend on the items you’re looking for

If you don’t know for sure what an item’s value is, spend some time on eBay before venturing out to get a feel for what it is selling for. Make sure and notice if shipping is included in the pricing as it can make a difference.


Generally, I’m looking for “wholesale” pricing as what I find will get marked up for a profit margin when it goes into the shop. For personal items that bring me great joy, I will splurge. However, It never feels good being taken so, a little knowledge is powerful.  

These 1960's kid encyclopedia have THE BEST illustrations. Great for Oracle Decks. 


#4 Ask for specialty items

I mentioned ledgers earlier. These are hard for me to find in a shop without asking. They get shelved in the book section, stacked underneath things, and oftentimes, don’t stick out. It never hurts to ask the shopkeeper if they know if items on your list are available. 

Ledger paper makes a beautiful background or in collage. Scan it and have it for a lifetime. 


#5 Learn how to say, “is this the best price?”

For those who hate to haggle, this is a gracious way to inquire if the owner of the object can knock off a bit. Volume matters so wait until you have all your purchases loaded on the counter to ask. In an antique mall the person working the register either knows what the vendors’ standard discount is or will call to ask. I tend not to ask unless the item is more than $50.


Another trick is to ask, “how much for all of them?”


These stencils were in a shop, priced by the piece. Taking them all, the owner knocked off about half what she was asking.

Any game with letters has to go home with me! And Anything Goes is the bomb for Rusty bits for dying. 


I hope this helps with your next Artist’s Junking Date! 

Tag me if you find some really cool stuff!


As much as I love red toolboxes, I left this one there. Extra points for creative closure, though. 


I love it when shops group items. Great displays at Anything Goes!

I ADORE finding the perfect vintage storage pieces for art supplies. 


Friday, September 14, 2018

Stored in My Studio – Stencils & Then Some; Adding Pops of Color with Trena Brannon


Hello Beautiful People!

Today I’m sharing an idea for how to add pops of color to your space. Since all the colors are my favorite, it’s a challenge for me to pick one (or even a few) to fill my creative space. We moved last year and I’m still trying to decide what my space will look like – it changes a little every time I get inspired to organize. 

Once I saw the Japanese Influence stencil (coming soon), I got an idea of how to add color to my IKEA Alex drawers. I could see each one of the 12 squares as an independent design. To get color that really pops, for me alcohol inks are the way to go!


I'm also sharing a wooden piece I found from a local thrift store, Recycle Ann Arbor ReUse Center - that helps me organize. What's Old is New Again... I painted it, used stencils to personalize it and filled it in a way that helps me be more efficient when I’m creating greeting cards.


In this video, I show the steps of what I did to create the color pops and a tour of my creative space, including how I store my stencils. 


Supplies used:
Substrate:  Yupo white, a found piece of wood 
Paints: Alcohol Inks, Matisse and ColourArte acrylic paints, ZIG paint pen, Liquitex white gesso
Other: Liqutex Gloss Gel, palette knife, Krylon Kamr Varnish finishing spray, blending solution
Stencils: The January 2014 StencilClub Set: Peacock by Jessica Sporn, my own Brush Alphabet Stencil, L645.
The other stencil you see in the video will be released soon. It's "Japanese Influence" by Cynthia Silveri.


Thank you so much for reading and watching!!

Take care and STAY POSITIVE!Trena


Tuesday, September 11, 2018

Stored In My Studio – Stencils & Then Some


Hi friends! It’s Belen of Art & Whimsy here to share with you some behind the scenes peeks at how I store my stencils and some of my other art supplies.


Finding a storage method that works for you is a very personal choice. One valuable lesson that I learned in my many attempts to figure out my own studio storage was that I needed to place less importance on what I wanted my studio to LOOK like in favor of creating a space that was functional and fit with how I create. 

For me, that meant having various baskets & bins and long open shelves where I can store things out in the open. I love the thought of having supplies tucked away behind closed doors, but I’m definitely one of those people that needs to have things out and visible or I tend to forget that I have them. I can’t begin to tell you how many supplies I’ve purchase duplicates simply because… out of sight, out of mind!


Here is an older picture of my studio. I've changed things around a bit and now have a full wall of workspace, but it gives you an idea of what my open shelves look like.
When it comes to my stencils, my storage preference involves large 12 x 12  3-ring photo albums with various sizes of clear page protectors.


I sort them into categories for ease of use and have now added a third binder this is dedicated solely to StencilGirl® stencils because I'm THAT obsessed with them! 


I use 12x12 sheets with individual 4x4 pockets to store my mini stencils.This allows me to store 9 per page.


For my 6x6 stencils I use regular 8.5 x 11page protectors and usually add 2 per page protector.


For my larger 9 x 12 stencils I use 12 x 12 page protectors. I actually store 2 stencils in each of these page protectors by slipping a piece of paper in between the two stencils. This helps to keep intricately cut stencils from tangling and the contrast of the paper also helps me to better see the design.


I like to create batches of painted papers to use in my various projects and when putting together my small Painty Papers Journals, but it drives me bonkers to have piles of papers lying about. To keep these somewhat neat and tidy I use a basket that I picked up at my local craft store.


I love to use misc. bits of paper and ephemera when I art journal. But again, I needed to find a way to store it that was convenient for me to use and fit with how I work. I came across this slotted organizer at of my local craft store and it ended up working beautifully. It helps me see what I have and it helps me limit what I keep on hand.


I also use various baskets to store things like paints and ink pads, like you see here. Again, things are contained but still allow me to have them out in plain sight.


On my main work counter, I use a variety of containers to hold various mediums, brushes, tools, paints, inks, as well as powdered & solid pigments. It might not be the set up that I envisioned in my original planning, but after much trial and error, I've found what works for me and that's what's important.

Thank you for dropping by, and allowing me to share my creative space with you. 

Happy Arting!
-xo, Belen