Anyway, not too long after I created my plaster elephant sculpture from a stencil, I started thinking that I could take the same process and adapt it to make my own mixed media version of a kalaga. The idea has been bumping around in my head for a while, then last month I was teaching a class on how to make my plaster sculptures, and I realized that the demo piece I was making from Mary Beth Shaw's dragon stencil would be the perfect centerpiece for this new project. So, when I got home from my teaching trip, I started working on it and voila! It worked! Here's what my project looks like, then I'll show you the steps to try and recreate your own if you'd like.
To make your own, you'll start by following the steps from the elephant sculpture post... I started out by tracing the stencil onto cardboard and then building out bulk to create the armature.
The difference here is that I only built it out on one side, keeping the other side flat so it could adhere to my background. Next up, cover it with plaster (this gets tricky with all of those spines! But it's worth a little patience when you're done.)
You can see how I did my best to keep the back flat so I could adhere it later on...
Next, I let it dry overnight (some quick dry plasters dry faster than others - I've discovered that Rigid Wrap is supposed to be quick dry, but it's really best to let it set for a while.) Once it was dry I pained it gold.
Then, is anyone surprised? I used my Liquid Pearls to start adding the details. I started with the scales, then did the face using a reference image from a dragon kalaga I'd found online.
The original image had an opening in the snout, but I realized it would look better if I filled it in, so I just glued on some backing and added some molding paste on top to fill in. Then I just went over top with the decorations and you can't tell the difference!
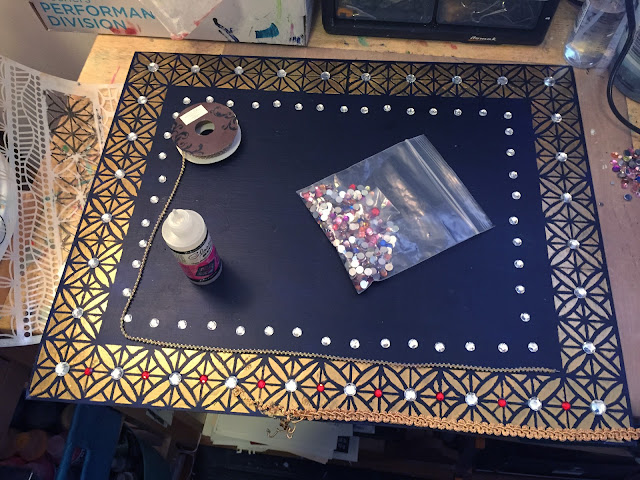
Once the dragon was done, I set it aside to dry and started working on the background. You could use any substrate you wanted, but I happened to have a sheet of Canson illustration board (you can get it at a craft store or an art supply store) that was the perfect size for this project (about 16"x20".) I gesso'd it and then painted with two coats of Golden Fluid Acrylics in Paynes Gray. Then I used Maria McGuire's Doodle It Border stencil and some gold embossing paste to create a border around the edge that would be the foundation for decorating the background. (You'll need to let the paste dry a bit after you apply each section so it doesn't smudge as you go.)
I have lots of plastic gems and trims sitting around, so I went through my stash to get jewels and a gold gimp trim (pretty sure I got my spool at Paper Mart several years ago) and some beaded trim from the craft store. I laid it all out and adhered it down, then I adhered my dragon into the middle (I used Helmar Quick Dry) and put some groupings of gold sequins around him.
Finally, I got my Liquid Pearls back out to fill in the "embroidery" for my background. I might have gone just a bit nuts, but it was so fun! And I'm super excited about the end result. Below you can see my "kalaga" from a few different angles to get the 3D effect of the dragon half-sculpture.
Now all that's left is to decide where this guy is going to go! I think it's time to pick out a frame and then he'll get hung up somewhere special :)
I hope you enjoyed today's project... be sure to come back and link us up if you try something similar at home!
Until next time, happy stenciling!


oh. my. gosh!
ReplyDeleteGwen, this is absolutely STUNNING!
You are a brilliant artist and never cease to inspire me with your art! :)
love this, just beautiful
ReplyDeleteStunning!
ReplyDeleteThis is so beautiful. Love it.
ReplyDeleteWOW I have a rug burn on my chin when it hit the floor! It's beautiful. Absolutely stunning.
ReplyDeleteStunning! Love how textural it looks.
ReplyDeletegwen, this is stunning -- lots of work but so well worth it!
ReplyDeleteThanks everyone! It was a fair amount of work, but so much fun! I was pretty excited that it turned out the way I pictured it in my head :D
ReplyDeletewow!!! you put a lot of work into this piece. beautiful!
ReplyDeleteAmazing!
ReplyDeleteAmazing!
ReplyDeleteSo beautiful! You are very, very talented! (and patient probably :))
ReplyDeleteYour article covers all the major aspects of the topic. Simply amazing.
ReplyDeleteYou knocked it out of the park on this one Gwen. Fabulous!
ReplyDelete