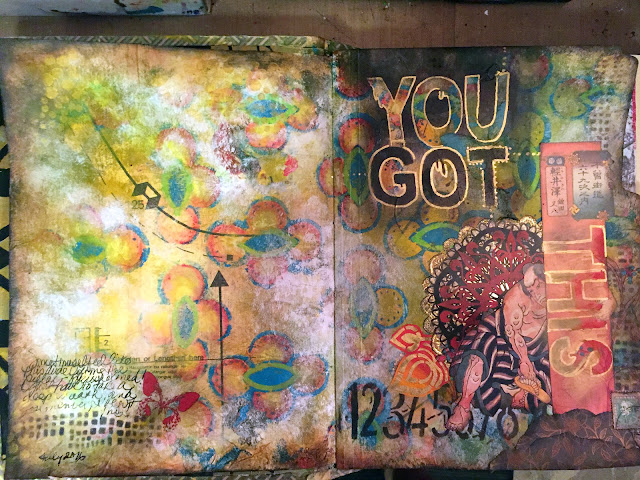
Here's my finished art journal spread, and below is a short little tutorial to show you how I made it.
To start, I gesso'd the background, then adhered a few large pieces of my pattern with matte medium.
Next I decided on my color palette - I went for greens and yellows for the first layer of paint and just started adding them and blending until I was happy with how it looked.
Once that was done and dry, I took my stencil out and used blue heavy body paint (Holbein Compose Blue #1) and a stuff bristled brush and started stenciling the image. I just rotated the stencil every other column to get a different pattern. I thought it would be cool to have kind of a fade-out effect, so as I got toward the left side of the spread, I just used less and less paint.
I thought this looked pretty cool already, but you know me... I need to add more!
I got out some water soluble crayons and a water brush and started adding some color into the circle areas (I've mentioned it before, but I like to design my stencils with the idea of coloring them in.)
You might be able to see a few spots of different colors added into the photo above - I grabbed some dried paint off of my palette and stuck it down on the page for some added color and texture (I cover them with a coat of matte medium to make sure they stick.)
To kind of tone things down and add another dimension, I took a cheap bristle brush and started to scrub in a bit of white paint here and there. I really love how this changed the whole thing.
Voila! The background is finished. Of course, you could stop at any point along the way if you're happy with it, but I was very glad I kept going until this point.
Once the background was done, it was time to do something with it! I was really feeling collage for some reason, so I just started pulling out images. I don't usually start with a theme in mind, I just grab what speaks to me. In the end, it usually ends up having something to do with whatever's on my mind... sometimes it's not even something I'm consciously thinking of. I'm sure I'm not alone in that :)
I started by layering my collage elements with some stenciling - I used the Numbers stencil by Seth Apter as part of the collage. I also used some heat embossed and cut out pieces from my Ornamental Peacock Feathers stencil and tucked those in on one side. Then I used Seth's You Got This stencil to add the title. I have to admit, I thought I was pretty clever putting "this" on the pillar my collage guy was lifting... lol.
Of course, I finished with a bit of journaling.
It was great to get back to working in my art journal - I had a lot of fun putting this spread together, and I hope you enjoyed it!
Until next time, happy stenciling!


Using an old clothing pattern is a great idea, Gwen, and I love the colors you chose for your beautiful artwork over it!
ReplyDeleteThanks Cecilia! Much appreciated!
DeleteGorgeous pages as always 💕💕💕
ReplyDeleteThanks so much Sherry!
DeleteI am drooling at the art here..........love this spread. Did not think of using all the Asian stamps and things I have...now I see how it can be done, thanks...clever use! Your colors! thanks for the step outs, I shall attempt to take a journey and try, and of course...that stencil is now on my wish list!
ReplyDeleteThanks Gerrie! I use a lot of Asian influenced stuff in my work - I'm really drawn to that for some reason... need to work in my stamps next :) Make sure you send me a link or a photo if you try this!
DeleteI recently purchased some old patterns and started using them in my backgrounds but not nearly to the extent you have. Love how you faded out your design and then scrubbed white paint over it to tone it down. I can't get enough of your work. Keep it coming!
ReplyDeleteThanks Jill! Yeah, I love how patterns add so much depth and some extra detail for so little... the background pretty much fades away after you adhere it, but you get such great marks!
DeleteI love that the face on the stamp is watching the big guy do his thing!! Thanks for sharing/inspiring!
ReplyDeletelol, the stamp was a last minute addition, but it really seemed to fit right in :D Thanks!
DeleteWOW Gwen, love the color and dimension you have achieved here. Just beautiful layering of stencils to achieve the overall look. Very creative, my dear!
ReplyDeleteThanks so much Teresa! It was lots of fun to play with all of those layers :D
DeleteI love your use of color! Beautiful
ReplyDeleteThanks so much Denise! I was trying to break away from my usual color palette, but I'm not quite sure I made it... lol.
DeleteI love the layering, the whole process itself and the final result too! TFS!!
ReplyDeleteThanks so much Brigitta - much appreciated!
DeleteIt's fabulous! Love the fading out affect, and that guy? He's perfect. :) :)
ReplyDeleteGreat spread Gwen! Thanks for the inspiration
ReplyDeleteThis procedure is imperative in various fields, and is generally an absolute necessity in work for the security of the general population and the business.globenewswire background check
ReplyDelete