Hello! Tammy Tutterow here. Have you ever had a stencil that you wished was a stamp also? That is how I feel about this fun little Modern Buds stencil by Rae Missigman. I really wanted to use the line art of the design for a background so I used a simple "stencil stamping" technique that creates a wonderful watercolor effect.
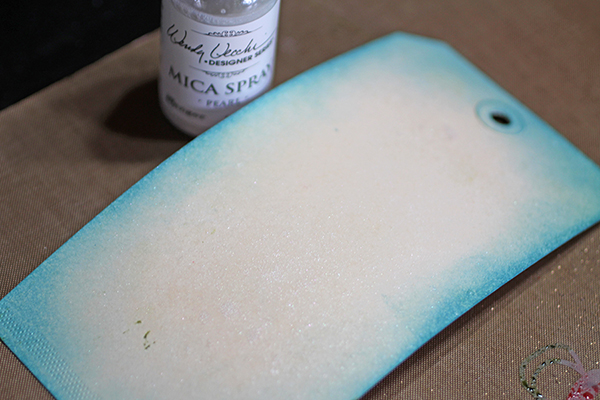
I used a tag for my piece, but you could easily use this technique on a card, journal page, canvas, etc. To prep the tag, use an ink blending tool to apply Broken China Distress Ink around the edges of a manila tag. Mist the center area of the tag with Ranger Pearl Mica Spray. Blot the excess mist and dry using a heat tool.
Place the stencil on a clean piece of scrap paper. Tap Worn Lipstick (pink) Distress Ink directly onto the stencil direct from the ink pad. Focus the ink on the flower part of the stencil design. You can also apply ink with an ink blending tool foam but it won't be as "juicy". You may find a mini ink pad to be a little easier to work with.
Carefully pick up the stencil and move it to your craft sheet. Mist the ink on the stencil with water. Use only enough water to create beads of color. The more water you use, the more diluted your color will be and will result in a very washed out imprint.
Place your tag ink side down onto the stencil. Run your hand over the back of the tag to transfer the design.
Carefully lift the tag off of the stencil. Try not to drag as you lift since that will cause your design to run. Set the tag aside.
If you still have beads of color on the stencil, place another tag on the stencil and make another stamping. Secondary prints will be less defined but still make great backgrounds.
For a more vintage look, use an ink blending tool to apply Gathered Twigs Distress Ink to the edges of the tag.
How simple was that? I love that it is such a quick and easy way to create an interesting background. Best of all, it is a great way to use your stencils in a whole new way!
Tammy
www.tammytutterow.com


Oh, I love this technique.... and everything you are creating, Tammy! ♥
ReplyDeleteSo adorable, Tammy! :)
ReplyDeleteLOVE LOVE LOVE this technique! I have a BUNCH of small Distress ink pads and this technique would be a GREAT way to use them and my stencils even more in my art. Thank you for sharing this Tammy!
ReplyDeleteI often stamp with my stencils also, because who wants to waste the paint/ink on the stencil? However, I don't think any of my things have come out as beautiful as this tag! You rock!
ReplyDeleteI have got to try this technique! I love the effect.
ReplyDeleteI just loved this! Beautiful! I love this technique and use it often! xx
ReplyDeletelove how simple but beautiful it comes out!
ReplyDeletemarybeth (at) stencilgirltalk (dot com)
ReplyDeletepenny@allenguitar.com
Thank you for this technique. It's beautiful and easy to do :)
ReplyDelete