Hi
everyone! My name
is Desiree Habicht, and I am an artist and fiber artist.
I love all types of art, including mixed media and designing stencils. I am so thrilled to be here with you this week! It is such a wonderful time of the year, summer is winding down and fall is fast approaching. It’s during this time of year that I love to go out and collect seeds from flowers I have been growing. Most of the year I have been sketching and painting nature and now I get to save some seeds for next year. The best part of gardening is sharing, whether it’s the veggies or fruit from our garden in the spring and summer or the seeds in the fall. This year I thought I would make some cute flowery seed packages. With these little artsy envelopes I can share my seeds in a more decorative package, a gift of seeds for a special friend.

I love all types of art, including mixed media and designing stencils. I am so thrilled to be here with you this week! It is such a wonderful time of the year, summer is winding down and fall is fast approaching. It’s during this time of year that I love to go out and collect seeds from flowers I have been growing. Most of the year I have been sketching and painting nature and now I get to save some seeds for next year. The best part of gardening is sharing, whether it’s the veggies or fruit from our garden in the spring and summer or the seeds in the fall. This year I thought I would make some cute flowery seed packages. With these little artsy envelopes I can share my seeds in a more decorative package, a gift of seeds for a special friend.

You will need
the following:
Card Stock
Matte
Gel Medium
Acrylic
Inks (I used green, yellow ochre)
White acrylic
paint
Derwent
Inktense Pencil (Bark)
Paint
brush for acrylic ink, gel medium and small brush for Inktense Pencil
Dobber
to apply the paint to the stencil
Watercolor
paper, large envelope paper opened up, paper bags or any semi sturdy substrate
1.
I
used a large piece of butcher paper but found it a bit thin, you can choose to
recycle old white paper bags or envelopes if you like. I laid out my paper and
began by using my dobber and white acrylic paint mixed with some gel medium to
pre-paint my paper with white stenciled flowers. I did flowers and leaves all
over the white surface.


2.
Once
it was completely dry I began to apply color. I mixed gel medium with my
acrylic ink (you could use acrylic paint) and some water and spread it randomly
around on the paper. It should go on fairly transparent. You can add more ink
if you want a stronger color. I decided that I wanted to use fall colors for
this group. I continue to apply a few colors until the entire area was covered.
You can use a paper towel and remove some of the color off of the tops of the white
flowers if you want them whiter.


3.
Once
I was happy with the background I took my template and drew several envelopes
over the painted surface. I strategically placed the template so the
pre-stenciled flowers would show on the front side of the envelopes. I also was
trying to get several envelopes on my painted area. I even had room left over to
make some tags that I can use for canning or other gifts!
4.
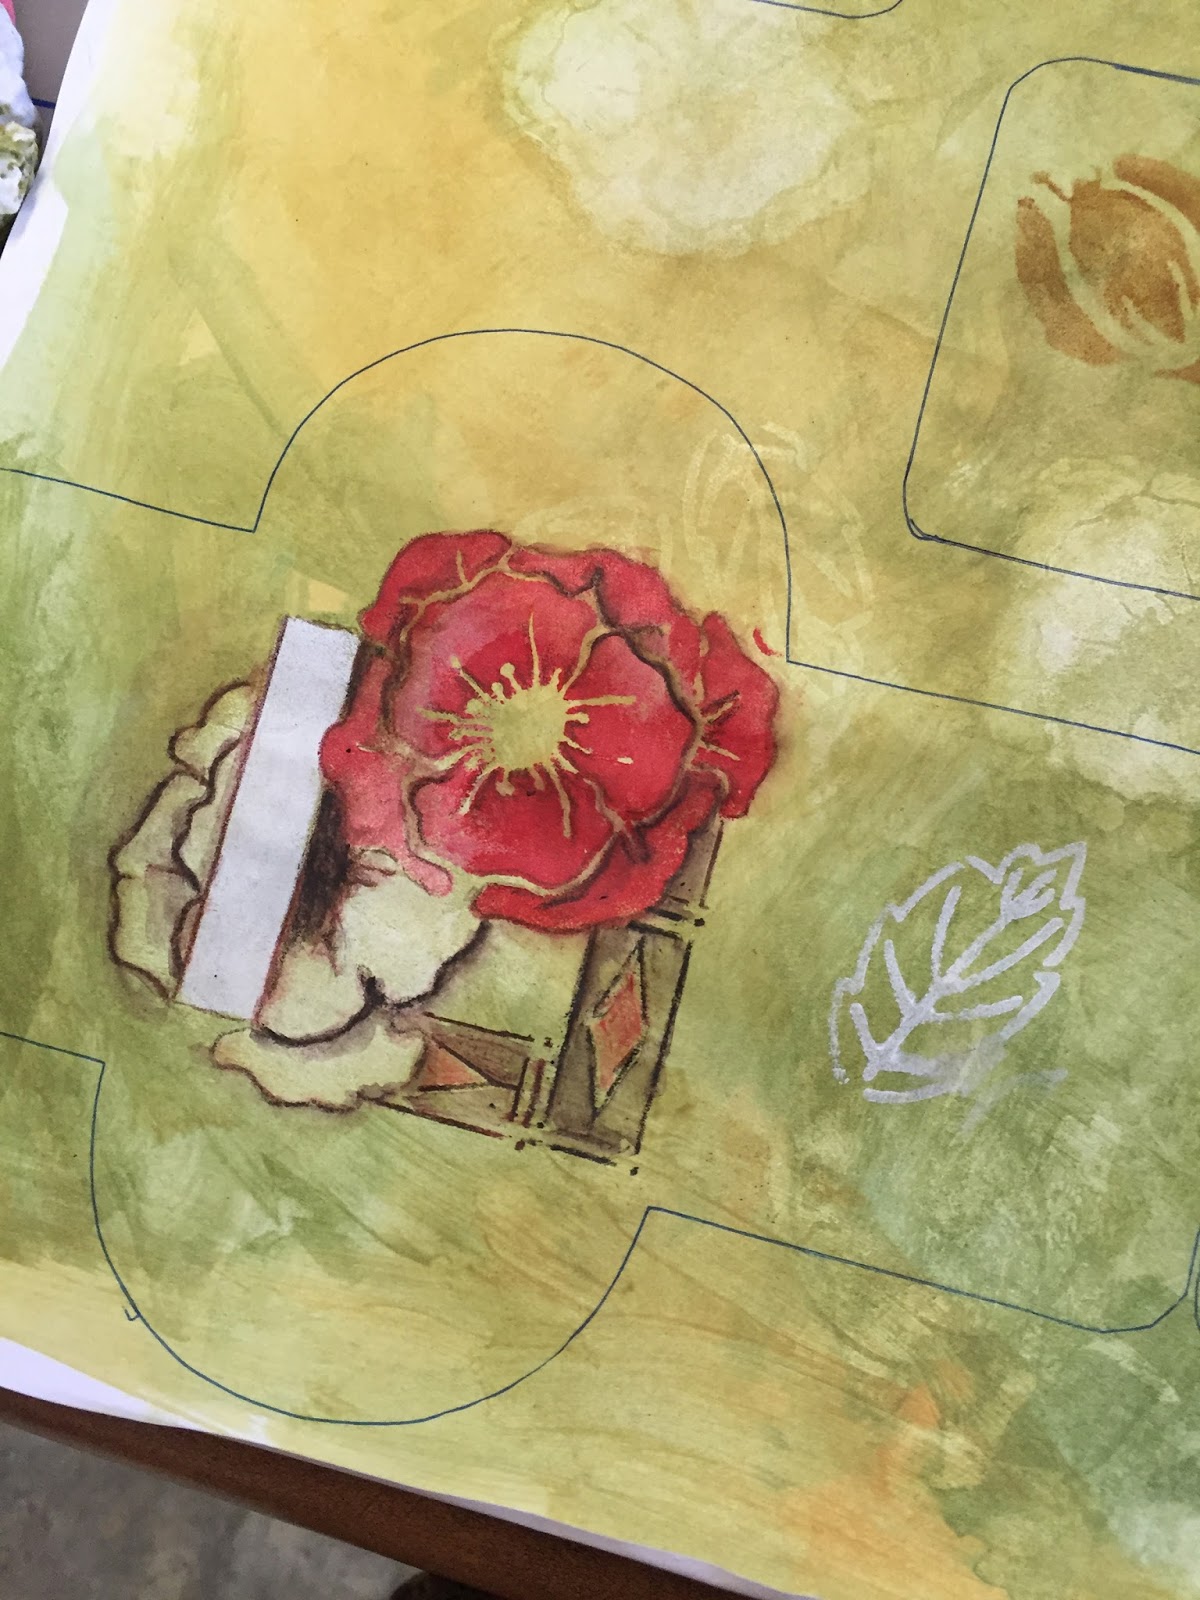
Now
that I can see where the front of each of the seed packets is I added more
flowers. This time I added some colors, red, brown, white all mixed with some
gel medium. I used the dobber to apply all the colored flowers and extra leaves
etc. I then added some borders using Tribal Men.


5.
After
everything was dry I took my Derwent Inktense Pencil (Bark) and outlined the
flowers and leaves. I took a small brush with a little water and used it to
move the line and blend in some shadows and edges. It gave it an old vintage
look. I continued to add line and work it with the brush until I was happy with
all the flowers, leaves and borders.


6.
When
everything was completely dry I sealed it with more gel medium. Brushing over
the entire design carefully as not to smear the edges. Make sure you don’t over
brush or you will lift the design and pencil.
7.
Once
dry cut out all the envelopes and fold them so that the sides fold all the way
in and the bottom comes up to cover them. I then put gel medium on the folded
sides and put the bottom piece over the top, gluing them together. I placed
them under some heavy books to hold them flat as they dried. Make sure your
opening flap is not folded at this point so you don’t accidentally seal your
envelope. Now our envelope is done. Each one looks unique and different even
though you used the same stencil and paint.


8.
Once
they are dry they are ready to write on and personalize. I like to put the name
of the flower or plant on the white label part and write some planting
instructions on the back flap. I also add the year so that we know how old the
seeds are. You can also sign these little master pieces.


9.
Collect
your seeds and I like to put them into a small plastic bag first, if they are
small and very dry, but that’s optional. These little envelopes, full of seeds,
are wonderful gifts for your garden artist friends.


Enjoy!
See more of Desiree's
art at www.desireehabicht.com and her quilt
patterns and fabric at www.desireesdesigns.com.
You can follow her on FB and Instagram and her blog http://myclothesline.blospot.com.
These are soooo cute OMG I want to make some!!
ReplyDeleteAdorable!
ReplyDelete