Friday, December 29, 2017

Brave Wings Art Journal

"Brave Wings Art Journal"
Created to write all your brave and inspirational things you have done or accomplished each week! 

Supplies:
Hardbound journal (blank)
Gold paint
White paint
Tissue paper (your choice)
Gel medium
Modeling paste
Favorite inspiration quote stamps
Stamp pad - black
Ranger liquid pearls in gold
Watercolor wash (mauves and pinks)
Big brush pen in pink
Sari silk ribbons
Feathers
Word charms with jump rings
28 gauge wire

Begin by painting the outside cover with gold paint and let dry.
Cover the front and back covers (outside) with the gel medium and then the tissue paper. Let dry.

Place the stencil down and use the modeling paste to apply a thin layer through the stencil onto the cover both front and back. When dried use a light water color wash in pinks to color up the wings a bit.

Outline the wings with the big brush pen in pink. Apply the liquid pearls around the wings.

On the inside cover, stamp quote on using the black ink pad.

Tie sari silk ribbons on the spine area and add feathers with the wire to attach.
Add some charms and you now have your own beautiful "brave wings " art journal!

Sherri Welser

IndigoEarth and WildHeart Art Studios

Thursday, December 28, 2017

December 2017 TBT with Sherry and Karen


This TBT we're bringing you a few of StencilGirl's early stencils by Joanne Sharpe and Daniella Woolf, artfully used by Sherry Canino, and Karen Gaunt.


The Word Is - Sherry Canino


For the past two years, I have chosen a word for the year and this coming year is no different. I have chosen the word "Love." 
     For 2018 I want to spread more love, give more love and do more of the things that I love. I want to live my life with more love in everything that I do so I have chosen to create a simple art journal spread with a photo of my husband (Dan) and I from our wedding. This is the one person who has brought more love to my life with each day that passes. I will use this art journal spread as a reminder to do everything in love in 2018.

Happy New Year xoxo - Sherry


Altered Book Spread - Karen Gaunt


I knew I really wanted to make the flowers pop on my altered book page. Combining them with a really bright background was just perfect. I added in some doodling details with my trusty gelli roll moonlight pens.
Happy 2018!


Wednesday, December 27, 2017

Art Journal Ornaments by Frieda Oxenham

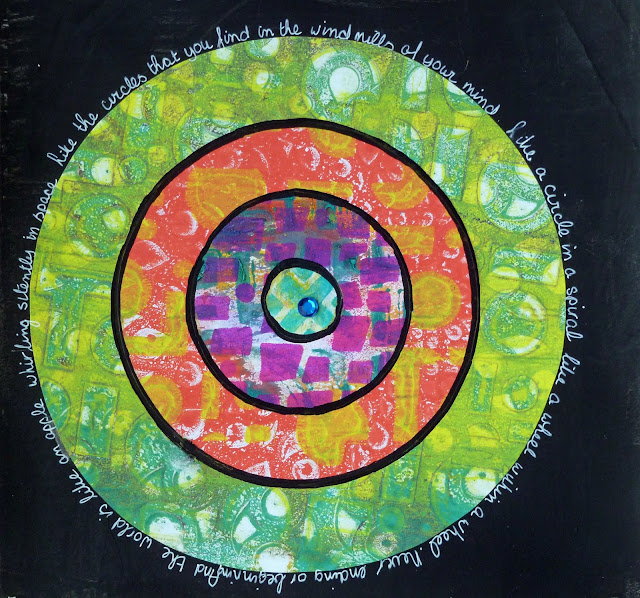
I’m not mad keen on Christmas but I do love the sparkle! That means a decorated tree and ornaments. My project this month shows 2 ornaments, this time not to hang in your Christmas tree but to reside in your art journal. You can put a Christmas related quote around them or choose a quotation or song lyrics that you like as I have done.

After working on last month’s Project where I used my Gelli plate to add color to the pages of my Sketchbook Project, it reminded me how much pure fun playing with the plate can be, so I decided to continue using it for this month’s project.

Here is the step-by-step tutorial:

1.      Using your 8 x 10” Gelli plate, cheap copy paper (A4 size or US letter size) and 2 colors for each page, squeeze the colors onto the plate and brayer them out, making sure not to mix them too much. You still want to see that two colors were used. Take a print.

2.      There will still be plenty of paint left on the plate so take another print with a clean piece of paper.  Sometimes you can even take a third. I occasionally overprinted one second print with another. Let the pages from step 1 and 2 dry thoroughly.

3.      Grab a set of stencils. I used L435 Ancient Marks, the large stencil from the January 2014 StencilClub set, Mod Ovals and Circles, Buildings and Cornish Petals. Please feel free to use stencils you like best. This will work with any stencils.  Add one color of paint to your Gelli plate, put one of the stencils on top, grab one of the pages made in step 1 and 2, and take a print. Again continue to take those ghost prints and make sure your Gelli plate is clean before using a new color of paint. Let the pages dry.

4.      Use the pages from step 3 and a new set of stencils. I used the large stencil from the October 2016 StencilClub set, the large stencil from March 2016 StencilClub, Toledo, Squares and Dots 9 and Amsterdam. Repeat step 3 but with different paint colors. In the end I had about 40 pages to play with for the next step (see step 6).

5.      Paint two pages in your art journal with black gesso. I used a 9 x 9” Bee Paper Company Mixed Media journal.

6.      With a protractor make templates by drawing circles on a spare piece of paper. I used a radius of ½”, 1.1/2”, 2.1/2” and 3.1/2”. You can also draw circles directly onto your painted paper or the back of it. But using templates means you can select the area of the painted paper you want to use (this is known in the quilt world as fuzzy or fussy cutting). Cut out 2 of each of the templates.

7.      Mark the center of your art journal pages and glue on the smallest circle, followed by the other rings. I used a UHU glue stick for this step.

8.      Outline each circle/ring with a black marker. I used a Sharpie medium point pen.

9.      Add your chosen quotation or lyrics around the circle with a white marker. I used a Signo Uniball one. My “ornaments” were surrounded by parts of the lyrics of Dusty Springfield’s song The Windmills of your Mind.

(C) Frieda Oxenham 2017. To see more of Frieda's work, please visit her BLOG.

Tuesday, December 26, 2017

New Year Art Journal Page + Free Desktop Wallpaper


Hi friends! It's Torrie here from Fox + Hazel for another Team Tuesday! I wanted to share this art journal page I created to usher in the new year and to celebrate all the possibilities! I normally go for a lot of color, but I kept this spread soft & minimal. I wanted to channel the desire of focus and calm for 2018 for me.

So let's check out how I made this page!


I started by mixing some soft acrylic paints in lavender and light blues with some matte medium to create a glazing effect. The substrate I'm using is some 140 lb watercolor paper, because I knew I wanted to use water in this spread. I kept layering and working until I was happy with the page!


Next, I used Organized Chaos by Cat Kerr to add some texture to my background. I liked the idea of a subtle star like pattern in the background, and this stencil was perfect for that!


When I planned this art journal page, I envisioned the moon phases framing the top and bottom of it. For this element I used Carved Moon Phases by Cat Kerr with Prussian Blue and actually reversed the stencil from how it is cut. I stenciled one half of the moon phases, then moved the stencil over and continued.


There wasn't enough stars happening, so I used Sun & Moon by Cathy Nichols to add some delicate stars spattered around the page.


Lastly I added some more details using a while gel pen. I then used a black fountain pen to write my sentiment "New year, new chances" and add some more stars and doodles to complete the page!


It was a relaxing and fun page to make. It's more minimal than my usual style, but I love the calming vibe it's giving off!

You can find all the stencils I used on this page right below!


And as a fun added bonus I turned this page into a desktop wallpaper that you can download for your computer! I love having art on my desktop, so of course, I wanted to share with you!

You can head over to my blog, Fox + Hazel, to download your free desktop wallpaper!


Monday, December 25, 2017

Merry Christmas from StencilGirl!

from all of us at StencilGirl...

Wishing
you a
VERY
Merry Christmas!

Saturday, December 23, 2017

Joanne Sharpe's NEW Whimsical Planner Stencils


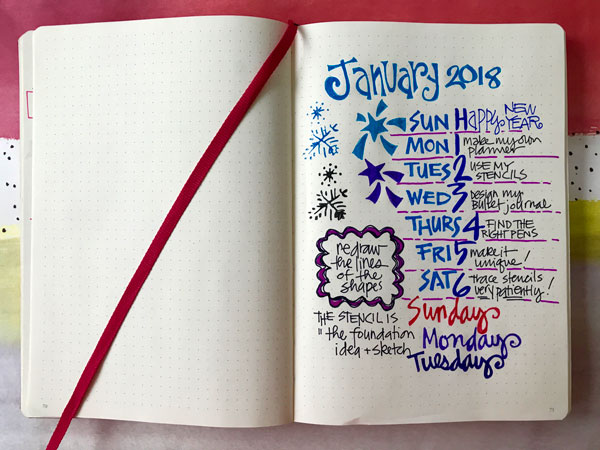
The planner phenomenon has taken the world by storm!   As a diehard art journaler, planner, notebook hoarder, (I mean collector) and pen and paper person, I wanted to design “artful planner” stencils that are functional and unique in the creative planning process. Whether you are an art or bullet journaler, planner aficionado or paper artist, the elements will add a whimsical touch to your handwritten organizational system.  In my sets for Stencil Girl, I have included exclusive alphabets, numbers, page headers and some fun little icons.  They are designed to be used with pens, pencils, and paint as a foundation for creativity and personal customization.

TOP TEN TIPS for using “WHIMSICAL PLANNER” STENCILS:

#1: PRIME THE WHOLE STENCIL SHEET  
I made a sampler sheet on bristol paper of each whole stencil with acrylic paint so that the detailed imagery was easier to see. (The paint remains on the stencil and that is okay.)


#2: CUT IT UP!  Cut the sheets into FOUR pieces for ease of use and simple storage in a journal or notebook pocket.


#3: THE RIGHT PENS  
Because the lettering tends to be on the smaller size it’s important to have pens and markers that make the process flawless. I have tried and tested the many pens in my personal stash and have found that the best pens and markers to use are fine tip, with a protective plastic or metal tip. These include Staedtler Triplus Fineliner, Flair by Papermate, Tombow TwinTone and Micron PN. These work best because the pen ink is not rubbing off in the stencil channel.  The pens by these brands come in dozens of colors.


#4: SLOW AND STEADY  
This stencil collection is made with thicker, 10ml mylar making it comfortable to trace smaller elements. Some of the finer details of the letters and numbers are a little delicate and will shift if drawing too quickly. Trace the stencil with pens or pencil SLOWLY to capture all the details. Color the inside of the outlines with colorful markers or even watercolor paints. It’s very cathartic and meditative.

#5 MAKE YOUR OWN PLANNER SYSTEM 
Trace the monthly headlines, days of the week, numbers and imagery to customize your own planner system in a blank sketchbook or journal.


#6 ALPHABET PLAY 
Mix, match and play with the fonts and lettering in this stencil collection to make a pleasing and interesting look for phrases, words, and messages.


#7 PERMISSION TO ELABORATE
It’s perfectly fine to add your own hand to the elements, redraw the shapes and letterforms, changing the look and sizing. There are endless possibilities with the assorted stencil letters.

#8 PENS OR PAINT? 
Try both! The designs are intended to be traced with pens, markers, and pencil, but work perfectly, gently stomping with your favorite acrylic paint or inking techniques. Watercolors work too!


#9 DOODLE YOUR STYLE! 
Put your own spin on the look of the lettering, by tracing the letters and filling the inside with fancy doodle designs and patterns.


#10 ARTFULLY DECORATE! 
Use the boxes and borders in this collection to embellish pages with decorative journaling spaces and repetitive line art included in the stencils.   

The possibilities are endless! Share your stencil planner art. I have set up an Instagram hashtag: #artfulstencilplanner so that you can share your very own unique planner systems and designs. You can also tag #stencilgirl. We can’t wait to see what you create!

Joanne Sharpe

Stencils: StencilGirl Products
Website: joannesharpe.com