Hi, servus, and thanks so much for stopping by today! Claudia here to share with you a storage solution for the smallest size of StencilGirl® stencils.
I found this little wooden gardening case in a Dollar store last year and had put it to the side to alter it at a later date. Yes, my name is Claudia and I am a hoarder of alterables of all kinds! On already crammed shelves I hoard a collection of old boxes, picture frames, little drawers, chests and other treasures to alter and I always tell myself to not take any new treasures home with me as there is no more room to store these, but I simply cannot pass any of these by when I find them in the sales sections or dollar stores.
But on the other hand, having boxes in many different sizes is a good thing - this way I discovered that this particular case is the perfect size to hold the smallest 4" x 4" StencilGirl® stencils. Yay!
I also use it to store very small stencils from other manufacturers, but especially the StencilGirl® minis are an exact match in size and look even more tempting in it.
I have been using this case already in my studio but didn't like the original look of it.
See? It has been doing its job, but it wasn't an inspiring sight to look at. I love to surround myself with objects that spark my imagination or that I simply enjoy looking at and this was definitely not one of those.
This is the view from where I sit when creating mixed media art and other craftsy stuff. To my left sits the Roman style bust alongside with jars holding fine detail brushes, small scissors, brayers, pokey tools and other items I need to have at hand for the everyday crafting. The papier maché bowl in the middle holds tiny bits and bobs - leftovers from projects that I could not throw away...often these find their way onto assemblage pieces.
If I turn even further left on my swivel chair there's a red metal rolling container with drawers holding my rubber stamps. I like to sort these by themes - one drawer holds stamps for creating patterns, another the holiday-themed ones, a third my steampunk themed ones. If I turn to the right on my swivel chair there's my rolling storage holding brushes, acrylic paints, and media.
And behind me on the shelves are all the bits I often use and need to have close at hand like blending foam, stamping ink pads, gel pens, markers, assorted glues and sticky foam pads, boxes with little found objects and my dies (also sorted by themes).
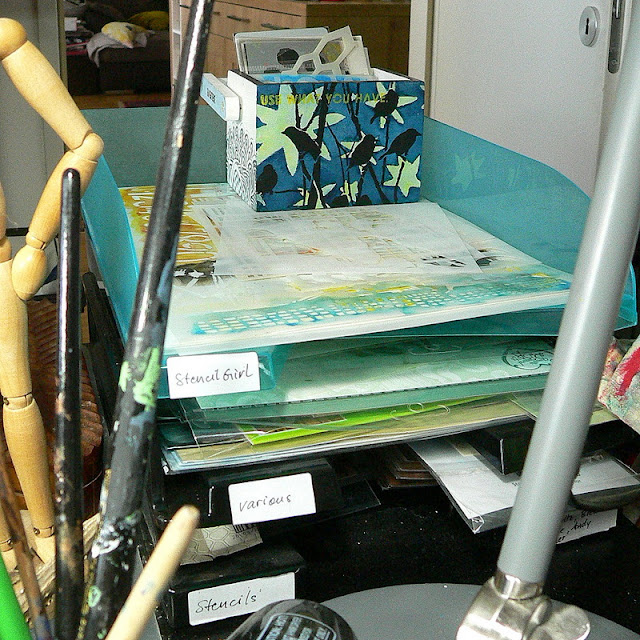
To my right on my desk, there's the stencil storage. I am using stackable plastic bureau storage trays for my stencils.
I have sorted my stencils by designers and/or manufacturers. This way I can simply take the tray I need to the top and browse through without needing any additional space on my desk (which is important as free space on my desk usually shrinks down to the size of a large paper pad within minutes).
But back to my altered gardening mini tool case.
Looks so much better now, doesn't it?
I used the same stencil with the birds in the branches on both sides but varied the background so I created a different mood on each side. I wanted to showcase how the use of the same stencil can lead to totally different beautiful results.
I love both sides and depending on my personal mood I turn one or the other side towards me when sitting at my work desk.
I did the same with the lovely Zinnia mask and stencil on the smaller sides. Same stencil - two different designs ( - endless possibilities for more variations on future projects ;)
StencilGirl® stencils used:
Before I started to work on the new design for my stencil case, I primed the front and back sides and the sides of the handle with two thorough coats of DecoArt Chalky Finish paint "serene" to cover up any smudges and the former decor.
I also added masking tape to protect the sides from any paint stains.
Then I used a makeup sponge and mixed some Americana paints - two different blues, some turquoise and a bit of white - with it on my palette and started building up the background layer by layer. The final layer was pure dark blue that I dabbed onto the still wet paint coming from the outer edges and working my way towards the center. This way I achieved a kind of ombre look with a darker visual "frame".
Once the paint had dried, I mixed tiny amounts of Jade Green, Yellow Light and Bahama Blue with more White Wash Americana paint on my palette and added the gorgeous Matisse inspired stars to the background.
To make the stars pop and to also cover up any inaccurate edges from the stencilling, I painted some shading around the stars' silhouettes using Navy Blue and a fine detail brush.
The next layer was stenciled on using a stencil brush and Lamp Black Americana paint with the "Black Birds in Trees" stencil.
Using Yellow Light acrylic paint and a smaller stencil brush I added an inspiring quote using a section from the Wall of Words stencil.
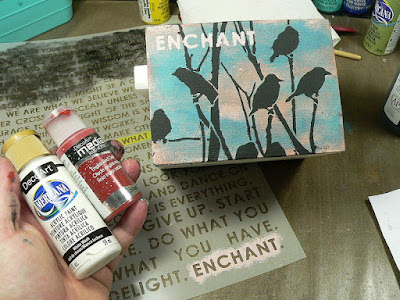
The other side was done pretty much the same. I only used different colors to create a kind of early morning mood. To do so I mixed some English Red Oxide media fluid acrylic (only a few drops) with white acrylic paint and dabbed that onto the still wet light blue background I had prepared.
I also added a thin wash of the English Red Oxide across the whole surface.
I used my heat tool to speed up drying time and then added the lovely birds again....
...and also another quote with a lighter mix of white and English Red Oxide.
I stenciled more encouraging words onto the handle's sides.
Then I added the Zinnia in Zinc to both narrow sides of the case and finished these up with black and dark blue acrylic paint and a detail brush and some doodling with a black Faber Castel PITT brush tip artist pen.
To visually fuse the black from all sides I colored the upper edge with a black permanent marker.
Done!
How do you store your stencils? By size? By theme? I really would love to know!
Hugs and happy crafting!
Claudia
xxx


I store my StencilGirl stencils primarily by size. I will often have stencils created by the same artist grouped together in the stacks. I store other vendors' stencils in multiple ways--often by size again and with like manufacturers grouped together. I kind of like leafing through the stacks when looking for a particular stencil because it always serves to remind me just which stencils I actually have so I don't forget them all! (I have WAY too many...LOL)
ReplyDeletelol....same over here too. ;)
DeleteI also sort by size and manufacturers and/or designers. And browsing through the whole stash of stencils often inspires new project ideas too.
Thanks for sharing your storing "secrets", Jill!
Hugs,
Claudia xxx
thanks for the tour!
ReplyDeleteYour welcome, Stephanie. Thanks for the nice comment! xxx
Delete