Hello Beautiful People!
Trena Brannon here today to share with you some of my favorite ways to use alphabet and word stencils in my artwork! Alphabet stencils are so versatile. They can be used in the background, as a focal point, and/or as a voice in your artwork.
The majority of my finished art comes out in greeting cards. I love to create interesting backgrounds and then add a focal point - something unique to make the recipient of the card feel special. To help get my creative mojo flowing, I will pull out a bunch of backgrounds - I create background designs in bulk with my gelli plate, paint off papers, fabrics pieces, etc... and then cut them into A2 size (4 1/4" x 5 1/2 ") pieces. I also pull out images I previously colored and design papers. I lay them all out and let the match making begin! I audition images and backgrounds together - looking for what goes with what.

Below is the outcome of some of the match making. I added words with stencils.
The next three cards are actually the same card. I started with painting a sentiment with These Jeans in a bright pink. The lovely ladies image is from Art Impressions. I colored them with Copic markers. The background is made with sponges and acrylic paint.

I thought the sentiment needed to be lightened up, so I added white dots.
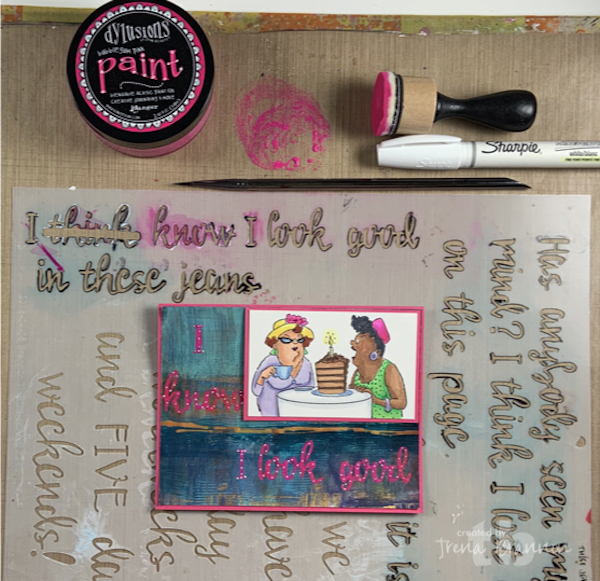
Then finally decided I wanted the letters white with a hint of pink as a boarder. :)

In the next several greeting cards, I used Brush Alphabet to add custom words to the greeting cards.
The shake is watercolored and then cut out.


The background is the second ghost pull from my gelli plate. The stencil is one my favorites - Tribal
Leaves Stencil. The girlfriends in the selfie are from Art Impressions, colored with Copics.


One nice benefit of having an alphabet stencil is that you can create words in different languages - well, languages that use the 26 characters in the American English
alphabet. :) The background is from an afternoon gelli printing -"Under Lock and Key" by June Pfaff Daley, the exclusive January 2018 StencilClub collection. The girlfriends, a.k.a hermanas (sisters), are now at the salon, colored with Copics - as you can see I have a bit of theme going.

I created this cute little grad greeting card with a sentiment from Positively Positive. The images are from Stampin' Up and Robert Jackson. The back ground features Ripples Stencil.

The 'voice' that compliments the abstract scene in my journal came from I Get to Choose.

This little sweet girl with the big dreams (image from Technique Junkies) was just perfect for My Mind and Opportunity and Progress.

Click here to see a video showing you how to use alphabet and word stencils in your artwork highlighting various techniques and art supplies.
TIPS/Suggestions on using Alphabet/word stencils:
- be mindful of your paper and supplies, wet supplies will run under the stencil on watercolor paper. When you want a painterly look, the results will please you. If you want a crisp look, the results will be different than you expect.
- when applying paint, use a dry brush or dry sponge and dab off most of the paint to get crisp lines. If you want a different, more painterly look, use a slightly damp brush or sponge - totally up to you, go for the look you want.
- press the stencil firmly to the surface and follow along the letters just as you would if you were writing the words with your handwriting - as with all stencils, be mindful of the tiny bridges that make the connections for the stencil.
- use a thin paint brush or same color marker to connect the letters to each other to make them look seamless
- if needed, smooth the letters with a thin paint brush or the same color marker
- for words/phrases "in the center of an area," count the letters and start in the middle. I actually write them down so I don't get lost along the way. hehehe
- for words ending at a specific place, start at the end of the word
- I encourage you to take your time, just like with hand brush lettering
- Use a light color paint to apply your words/letters through the stencil and then trace over it with black or white or a contrasting color.
- recommendation: test your technique on scrap paper before you apply on your artwork.
- Have fun!
Thanks you for allowing me to share with you today!
Take care and STAY POSITIVE!
Trena
#trenabrannonart
Great suggestions with delightful illustrative examples - thanks!
ReplyDeleteBTW, several of the links to your stencils aren't working.
Thank you Terry - for the sweet compliment and for the feedback on links!
DeleteHave a wonderful weekend!!
Love this inspiration, Trena! I bought your word stencils (such a thrill to see my friend have her own stencil designs) -- now I must get busy and get them dirty!
ReplyDeletecan't wait to see how you use them sister! you Are so creative. Thank you for your support! XXOO
Delete