
Happy New Year! Jill McDowell here. Recently, I've found myself thinking a lot about a beautifully written FaceBook post by Brigit Anna McNeill accompanied by the artwork ofJessica Bohemian. In her post, Brigit reflects upon the winter solstice and the tension of trying to keep up in a fast-paced world when what we naturally need is to spend the winter months healing in quiet introspection.
For me, the winter months are a time of solitude; a time to spend on projects around the house; and a time to do simple, repetitive tasks that lets my mind wander as I work.
During the winter I find energy in cleaning out closets and rearranging rooms while at the same time I find peace in just quietly sitting and working an embroidery piece by the fire.
This month one of the StencilGirl® Creative Team themes is Grid it. Grids are perfect for winter projects. They are simple and repetitive yet provide you with boundaries so you don't have to worry about getting too far off track. I decided to use grids to bring life back into an old, unused dresser that found its way into a thrift shop. It's a great project to occupy a long winter weekend; big enough to make you feel proud of what you've created but not so big that you get overwhelmed or bored with the project.
So here goes....
For the past few months I've been searching all the local thrift shops for a dresser to makeover. I saw a few that intrigued me but none that made my toes curl. I held out until I saw this one....

It had just come out on the floor and there was no price on it. So I grabbed a clerk and patiently waited while he found a manager. When he came back with this price sticker I could have kissed him. SCORE!

I brought it home and gave it a quick sand that same day with my palm sander. And when I say quick, I mean really quick. I sanded and wiped the whole piece down with a tack cloth in less than 15 minutes.

Then I brushed three coats of General Finish Empire Gray Milk Paint on it. It's an earthy, green-gray that makes me think of the forest. One of the nice things about General Finish Milk Paint is that it comes premixed so you get those beautifully saturated milk paint colors without the stirring and the lumps that can come with it.
I waited for the paint to dry between coats and then ever so lightly sanded it all over with a sanding sponge followed by a quick wipe down with a tack cloth to get off any dust.
This is how the dresser looked after two coats of milk paint.

The next morning, I used a sanding sponge a little more aggressively on the dresser to distress it. I paid special attention to the edges, around where the handles would go, and other places that would normally get wear and tear from everyday use.

I brushed on two coats of General Finish Flat Out Flat Water Based Topcoat which gave it a really nice smooth finish. Time to take it up a notch and make it something really special.

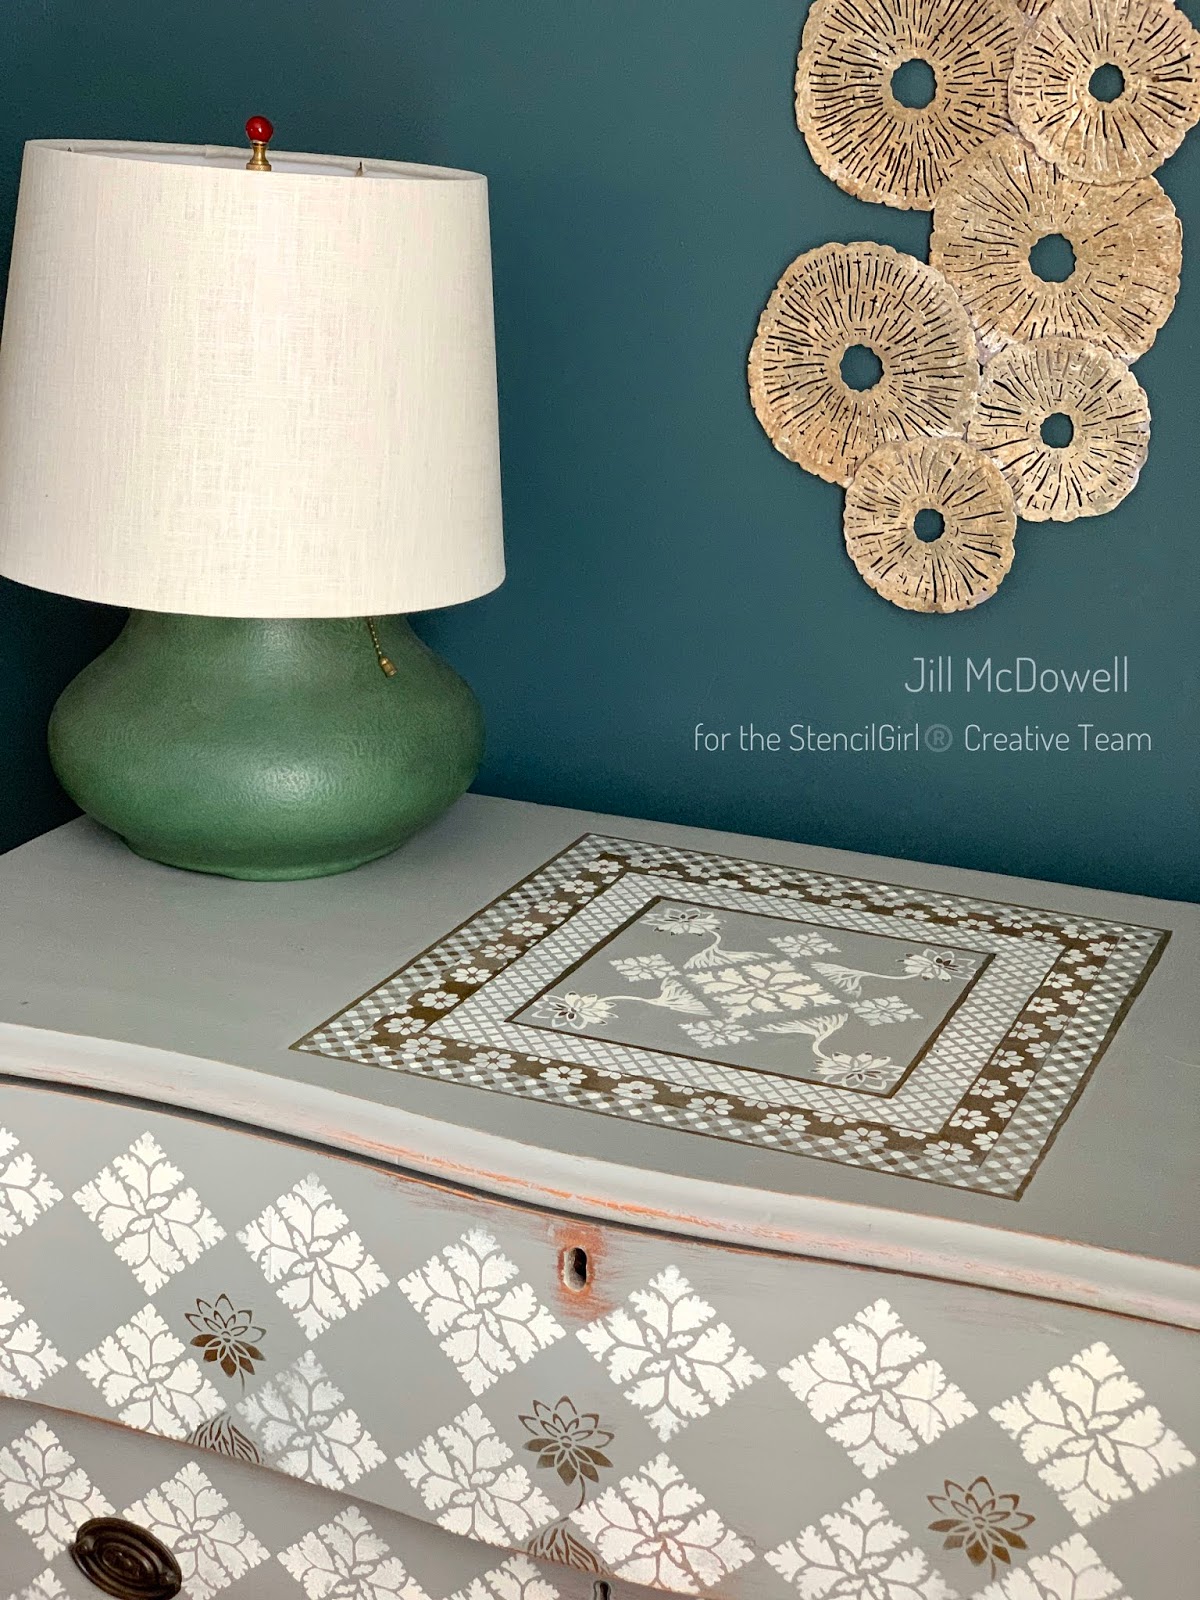
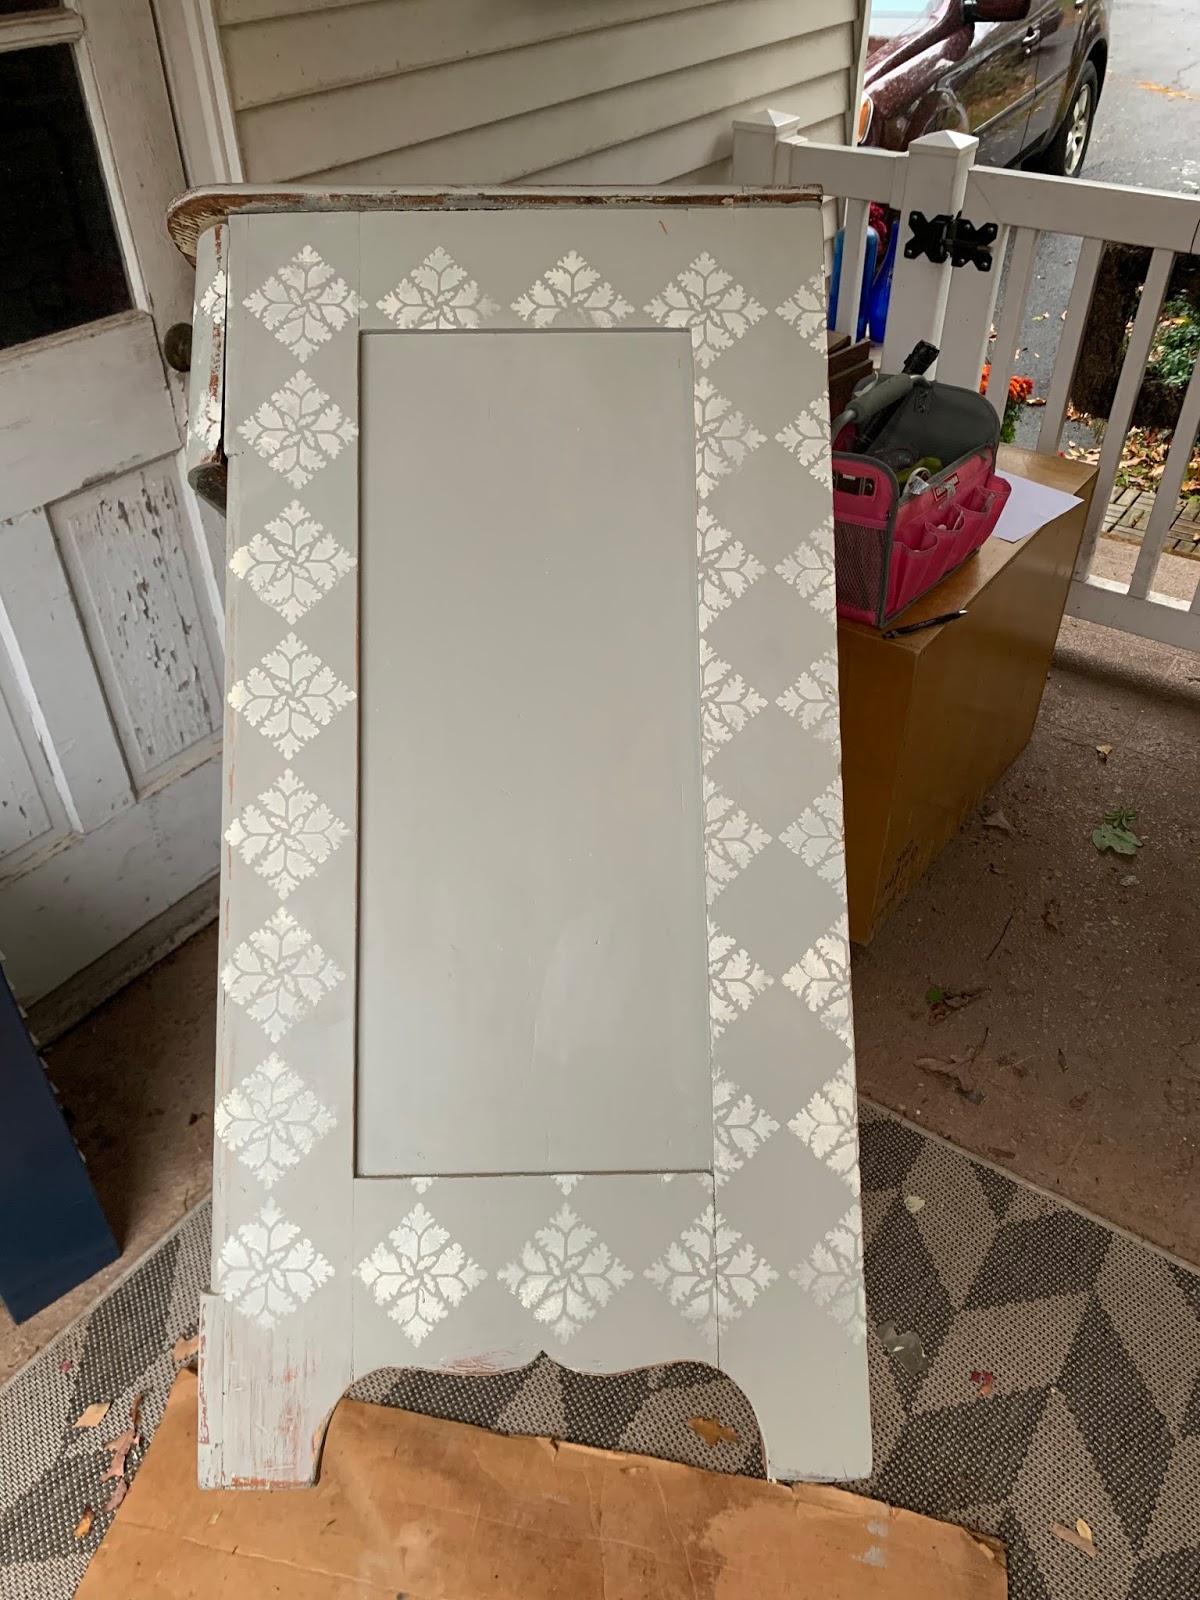
It's a good thing that grids don't necessarily have to be square since the Leaf Diamond Home Decor Stencil designed by Mary Beth Shaw for StencilGirl® Products makes me very happy. The large 12X24 repeating pattern is perfect for bringing new life into this old, unloved piece of furniture.
I sprayed the back of the stencil with Krylon Easy Tack and let it sit for five minutes to cure. I like to use Easy Tack when I'm working on furniture because it frees up my hands for other things and really helps to keep the paint from seeping under the stencil.

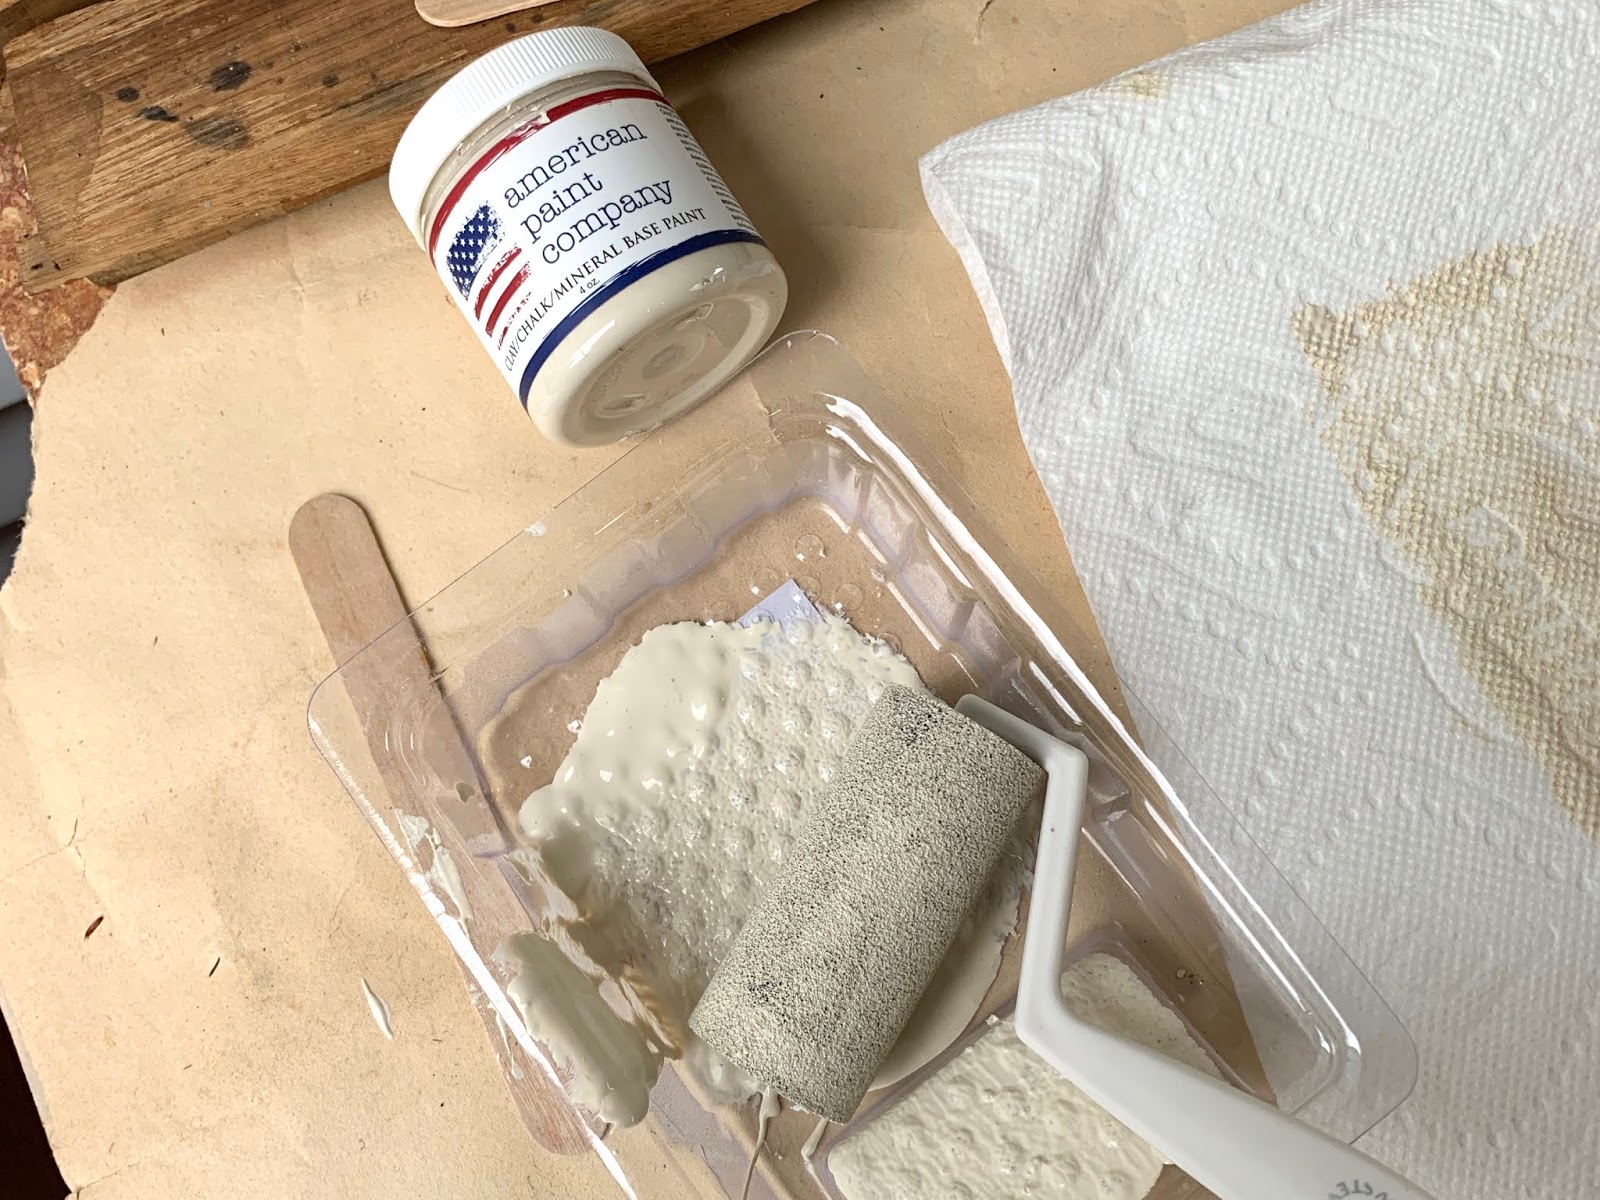
I decided to switch it up and do the stenciling with Chalk Paint since its so forgiving before its permanently fixed with a sealer. If you make a mistake you can easily wipe it off with a damp paper towel and then do it over again. It also dries quickly. I was able to move the stencil over to the next area and continue my design almost immediately after rolling on the paint.
I put some American Paint Company Chalk Paint, (Limoges) in a tray and rolled it out. I offloaded some of the paint onto a paper towel. I like my rollers to be damp rather than wet because you get a much cleaner image. (It really doesn't take a lot of paint to stencil a dresser. I used about 1/3 of a four-ounce jar for this project.)
When I work with repeating patterns, I always start from the center of the piece and work the design outwards to balance it. In this case, the keyholes in the drawers made it easy for me to find the centers so no measuring was necessary.
I pressed the stencil firmly onto the top drawer, (yup, I stencil with the drawers in) and then rolled the paint over the stencil. Then I slid the stencil over, matched up the design and continued on.

I found it easiest to lay the dresser on its back to do the stenciling.

It took almost no time at all to stencil the entire piece.

I decided to do something a little different in the recessed area of the sides.
Repetition and proportion are two of the basic elements of design. A simple way to add both is to incorporate a smaller version of the same design into your project. And it just so happens that Mary Beth Shaw created a smaller 6X6 version of the Leaf Diamond Stencil. Lucky me!


Since this post is being released on the New Year's Eve that's tipping off the "Roaring Twenties" I decided to add little bronze bling to some of the empty grid spaces. I chose to use the Tree from Carol Wiebe's ATC Mix Up Stencil because it reminded me of the artwork by Jessica Bohemian accompanying Brigit's FaceBook post.

I had originally planned to call this project finished here. But if you know anything about me at all you'll understand that I felt a tug of my own to keep going with a motif on top of the dresser.

I made a template so that I could find the center of the dresser without having to do any measuring, (measuring has never been a strong point for me). I taped copy paper together so that it fully covered the top of the dresser. Next, I used the side of a pencil to mark the edges of the dresser and then I cut out the template.

I used the template to pencil my guidelines directly onto the dresser. (It helps to put a ruler or other straight edge over the template to guide you when you pencil in the lines.)
- Fold the template in half lengthwise. Position it back on the dresser and use it as a guide to lightly pencil in the vertical center line.
- Open the template up and then fold it in half the other way. Position it back on the dresser and use it as a guide to lightly pencil in the horizontal center line.
- To make the diagonal guidelines use a ruler or other straight edge to make diagonal lines that run from one corner to its opposite corner, making sure that the lines run directly through the center.

Elements of your design should always be measured from or situated around these guidelines, (as opposed to measuring from the outside edges of your piece).
I wanted to use one of the large Leaf Diamonds as the center of my motif. I used painters tape to mask around one of the diamonds to make stenciling with a roller easier. Then I positioned the stencil so that the top and bottom points of the diamond lay on the vertical guideline and the left and the right points lay on the horizontal guideline. This made for a perfectly centered diamond.

I then added smaller 6X6 Leaf Diamonds using the horizontal and vertical guidelines to keep me straight followed by the trees using the diagonal lines to guide me.
I marked out a concentric grid of square frames as I went with painters tape, always measuring out from the horizontal and vertical guidelines, and always ending with corners falling on the diagonal guidelines.

All of the motif frames were created with one super versatile stencil designed by Ann Butler. The Mail Art Stencil is part of the March 2019 exclusive Club Set and I think I'll be using it a lot in the future. I was even able to make a two-toned diamond pattern by stenciling the first time with the Navajo White Chalk Paint, and then sliding the stencil over to expose the area that had not been painted and stenciling a second time with Golden Iridescent Bronze (Fine) Fluid Acrylic paint.

When the paint was dry, I pulled up the painter's tape and laid it down again directly on top of the areas I'd just finished stenciling to protect them. (Hence, the title Grid As You Go!) I painted in the newly exposed frame with Bronze paint and topped the frame off with the flower design from the Mail Art Club set. I finished off the motif by edging the frames with borders drawn in with paint pens.

And lastly, I erased the penciled in guidelines and brushed on two coats of General Finish Flat Out Flat Water Based Topcoat to seal and protect the motif.

In her post Brigit Anna McNeil goes on to say:
"The winter time is a time of rest and deep reflection, a time to wipe the slate clean as it were and clear out the old. So you can walk into spring feeling ready to grow and skip without a dusty mountain on your back. Without the grey rubble causing blockages at the gateway to your soul. For when you do not start to meet these parts of you, they block the doorway to your soul, and so happiness, joy, love and life can also no longer pass through and touch you deeply, the beauty of Spring will not be able to reach your centre.
"Winter is a time for the medicine of story, of fire, of nourishment and love to call you home, into yourself."
For me, being creative is my nourishment and its working on projects like this during the dark winter months that calls me into myself. It's where I find my me; where I clear my head; where I heal, and where I ready myself for the bustle of new growth in the spring.
I wish you all a happy, healthy, and creative New Year to start the Roaring Twenties.
Hugs until next time in 2020, Jill

Other Products/Supplies I used:
- General Finish Water Based Milk Paint - Empire Gray
- American Paint Company Chalk Paint - Limoges
- Golden Fluid Acrylic Paint - Iridescent Bronze, Fine
- General Finish Flat Out Flat Water Based Top Coat
- Palm sander
- Tack cloth
- Sanding sponge
- Krylon Easy Tack
- Mini paint tray and paint roller
- Paper towels
- Paint brushes
- Painters tape
- Copy paper
- Pencil, eraser, scissors
- Paint pens
These are the StencilGirl® stencils that I used for this project:

- Leaf Diamond Home Decor Stencil Designed by Mary Beth Shaw
- Leaf Diamond 6X6 Stencil designed by Mary Beth Shaw


Wow! You truly did find a bargain treasure at that thrift shop. And you turned it into a gorgeous heirloom dresser. Beautiful work!
ReplyDeleteHoly moly! This is amazing ❤️❤️❤️
ReplyDeleteBeautiful!!!!
ReplyDelete