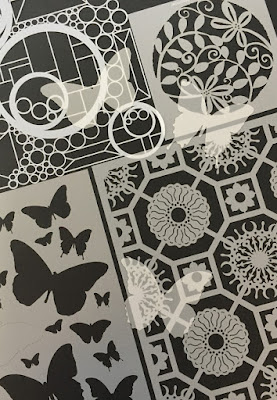
For this project I used the following StencilGirl® Stencils: Flower Tiles by Mary Beth Shaw; Doodle It Geometric Landscape by Maria McGuire; Stepping Stone #1 and Leaves 6 by Terri Stegmiller; Herring Bone Brick by Lizzie Mayne; Butterfly Journeys and Vintage Typewriter (Lowercase) Alphabet by Carolyn Dube; and Marrakech Mix by Michelle Ward.
I often make books from scratch, but in this case, I wanted my mom to be able to easily add, subtract or move pages around, so I decided to alter a pre-made photo book with a ring binding. It's about 10 x 7" with pages that are 9 x 6.25".
I added detail to the end papers by sponging white acrylic paint through Mary Beth Shaw's Flower Tiles Stencil a bit unevenly, to get the worn look of paving stones in a garden.
I also added some white paint to the edges of the raw chipboard and covered the striped binding with neutral washi tape.
At first glance, it may not seem like I used Maria McGuire's beautiful Doodle It Geometric Landscape stencil very prominently. After all, there's only a scattering of the smaller circles applied fairly randomly. But really... the entire concept of my project was inspired by that stencil. The groupings of the circles; their sizes and proportions; the placement of my focal point, cut out areas and stitching... all of those elements were directly based on Maria McGuire's beautiful design! I even chose Terri Stegmiller's Stepping Stone #1 specifically because I envisioned it being the pattern inside the largest circle.
I started by making a collage of garden-related papers backed by plain white cardstock for strength. Then I applied a soft green oxide ink through the Stepping Stone stencil and outlined not-too-precisely with a very fine black pen. I cut a circular frame from cardstock the size of my fancy chipboard frame, so that i would know exactly which part of the design I wanted to focus on. And I chose a peony from a vintage garden book to frame up. Now I just needed a place to put it!
Rather than build directly on the book's covers, I made collage panels that could be affixed on top. That way I'd be able add my envisaged cut-out circles and also some machine stitching. My first step was to make the backgrounds, for which I used a base of soft green ledger paper topped with randomly torn vintage book paper. Some of my favorite types of paper for this sort of background are dictionary pages, foreign text (in this case Italian and Kanada which uses a similar alphabet to Hindi), architectural and landscape drawings, numerical charts and sheet music. Since I knew I'd be using inks on top, I chose papers which were fairly sturdy and did not have a lot of patina.
I used Maria McGuire's Doodle It Geometric Landscape stencil to guide me in choosing the correct proportion, size and placement of my cut out circles, for which I used a few sizes of punches; I added some of the smaller circles from the stencil in various shades of green dye ink. Later I added and outlined little clusters of foliage from Terri Stegmiller's Leaves 6 which coordinate beautifully with her Stepping Stones.
I used Maria's Doodle It Geometric Landscape a final time, to sketch the circles I would machine stitch, purely for decoration and a bit more texture.
Meanwhile, I'd been thinking about what should be revealed by those cut out circles. I believe the first StencilGirl® stencil I ever bought was the Herring Bone Brick by Lizzie Mayne and it's still a favorite for both its beauty and versatility. I made the bricks dimensional by applying a custom mixture of plain white modeling paste, a little bit of glass bead gel, and a tiny amount of copper glitter paste; atop richly patina-ed dictionary paper backed with cardstock to make it sturdy. I used the palette knife pretty roughly to get extra texture on my bricks.
Finally I had all of my cover elements ready, so I set them aside to focus on the interior.
My mom has been dabbling in collage and photography lately, so I didn't want to finish the interior of the book; but it felt weird to leave it completely blank. I settled on making a few quotation pages, for which I used Vintage Typewriter (Lowercase) Alphabet by Carolyn Dube to highlight significant words and stamped the rest of the text.
For decoration I grabbed another favorite by Carolyn Dube, the beautiful Butterfly Journeys, and added butterflies in soft pink with a darker pattern inside them, created with some of the smaller motifs within Marrakech Mix by Michelle Ward.
I added the quotations to super-sturdy collage pages; so they can be dividers, or have pockets added, or hold photos or... well, I think they're pretty flexible.
At last I had all of the different parts ready to assemble. To be dramatic, I'll show the back cover first:
And now the front:
I hope my mom will enjoy working in her Garden Grunge Photo Journal as much I loved making it for her! And I hope you'll be inspired to use your StencilGirl® Stencils to make something fun for a family member, a friend, or for yourself! ♥
Is a collage artist, cardmaker, teacher and stencil lover who lives in New Jersey.
She has a house full of vintage paper, art supplies and a very patient husband.


awesome step-by-step on both your inspiration & your construction ... I loved seeing how the project started and then came together ... absolutely stunning ... your Mom will cherish it.
ReplyDeleteLauren, this is sooo gorgeous! I love every nuance of it❤️
ReplyDeleteThis is beautiful. And it does inspire me -- I've put it on my "I want to do" list / Pinterest board.
ReplyDelete