So, what’s a girl do when a pandemic hits and her upcycling sources dry up? Why she goes online like everyone else of course.....
Tips for getting in on the online auction fun
- Search the web for Online Estate Auctions near you. I happen to like the Auction Ninja web site. It connects buyers like you and me with a bevy of estate sale professionals and auctioneers. While the auctions on this website are primarily in the Northeast, I’ve seen some listings from as far away as Colorado and Texas. (If you use another website be sure to review their FAQ’s. Their rules may differ from those below.)
- Once you find an item that you are interested in carefully review the Auction Details before bidding. It contains all the legal terms and conditions of the sale and let’s you know where and when you’ll need to pick up your treasure. In most cases, the actual pickup location will only be disclosed to the winning bidders once the auction closes. You should also expect to see COVID related safety information here.
- Caution - Do not bid on an item if you are unable to pick it up at the appointed place and time. If you win and can’t pick it up, you will forfeit both the item and your payment. However, I’ve found that if you reach out to the seller prior to the auction, many are willing to make arrangements for shipping at an additional cost.
- Note the buyer’s premium - This is an add on fee that the site charges for running the auction and will be added to your winning bid at check out. In the auction above the buyer’s premium is 18%. This means that if your bid is $10, you will pay $11.80 plus tax if you win. Take note that your credit card will be automatically charged as soon as all the items in the auction have closed.
- Do your homework beforehand. One of the nice things about online auctions is that you have plenty of time to do your research before you bid. The auction below doesn’t close for almost three days so I have time to look at past auction sales, Ebay, or othe websites to see what others have paid for a similar item. I recommend that you set a hard limit of how much you are willing to spend before you start bidding so you don’t get caught up in the excitement later and pay more than you wanted. When setting your limit, don’t forget to take into consideration the additional buyer’s premium.
- Bidding - If you find an item that catches your eye you can place a bid before the auction goes live. I call this the RONCO Set It and Forget It strategy. If the auction is run by an Auction Ninja vendor you will be asked for your opening bid and your max bid. Don’t worry, your max bid will be masked so no one else can see it. This also means that you don’t know what other bidder’s max is. Your max bid will only come into play if someone bids higher than your opening bid. When that happens your bid will automatically be increased to just above the last bid. The danger is that if another buyer is really interested in the same item, the bidding could proceed very quickly as your opponent will keep upping her bid by $1 in order to snoop out your max bid. And when she finds it, she’ll outbid you and you’ll be toast.
- That’s why, when I can, I prefer to hold my cards close and bid during the actual auction. That puts me in a position to sniff out the other bidders max. If I’m lucky, my nemesis won’t be participating in the live auction. This gives me the chance to poke and find her max. When I do, I can swoop in and grab the treasure for just $1 more. Isn’t victory sweet?
- Everyone has their own strategy, but for now that’s mine and I’m sticking to it. However if it’s an item that just takes my breath away...... then all bets are off, (or should I say all bids are on?)
- Another advantage of bidding during the live auction is that’s where you will find the best deals, especially if your an upcycler. Others are quick to bypass a piece that needs a little love and attention. We upcyclers however, can see the the potential in most everything and we have lots of love and attention to spare. I’ve seen many beautiful pieces of furniture sold for under $10.
- And my final tip for you is to watch a live auction for a while and get the feel for the speed of things and how they work before you start bidding. I have a feeling that you will catch on quickly. Just not too quickly please... I’m still looking for deals. (LOL)
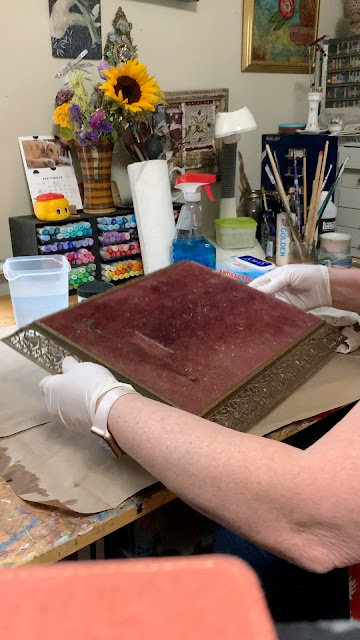
How to transform an old brass frame into a stylish verdigris tray with chalk paint
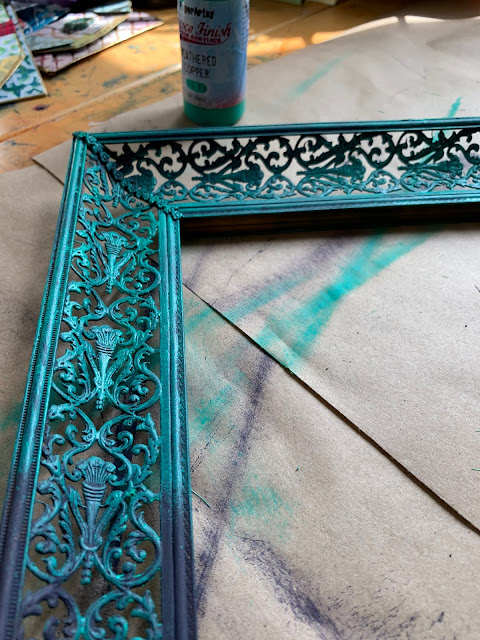
Step Two - PaperArtsy’s Fresco Finish Chalk Acrylic Paint in Weathered Copper. This is a semitransparent acrylic paint with a matte finish. (Yes, you can mix chalk and acrylic paints.) I dry brushed the paint on both the front and the back of the frame with a stiff bristle brush and let it dry.
Aren’t those filigree details gorgeous?
Step Three: Dixie Belle Chalk Paint in Fluff. I gave it a light dry brushing with this soft white paint applied with a stiff bristle brush to knock back the color.
Step Four: Black Walnut Ink applied with a soft cloth here, there, and around the edges to age the metal just a few more years.
Step Five: Rust-Oleum Painter’s Touch 2X Satin Clear Ultra Cover. I took the frame outside and sprayed it with two coats to protect the finish.
Isn’t it wonderful?
Now that the frame is ready, it’s time to create something to display in it. I rummaged through my stash and found this lovely piece of tea stenciled rice paper that I had created ages ago with Gwen LaFleur’s Decorative Flower Stamen Stencil.
I wanted to keep developing the paper with neutral colors so I pulled the Black Walnut Ink back out.
A few splatters and ink spots just added to the charm.
If I had done some preplanning, I would have made sure that I had some spray adhesive on hand for this project. But I didn’t, so I used some matte medium to adhere the rice paper to the frames’s hardboard insert. I have to admit that it was just a tad bit stressful gluing the rice paper onto the hardboard, but I took a deep breath, worked slowly, and it all worked out.
I spent a few relaxing evenings coloring my focal motifs while watching Netflix. There’s so much room for creativity with Gwen Lafleur’s Chinese Lotus Garden Stencil, Pitt Pens and Posca Paint Markers. This is how they started on watercolor paper.
I began by laying down a base color on the petals with a Pitt Pen. Then I built up the layers to create depth, and finally, I used a Posca Marker to add details and lines.
I like the effect of mixing cool and warm shades of the same color. For example, the flower petals below on the left motif have a cool blue Pitt Pen base that is topped with line work made with a warmer blue Posca Marker. While the flower petals on the right motif have a warm blue Pitt Pen base topped with lines made with a cooler blue Posca Marker.
Then I cut the leaves out and glued them together in clumps of three. (In this pic you can see my original “busy” leaves at the top. While I won’t be using them for this project, I’m sure they‘ll soon find a home in another project.)
My glue of choice for thicker paper like watercolor paper is a mixture of Yes! Paste and Golden Satin Glazing Liquid.
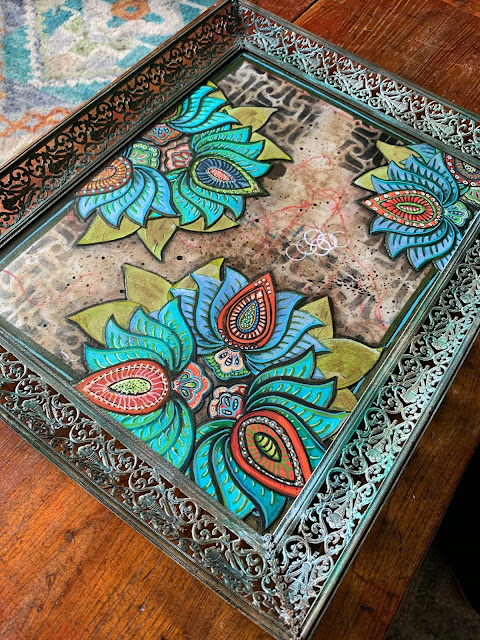
I assembled my design in the frame under the glass; transforming this old, dull brass frame into a stylish Verdigris Tray.
In the pic below picture you can see my living room rug, which was the inspiration for my color palette.
I’m willing to bet that you have more than a few Gelli Prints and painted papers that would look great in a tray like this. Picture one filled with your own artwork, (or your kids/grandkids 3rd grade masterpiece). You could display it:
- On your coffee table with a candle on top,
- On a dresser with a sweet little potted plant,
On a table with a bowl of candy to hand out to trick or treaters(maybe next year), or- On your kitchen table with a bowl of acorns, gourds, and mini pumpkins.
Change the look just by switching out the artwork. Restyle with the seasons or with your mood. I’ve used the same frame below to display a stenciled paper weaving made from strips cut from Gelli Prints. (I spy Mary Beth Shaw’s Curvy Lattice Stencil 6 and my own Four Buds Trivet Stencil in the mix.)
Hmmmm, I think I’ll use my tray to collect elements to use in my next project.In closing, stay well, find yourself a great online estate auction, bid, and then upcycle. I’d love to hear all about your adventures. Virtual hugs until next time. Jill


Thanks for the auction tips! I love your final lotus flower art work, and it's a great match for your beautiful verdigris frame.
ReplyDeleteBeautiful upcycling! I love the colors and how you worked with warm and cool colors together. Thank you sharing your tips and tricks on navigating online auctions too!
ReplyDelete