Hi all, it's Gwen with a new project and tutorial featuring different ways to use paint and texture with stencils in your work. This month I've created a heavily textured background using found fibers from around the house to create a background that's the perfect place to insert little nuggets of stenciling, journaling, and embellishments.
For my first step, I prepared some uncoated tissue paper by stenciling all over first with my Collage Textures and Patterns - Medieval Cyrillic stencil and then with my new Suzani Flower Medallion stencil. I followed up by stamping a few of the coordinating images from my EGL12 stamp set with PaperArtsy to add a bit more detail. I used Archival Ink for both because you want it to be permanent and I wanted something quick-drying. (Other inks will work - just be sure to let dye inks dry completely and I recommend heat setting pigment ink so it doesn't smear later.)
While I used uncoated tissue paper, you can use other thin papers... uncoated will collage best, but regular tissue paper is fine and I also frequently use rice paper or thin mulberry paper for this type of work. For a different look you could also try deli paper or another thin paper, but the texture and appearance will vary.
Now to start on the background...
I picked a blank page in my art journal (my paper was dark gray) and then put down a quick coat of paint - I used PaperArtsy paint, but you can use other brands or a colored gesso or skip it altogether if you just want the tone from the substrate. You could also use this technique out of your journal on paper, canvas, a panel, etc...
To create the basis of my texture, I took scrap pieces of hemp twine and adhered them onto the background in a grid with a few large circular openings using Tacky Glue - you can see a peek of how that looked below. You could also use string or a thick yarn or other, similar fibers. I like the hemp because it gives me very obvious texture without being too bulky - this added a depth of just under 1/8."
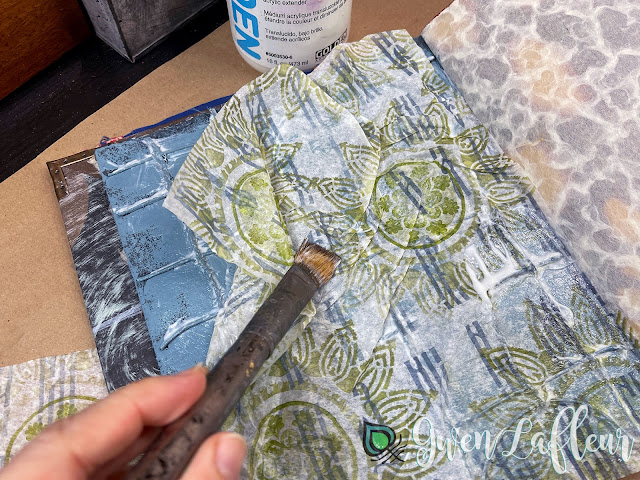
When the twine grid was dry, I took my stenciled and stamped tissue paper and collaged it onto the background with matte medium. As you can see here, I crinkled up the sheets so that it wasn't perfectly straight so that I could mix up the background pattern a bit and work in some more texture.
As I went over the top of the tissue paper during the collage process, I made sure to really work my brush into the seam along the hemp to make sure that the paper got down in there and created nice, clean square wells. (This is why it's important to make sure the glue is dry on your fibers so that it doesn't move them around while you collage.)
At this point I let the collage dry completely and then came back in to start adding color and images into the different openings of my grid. First, I used some ShinHan water soluble metallic pigment powder along with painting glue to put some gold accents in some of the squares. You can also use metallic paint or a paint pen for a similar effect or skip metallics completely if that's not your thing.
Next I used just a touch of gouache paint (which is a kind of watercolor but generally more opaque) and put just a bit of pure color straight from the tube into the corner of one of my squares and then spread it out to fill the whole area by getting my brush damp, but not soaking wet. I continued to spread and thin it out until I liked how it looked. You could use acrylic paint as well (regular consistency or thinned with water,) but I like gouache because you get vibrant color and a bit of opacity but you still have the translucency of watercolor, allowing the patterns from the background to show through.
I continued to add different colors until I felt like I had a balanced mix of hues and I liked the way they filled out the grid. I didn't fill all of the spaces, but you could certainly do so if you wanted to.
I built a few large circular openings into the background thinking that first, the circle would be a fantastic contrast with the grid and that second, it would create some great larger openings where I could put in some focal images. I did this using my new Boho Daisy Mini stencil.
I continued to add some more stenciled imagery into the smaller openings using my Suzani Circle Flowers and Suzani Circle Medallion stencils (and I only used one of the Circle Flowers and the center of the medallion stencil - I love using just bits and pieces of stencil designs in situations such as this.)
With all of the basic components of the page in place, it was time to start adding details and creating a bit more depth. I put a few pieces of collage into the circular areas, including some scraps of papers that were stamped with some more of my PaperArtsy stamp designs to create centers for the flowers.
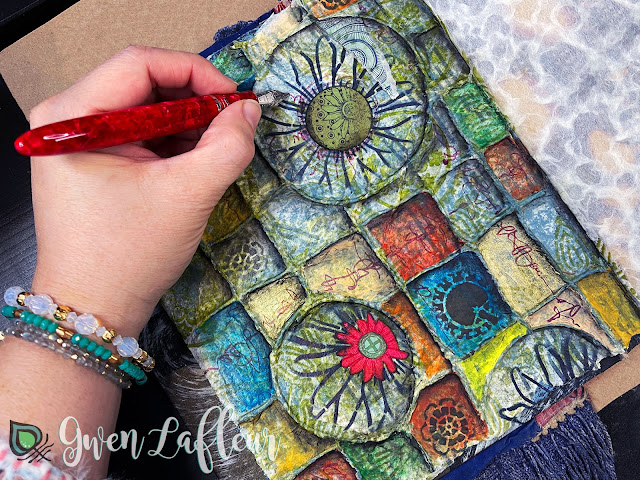
I also took a black Stabilo All pencil and a water brush and used them to create some shadows that emphasized the texture of my background. (The Stabilo All is a must-have for me - it's a water soluble pencil that dries permanent, so it's great for creating quick and easy shading in your work.)
I love to add writing to my art journal pages (even if you can't read it,) both because I like the process of freeing thoughts and feelings in the moment to become a part of my page and because I love the look of text as a design element. In this case I wrote illegibly - I got the catharsis of writing what I was feeling at the time but the look of asemic writing. (And if you're curious, that's an Easterbrook fountain pen with some red ink - it's a dye ink so I new it wouldn't be permanent in the next steps, but I'm okay with that - I like the look.)
Next I pulled out a few pieces of scrap paper - in this case collage papers left over from other projects. These particular papers were made with deli paper and various marks with my stamp and stencil designs. I tore out a few small pieces to add into the background for a bit more visual interest and color. I just adhered with an Avery glue stick.
I wanted to highlight the texture on this page just a bit more, so I got out some gold wax just used my finger to lightly rub it across the raised surface of my grid and the circular openings. I love the effect that created and how perfectly it brings out the dimension and ties in with the metallic powder I used in some of the squares.
Finally, I wanted to turn those circular openings and a few of the smaller squares into windows. To do that, I made sure the page itself was resting at a flat level and then took some Judikins Diamond Glaze and filled each of the selected openings to the brim, using a toothpick to try and pop any bubbles (if you don't, they'll dry that way.)
This is basically a clear glaze (very similar to Ranger Glossy Accents which also works great here) and it contracts as it dries and the water evaporates out of it, so I poured the openings as full as I could without overflowing so that the final coat is still nice and thick. I set it aside to dry for 12-24 hours. Once it was dry, I bent the pages to crack the glaze and get some nice subtle lines in the windows. It's hard to see the impact of this in the photos, but the camera picked up a bit of the glare so you can see what a nice contrast it creates with the other elements on the page.
That's it! Here are a few more photos so that you can better see the dimension and how everything plays together on the finished art journal page.
And here's the finished page again so that you can see it all together:
So there you go! I hope you enjoyed today's project and tutorial - I certainly had a lot of fun coming up with this one and putting it all together for you. Make sure to link me up if you try this at home so that I can see how it came out... this is one of my favorite paint and texture tutorials so far and I'm sure you're going to love it just as much if you give it a try.
Until next time, happy stenciling!


Loving this Gwen. Such wonderful colours and depth.
ReplyDeleteThis is mesmerising! I can't wait to try your method.
ReplyDeleteThanks so much for sharing. :)
Gwen ; hoping see you in person for classes , not do far in time..
ReplyDeleteLove this idea Gwen. I use tissue paper alot for my mixed media and collage art. It has such a fragility as a contrast to the heavier papers and card stock. It's a fav and I know I'll be trying this technique!
ReplyDeleteThis is amazing!
ReplyDeleteDefinitely want to try this. Thanks for the inspiration!
ReplyDeleteLoving
ReplyDelete