Showing posts with label watercolor. Show all posts

Friday, May 29, 2026

Grunge and Neon Mass Make Tags

Hi friends! Consie Sindet here with another fun project for you. I love how inspiration can show up. This project came about because of a tag someone made me, a birthday gift of neon paints, and my love of reading and using book paper.

If you are looking for a delightful gift for a bunch of people, try this project! It is a great mass make. Let's jump in to how I made them!


Let's start with the supplies I used:

8.5x11 white cardstock
Cookie sheet or tray
Watercolors
Water spray bottle
Makeup sponges
Neon + black acrylic paints
Black Sharpie pen
White paint/gel pen
Book paper
Teabags
Paper cutter
Corner rounder
Scissors
Sewing machine
Black eyelet/grommet setter


I started by grunging up my white cardstock using watercolors in brown tones. I sprayed water onto a cookie sheet, added brown watercolor to the sheet, sprayed the cardstock a little with water and then laid it down into the watery watercolor. I flipped the cardstock back and forth a few times, adding more watercolor and water to get the color and darkness that I wanted. I also added splatter with the same browns to get a mottled effect. Let it dry.


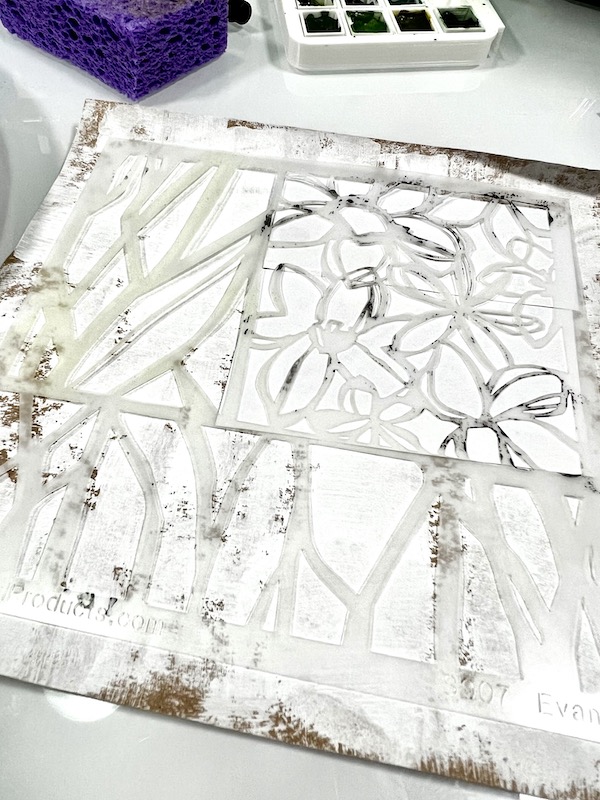
To add even more grunge to the cardstock, I used the Interesting Dots Repeating Patten by Jennifer Evans: S769 stencil and a dark brown to add random marks all over the page. The final step to the background paper was to splatter orange neon paint all over. Let this dry completely. Then cut the cardstock into 8 equal pieces: 5.5" x 2.125". I used a corner rounder paper punch to round the bottom corners of each tag. Set them aside.


I then created the teabag overlays. Each teabag was able to be torn in half so it fit over the tag pretty closely in size. I used one of the masks from the Feather Patterns mask and stencil by Valerie Sjodin: S939 to add a multi-colored neon acrylic paint feather to each teabag. I then used a black Sharpie pen to loosely outline the feather. Remember to keep it loose and imperfect!


Back to the tags... using the ATC Mixup Apter stencil by Seth Apter: L664, I added a word on each tag along with some fun background marks with black acrylic paint. I kept the words the darkest and added the marks with a lighter touch. I did put the words on the bottom of the tags.


On my book paper, I stenciled the faces from the ATC Mixup Evan stencil by Jennifer Evans: L654 and then ripped each face out. I used one larger and one small face for each tag.


To add more neon to the grunge, I added touches of yellow to the faces and orange to the edges of the tags. The orange on the tags picks up the splatters that we did earlier!


I glued a set of 2 faces to each tag above the words. I paid attention to the marks on the tags and moved the faces a little this way and that to take advantage of what was showing. I also added a white highlight with a gel pen on the eyes of all of the faces.


If you do not have a sewing machine for the next step, glue or a stapler are great options! I folded the teabag over the top of the tag, then sewed with a straight stitch a few times back and forth across the top of each tag, leaving the strings for a fun messy look.


Using a black eyelet and grommet setter, I added more texture and function to the top of each tag. Add ribbons, string, a bulb pin, a paper clip depending on how you will use the tag.


I left the back of the tags blank for journaling, quotes, or anything else you want to add! Since these are made in sets of 8 from one sheet of cardstock, you can make 16 pretty easily for a fun mass make to send out as happy mail, give to your bookclub or art group.

I would love to see what you create using these stencils! You can tag me on Instagram and find me in the following spaces!

YouTube: @ConsieSindet

Friday, February 27, 2026

Create a Dimensional Garden Labyrinth with Modeling Paste

Hi, my friends! I'm Consie Sindet and this is my first post for StencilGirl®. I'm a mixed media artist that loves playing with supplies, experimenting in my art journals, and delighting in sharing what I come up with!

I'm a big fan of being outdoors and walking a local labyrinth in my town. I find the experience to be very meditative. However, sometimes the weather doesn't cooperate! Today, I wanted to share with you how to create a finger labyrinth in your art journal so you can always "walk" the labyrinth anytime you want.

BTW...I made a video of the process which you can find at the bottom of this post.


Let's start with the supplies:
Watercolors
Makeup sponges
Modeling paste
Palette knife
Inktense pencils
White paint pen


The first thing I did was to create a background of mossy rocks to anchor my garden using a variety of green watercolors and a makeup sponge. The ATC Mixup Apter stencil by Seth Apter: L664 had a few different size circles that I could use to add a layered look to the page.


I then applied modeling paste with a palette knife to form my garden and labyrinth. I used the Leafy Doodle Verge stencil/mask by Valerie Sjodin: S714 to add the trees and foliage that I have at my actual labyrinth and the ATC Mixup Evan stencil by Jennifer Evans: L654 to add the garden on the bottom of the page to represent the flowers that grow in the surrounding woods. 


After I applied the paste through the Ceremonial Labyrinth stencil #2 by Cynthia Silveri: M228, I went back in to fill in the sections that were not covered by the bridges in the stencil. I wanted to have the walls as a single piece. Because I was adding the paste without a stencil, the finished texture had a wonderful rough stone feel about it!

A quick note: I don't as a rule clean my stencils except when using modeling paste. I did clean each of these stencils right after using them and allowed the modeling paste to dry with each layer on my page so I didn't pull up what I had already put down when I used the next stencil. 


Once all of the paste was dry, the next step was to add watercolor over all of the raised sections. I used a dry-ish brush to apply the paint. It is not really possible to drybrush with watercolor as you need moisture to get the paint to move! However, if you use as little water as possible, you can get the paint to catch on the modeling paste and not as much of the background paper. A light touch and layering works better than trying to get the color to cover all in one go.


After the watercolor had dried, I went in with my Inktense pencils to add more depth to all of the sections. Feel free to use watercolor pencils, water-soluble crayons, or any other supply you want to experiment with! I used the pencils to add shading to get all of the garden elements to really pop off the page. 


Most of the shading was done on the modeling paste itself. However, with the labyrinth, I wanted that to stand out the most. So, I shaded around the outside of the paste to really give it a raise stone wall look.


The final touches included a few highlights with a white paint pen on the flower petals and the labyrinth, and some splatters using the Indigo Inktense pencil. Now the labyrinth is ready to use whenever I need a meditative minute or two in my day!

I would love to see what you create using these stencils! You can tag me on Instagram and find me in the following spaces!

YouTube: @ConsieSindet


Wednesday, December 20, 2023

Rainbow backgrounds using stencils


Hi Everyone,
It's summer here down under, and that means bright colours!!! Well, it means that year round for me, but I digress!
This simple journal page was created using only stencils and acrylic paint, and it was so fun to make. I love how the background is such a strong focus, yet stands up to the bold image in the foreground.

To create this page I used the Circle Tile Stencil (L015) and sponged rainbow colours through the parts of the stencil all over my page. I started with the lighter colours and built up to darker, so if there was some overlap it would be covered.

Once dry, I then stencilled the pretty as a Peacock face ( S288) in black gesso and part of the You Got Time (M398) stencil to create a body. I used white paint pen to add highlights to the black gesso. I then stencilled a quote from the Rainbow Quote stencil (L956) and added white highlights as well. 

I love how happy this piece makes me, so I experimented with doing a similar piece using bright watercolours. This turned out okay - but there was some bleed through under the stencil, which you could avoid if you used a stencil spray to hold it close to the page. I freehanded a silhouette of a vase of flowers, but you could easily create your own stencilled version. 

Here is a list of the stencilled used in this journal page:

Here is a link to a video creating this page: 


Happy creating
Niamh

Tuesday, January 24, 2023

Sponged


S        P        O        N        G        E        D

It's Nancy Curry back on the blog with my first projects for 2023.  Even when I've worked with a medium for a long time, I love to find new (to me) ways to apply that lend themselves to different outcomes.  This week's exploration was applying watercolor with a household sponge.  Using a sponge through a stencil helps to control the amount of water leading to less seepage and adds an interesting texture as well.  The three pieces in the top photo were all done with the same palette of colors.  All are done on craft paper that had an application of gesso, but you can also do this with watercolor paper or even a good mixed media paper. 

M A T E R I A L S     L I S T:

  • artist grade watercolors 
  • gesso
  • household sponges cut into parts 
  • plate 
  • watercolor paper or paper treated with gesso 
  • black gouache, acrylic paint or permanent black ink
  • scissors and glue stick
  • cardstock or other substrate
S T E N C I L     L I S T:
I like to use a large stoneware plate that I found at Wal-Mart for my palette.  It is non staining and the flat surface is good for a number of different applications.  I bought a few and let the watercolor dry on them so I have palettes ready.  I transfer the watercolor with an old brush a few minutes before I am starting to paint.  Its surface area can hold a nice array for colors.  You'll see me use it often in my Instagram videos.  I also prepped some craft paper with gesso. I generally apply it in a thick and thin manner and leave some areas bare for a distressed look.  Complete coverage is also fine.


I spritzed the dry watercolors with a light fine mist of water and pressed my sponge into it.  I then used a light-medium pressure to pounce through the Paperwhites stencil.  If there are areas that you want to use different palette colors, place a piece of printer paper in those areas.  In this case, I did the leaf areas first and later returned to do the flowers in purple.  I decided the flowers needed centers and added them with a brush. 


To finish, I mounted it on dimensionally striped cardstock.

I had paint left over so I continued playing.  For the second piece, I chose a rectangular format and parts of Capture the Journey. I began by using washi tape to mark off a place for a word and then sponged on the background florals and leaves.  Originally,  I was going to add a word in the masked area directly onto the background, but changed course and did it on a separate piece of paper.  I finished it off by sponging black gouache with Emotions & Feelings #3 and attached to the background with a glue stick.  


 I mounted the background on coordinating green cardstock
My final piece was a stencil I'd been dying to use, Twisted Forest.  I cut paper into a 3.75" square and sponged into the stencil.  Once finished, I attached it to tumbled stone coaster, cut out letters from a National Geographic, and used a glue stick to affix.  


I had a great time playing with kitchen sponges.  They clean up well, are reusable and easy to find. Be sure to use highly pigmented watercolors for the best color.  Acrylic ink will also do well if you're looking for something else to try.  Just don't leave it on your sponge overnight!  As always, it's a pleasure to share my projects with you. For more of my work, head here, or my main website where my store is.  

I wish you a happy, healthy and creative 2023.
 
xoxo,
 
Nancy


Tuesday, October 4, 2022

Total Eclipse of the Heart

Hello!  I'm StencilGirl® team member, Nancy Curry, and I am here to "mix up" my own use of stencils and hopefully yours, too.  I am all about having stencils that can be used in their entirety or in a subtler manner.  This project may help you look at your stencils in a whole new way.  I know it impacted me that way as the project left my head and hit the paper.  I wanted a stencil that was busy and did choose one that was more representational rather than abstract, but you could use one of those, too.  Mary Beth Shaw and Traci Bautista are masters at that type of stencil.  I chose Margaret Peot's 9" x 12" floral heart stencil L846, which is a giant heart full of so many interesting twosomes.  Even if you choose a stencil with a distinctive, recognizable object design, it will change when cut into a bunch of repeat shapes.  


I began the project by grabbing my media and paper.  I chose a piece of mixed media paper (watercolor paper is perfect, too) that would fit the stencil and a selection of watercolors.  I am smitten with all kinds of artisan and artist quality paints.  These happen to be by Jazper Stardust. I promise I am not trying to enable you.  I lightly sprayed water through the stencil and wet the paints.  If you tend to be heavy-handed with spray bottles, I would advise using watercolor paper rather than mixed media.  Mixed media paper will only take so much water.  I let both sit for a few minutes to settle in.  


My goal is to add watercolor through the stencil in different ways.  Sometimes I use a mid-sized brush and flick or splatter to make marks on the paper and then I loosely brush through the stencil with more paint on the brush.  Varying the amount of water used will change the saturation and I like the look of that as well.  I did not affix the stencil with Pixie Spray, but you could if you don't want any movement.  I continued using a palette of two or three greens, and four other colors of choice until the pattern was painted to my satisfaction.  Before pulling the stencil off, I let it sit a few minutes.  Alternately, you could let it dry thoroughly before the reveal.  I'm always a little impatient.  

Design Reveal 


Once dry, I cut around the heart to allow closer proximity to the chosen punch.  My daughter just chose her wedding gown yesterday so I decided to stay with the hearts theme and just happened to have an old punch that would work with some minor adjustments.  I began punching out the design without a lot of thought.  I love the randomness that just doing without thinking brings.  I do like to use the punch backwards to make sure I get the whole piece of paper in and don't have a half heart. This punch had a lack of symmetry to the heart, but I used the first one I punched out as a stencil to even out the lobes of the hearts.  It was an extra step but for this project, I wanted more symmetry.


I like to lay the pieces out and play with positioning.  I had a lot of extra hearts for the mat size so I save them to use for single images on cards or tucked in with art orders from my shop.  Hearts never go out of style.  Once happy with the organization, I attached some of them with ScorTape to green cardstock and finished with and 8" x 8" mat. Size is definitely artist's choice.  I've been on a tear with these types of compositions all summer.  They are easily found in my Instagram feed under the hashtag #artinpieces. I've gone as large as 11" x 14" and as small as 8" x 8" mattted.  These are all paint only but the concept is the same.  Here's one of my dimensional favorites for inspiration, Tossed. Yes, I'm still on the wedding theme.


I hope you enjoyed this process and will look at your stencils with fresh eyes.  I have plans to continue this series done both ways. I am always happy to be on the blog and this project was a joy to do.  Happy creating until next time!  As always, you can find me on all social media as Nancy Curry Art or on my comprehensive website/store.  

I'll be back soon!!!

xoxo

Nancy


Monday, May 23, 2022

Mythical Illustration in Watercolor


Mythical creatures have always intrigued me, some of my favorite being mermaids, dragons and unicorns. The Little Mermaid was my favorite movie from childhood. Being able to talk and sing underwater while sporting an iridescent tail seemed like the ultimate fantasy. And then I grew up and had a daughter.
My daughter has an incredible imagination. She has a pet tiger that lives under her bed, along with a unicorn that we found in an egg on one of our bedtime adventures. One night she asked me to tell her a story. Unlike her, I am not very good at using the imagination area of my brain. I draw all my inspiration from others and what is around me. I desperately wanted to be one of those parents in story books that make up tales that come to life for their children. I made up a story about a little girl that had her own pirate ship (she was into pirates), and her brothers were her first mates. On her very first adventure, she found an egg that she brought back to her pirate ship. After several days, the egg hatched, and a tiny pink unicorn with emerald colored eyes emerged. She was named "Em', short for Emerald. And from that day on, they would go on many adventures, sailing their ship and meeting all sorts of people and mythical creatures.
My painting today is one interpretation of "Em, the Unicorn." 

I started off using Unicorn Magic to stencil my unicorn.


I made a few color swatches of paints that I wanted to use. I used Kuretake Watercolors.


I added text using Celtic Alphabet Stencil and then tried adding a girl.


On this version, I made some proportional changes to the girl but decided to try embellishing the unicorn using the Botanical Wildflowers Stencil.


At this point, I still wasn't sure about free-handing a girl so I traced a plate and started filling in foliage around the unicorn. Here is my basic sketch.


I transferred my sketch to 300gm watercolor paper, using graphite paper and a pencil. I like to paint in my recliner so this is my set-up, otherwise known as my lap.


I recently purchased some masking fluid and here I am trying it out on the stars and dots on the unicorn body.


Painting in progress.


At the end, I added a few touches of gold paint to make it sparkle.


I had a lot of fun stretching my imagination to put together this illustration of "Em." I can't wait to try it again with different modifications and adding my daughter. Thanks for following along with my process and if you have any tips about illustration, I would love to hear them.

Until Next Time,
Kate