Hi all stencil lovers! Patricia Lintner here!
I have an exciting project to share with you that I loved using my StencilGirl® stencils on!
A good majority of my work involves animals. Dogs,
birds, wildlife and recently chickens. Why animals? They are pure
creatures that speak to me and all of us in some way or another. They can
bring many emotions in us such as, comfort, inspiration, love,
curiosity, nurture, beauty and so much more!
With that said, I started doing a spirit animal
series a while back, and wanted to do something “different” with them.
After some time, stencils seemed to interest me, yet I was not sure
how I was going to use them with my animals. So, I just jumped in and
started playing!
For today’s project I decided on doing a spirit
animal Cougar for its confidence, strength, and wisdom.
I started with a 9" x 12" cradled wood
panel that I exclusively use in most of my art. I sealed the panel both front and
back as well as sides with Golden Gac 100, then gessoed the front
and sides to prep the panel.
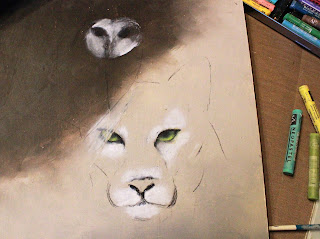
I used oil paint sticks, using a combination of R
& F Pigment Sticks and Richeson Shiva Artists' Oil Paintstiks, to
start adding a base color. What I love about oil paint sticks is that
they don't take as long to dry as oil paint out of the tubes. At this
point I let it “set” overnight.
the painting.
same method as I did with the cougar and the deli paper.
At this time I start looking at what stencils will work. Note that I do not start with a stencil in mind, but rather what speaks to me.
I chose several mandala styles because of how the cougar and owl are placed, and how the circular composition bring these two subject together. I finally settled on Rose Window and Border Stencil by
Lizzie Mayne. I love this design because not only of the circular composition, but also of the "architectural" feel that I am so drawn to.
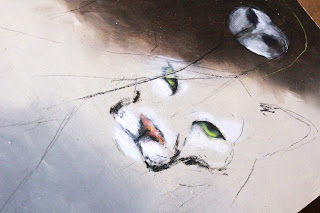
Momentarily setting the stencil aside, I draw more defined lines and now more color. I also at this stage start to scrape the paint to add more texture and visual interest. I still need more base color so that
when I add the stencil design, I will have that layer underneath. Again I let the paint set overnight.
Now is the time to bring that beautiful stencil in! The oil sticks are heavy bodied which is what I love about them because I love texture. I add my chosen colors and making sure not to move the stencil I start applying the oil sticks. I also somewhat remove the exposed areas with a paper towel and even baby wipes (my number one supply I use with all my work), as a tool. Notice how the thickness of the paint stick and removing some between the layers creates even more texture! I also decided at this point to not use the whole stencil, but rather just on the subjects. Cleaning the stencil with baby oil works beautifully!
I felt I needed something in the negative space in the lower left hand corner. So going through my StencilGirl® stencils I quickly found the 4" x 4" Feathered Tribe exclusive club stencil by Gwen Lafleur was perfect! I used the same method as I did with the previous stencil except I did not take any away, to leave a "raised" effect.
Adding finishing touches with mark making using my Neopastels, charcoal, scratching with a razor blade and skewer. Here I am paying attention to color, shape, detail, contrast and again composition.
I seal the painting with Gamblin Cold Wax all over sides and front.
And the finished piece!
Thank you everyone for coming along on my journey of my Spirit Cougar and Owl "One by One"!


Thank you for sharing Patrica!Sherri ( at) stencilgirltalk(dot com)
ReplyDeleteAbsolutely Sherri! Thank you!
DeleteI really love this piece and the effect you achieved with the stencil. I love the red outline and the final pencil/charcoal markings. I'm curious about one part - the red oval on the bottom left of the cougar - it looks like it says "No", or is it just a scribble? Hard to tell on my computer.
ReplyDeleteBeautiful art.
ReplyDelete