If you're anything like me, you are in love with kraft paper, and this kraft journal from Dina Wakley is no exception. To me, kraft paper is so awesome because it's basically a built in background, but I have heard so many people say they don't know what to do with it, so I decided to share this process with you!
StencilGirl Products Used:
Supplies:
Dina Wakley Media Kraft Journal
Dina Wakely Media Collage Tissue
Liquitex Fluid Matte Medium
Liquitex Basics Gesso
Matisse Fluid Acrylic - Australian Salmon Gum, Unbleached Titanium
Charvin Acrylic - Caribbean Pink
Stabilo Pencil - Black
UmWow Studio Chipboard - Layered Chevrons
Liquitex Spray Paint - Black, Viridian Hue Permanent 7
YES! Paste
Cheesecloth
Tim Holtz Quote Chips
 Step One: I used Liquitex Matte Fluid Medium to glue down some Dina Wakley Media Collage Tissue papers. I just love these floral prints! Don't worry that you can see a discoloration where the matte medium is - you won't see it when we're done!
Step Two: Using gesso, stencil wherever you'd like over the background. I stenciled along the sides and a little across as I didn't want everything to be covered - I wanted to leave a little blank space. I used gesso instead of white paint because, in my opinion, it's easier to layer over.
Step Three: I used three different colors to layer a floral stencil over the background. This time I stenciled along the bottom portion of the spread. I used three colors as I didn't want the stenciling to look "flat" - adding more colors (and not necessarily mixing them) gives some values to your stenciled image.
Step Four: Using a Stabilo pencil, I drew some botanical stems. I then used water to activate the pencil and added gesso to fill in the leaves.
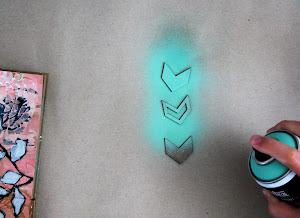
Step Five: Spray paint your chipboard shapes in a contrasting color. I used this turquoise-green color as I loved the pop against the pink. And you of course don't have to use spray paint, you can use whatever you'd like!
Step Six: Next, I spray painted some splatters in black. You could also use watered down paint or gloss sprays
 Step Seven: Now it's time to glue things down! I like to use YES! Paste for gluing down "heavy" items such as chipboard. I feel it gives a stronger hold than a glue stick or fluid matte medium. A gel medium would work well, also. I glued the chipboard shapes along the sides, then added some painted cheesecloth and a Tim Holtz quote chip.
 And that's it!
I hope you enjoy the tutorial, and that you feel inspired to start playing with your kraft papers!
Laura Dame (LauraMixedMedia)


I can't wait to try this! My new favorite color palette. Thank you for the tutorial.
ReplyDeleteI love this pretty spread - thanks so much for sharing your technique.
ReplyDeleteI love this. I wish you had mentioned the stencils you used. Or did I miss it somewhere.
ReplyDelete