Friday, January 28, 2022

Japanese Style Wabi Sabi Gift Box


Servus! It's Claudia here today to share with you a project that was totally inspired by the designs of Japanese Kimono designs and the beautiful StencilGirl® stencils designed by Mary Beth Shaw, Gwen Lafleur, Jill McDowell and Daniella Woolf - a wabi sabi style gift box.


Having two studios in two different locations often means you're in search of specific stuff from your stash and just as often it also means that you're searching for it in the wrong home - but in many cases this leads to inspiring discoveries - or rather re-discoveries - of long forgotten items! In my case that was the unearthing of a poster book with Japanese Kimono designs from one of my quite neglected shelves (while actually searching for posters of H.R. Giger to give to my son for possible reference for his pencil shading exercises). I already had the beautiful Crests stencil designed by Jill McDowell on my desk...


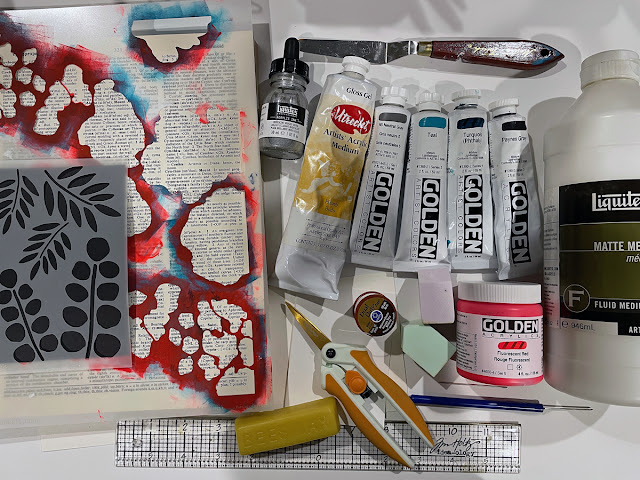
...and I knew I needed a special gift box for my sister's big birthday, so I grabbed a glossy white box that once held plain white greeting cards and envelopes, some DecoArt premium Acrylic Paints, a large round Gel Press Plate and a smaller octagonal Gelli plate, a brayer and some torn to size white deli paper and light grey wrapping paper (used for wrapping dishes for safer transport) sheets, a dabbing sponge and a palette knife and started to play. 

Other StencilGirl® stencils used: 


But before I started my gel plate printing session I remembered to first prime my white glossy box lid with two layers of DecoArt Chalky Finish paint "lace" to not only tone down the cold white and gloss but also provide a bit of texture and tooth for adding paint and gluing the prints on. 


I knew I wanted a symmetrical design and a combination of circle and octagonal shapes - but not as parts of a clean and simple style project! Going for a symmetrical composition with grunge or wabi sabi style designs kind of emphasises the grungy feel and also contrasts the imperfections of the focal elements. And contrast always means that there is "visual adventure" for the beholder to experience.  Symmetry also is a means to "control" a grungy mixed media design and not let it slip towards that feel of "someone-just-threw-lots-of-cool-stuff-onto-a-canvas-in-a-random-and-messy-way". Well, I think you know what I mean. ;)


Wabi-sabi is a term that comes from a set of believes with traditional Japanese aesthetics and is mostly about the acceptance of imperfection and impermanence. Mixed media and wabi-sabi go together really well - wabi-sabi per definition is never sleek or mass-produced but instead celebrates hand made one of a kind makes. It also focuses on the beauty of nature's imperfections and perishable natural materials - so texture, grunge and weathered are the perfect styles to integrate the concept of wabi-sabi in and enjoy being allowed to work without measuring, precise cutting or having to look for neatness in general. 

I used some of the Kimono designs from my poster book as a reference for picking Japanese style colours.


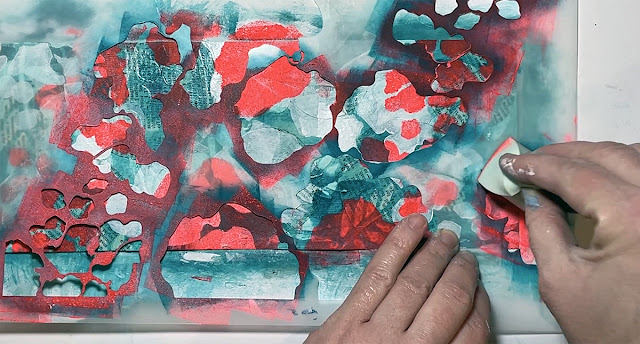
Then it was finally time to enjoy a good gel printing session! 


I didn't aim for specific results but rather experimented and went back and forth and I also used up any spread paint on my brayer for additional random background prints. 


The paint on the used stencils also got used up by misting the paint left on the stencil and pulling prints directly from the face up stencil. 


That led to an even more wabi-sabi style result I found!


For my focal element I picked one of the randomly layered larger circle prints and added stencilled layers only in sections...


Especially the small circle stencil with the pagoda from the "Crests" stencil was a perfect addition. As the print I had pulled using it wasn't too good, I placed the pagoda stencil in the exact same spot again directly on the print and added a darker layer of Raw Umber on top using a dabbing sponge.


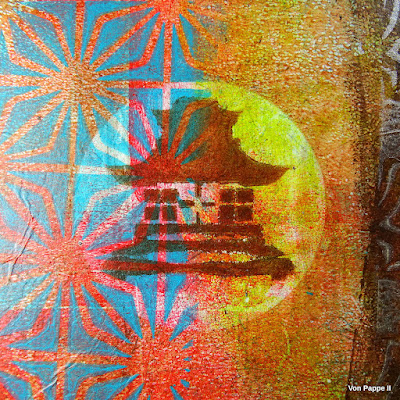
For a more festive look (as it was a big birthday celebration this gift box was meant for) I decided to add DecoArt premium Acrylic "Pale Gold" to the print, using the Moroccan Spa Window stencil again. To make it pop from a darker background I first had to add Raw Umber to the print - but only in the section that I wanted the stencil design to go. 
Needing two tries for this and therefore not getting a straight edge for that part on the print as you can see still got dearly embraced - remember: wabi-sabi is also about embracing this kind of imperfections as these are what distinguish makes as one of a kind hand made pieces from mass produced ones. And that definitely is a quality, don't you agree?
It's not always easy to give yourself the permission to stick with the obviously imperfect - I can tell! - but it is a wonderful exercise in awareness (and you get better at it with each time)! 

Of course the picked octagonal and circle prints couldn't go on a plain white background - too much neatness and too little visual fusing! - so I scraped more Pale Gold onto the box lid with a palette knife, trying to only do loose vertical scraping motions. 


Once that had dried (in the meantime I had roughly (!) cut out the prints I was going to use), I glued the deli and tissue paper prints in place using a wide soft brush and matte DecoArt Americana Decou-Page glue and sealant. I made sure the prints used around the edges also covered the narrow sides of the box lid - this added a lot of depth and interest to the whole design. 


I really love that I managed to capture a true Japanese wabi-sabi feel with my gift box and how all the beautiful stencil designs were all equally starring on the box lid! 


I hope you like this wabi-sabi approach to gift-wrapping! 
Hugs and happy crafting!
Claudia
xxx


Thursday, January 27, 2022

Come meet our newest designer, Kecia Deveney, and her inaugural launch!

Please join us in welcoming our newest designer, Kecia Deveney, to the StencilGirl® family. Kecia is a published mixed media artist, instructor, and world traveler, living at the Jersey Shore.  As a mixed media artist, her eclectic style can be seen in fabric and textiles, jewelry design, sculpture-work, and painting.  Creating is pivotal to Kecia and becomes, for her, art therapy. Her imagination comes to life and allows her temporary reprieve from her role as a full-time caregiver.  Her work is about ingenuity and playfulness. Kecia travels across the world so she may inspire others to find their own artistic spirits.  


Unalomes are symbols of enlightenment. Historically they are thought to have originated from ancient India and have been found in both Hindu and Buddhist writings. More modernly, they have evolved into sacred body art. 


Artistically Kecia loves to draw them; creating spiritually charged symbols and likes the idea of adding power words to the Unalome to give them a mixed media feel. Kecia's work  incorporates them into paintings, journal pages, making cards, and even embroidery.


You can learn more about Kecia at her website keciadeveney.com


Wednesday, January 26, 2022

Mary Beth Shaw's VLOG: January 2022


We hope you enjoyed this episode of Mary Beth's VLOG.

Stay tuned!
Mary Beth Shaw will be back again next month with another new VLOG post!

Tuesday, January 25, 2022

Chunky 5-hole Pamphlet Stitch Book with Kirsten Varga


Today's project is inspired by the December 2021 StencilClub stencil set Mix and Match Botanicals designed by Rae Missigman! I am inspired by the combination of realistic and abstracted organic shapes in her designs. I knew I could use them to create lovely layered compositions. By using gloss medium in one of my early layers I created a resist effect that allowed the stencil designs to show through multiple layers.


Making a chunky book involves a lot of folding, hole-punching, and sewing but don't let that deter you. I find it meditative to give myself over to the repetitive work and let my mind rest. Instead of a long stitch method that involves using one piece of string to sew all the signatures, I decided to individually stitch each signature to the cover using a 5-hole pamphlet stitch. The button thread I used is thin and doesn't stand out too much against the cover. You could use a thicker or more vibrant thread for a totally different look.


Check out the video below for all the details! 


Thanks for stopping by the StencilGirl® blog and I hope you have a creative day!

Kirsten :)

You can find me on Instagram!


StencilGirl® Stencils:

Mix and Match Botanicals by Rae Missigman

Other supplies used:

Watercolor paper 
Drawing paper
Dictionary pages
Acrylic paint
Acrylic ink
Gloss gel medium
Matte medium
Palette knife
Makeup sponges
Scissors
Ruler
Button thread
Needle
Awl
Beeswax


Monday, January 24, 2022

StencilGirl® Self-Portrait Collaboration


Hello and HAPPY NEW YEAR!!!  I hope your 2022 is full of happiness, health, and joy!

In reflecting on 2021 and the past (almost) two years of the COVID pandemic, focusing on self-care in all aspects of my life, looking both inward and outward of myself, is what brought this collaboration to life.

In order to continual grow and evolve with ourselves and others, we must self-reflect on our strengths and challenges, as well as ways to improve and adapt where we need.  Creating a self portrait of how we see ourselves is one way to start this journey of self-care and self-awareness.

SELF: A person's essential being that distinguishes them from others.

Collab participants were challenged to create a self portrait, using any mediums, design styles, or techniques of choice, but with the caveat, to create a portrait as they see themselves.

As with most of my collaborations, the variety of end results and overall creativity and awesomeness is truly inspiring.  Let's check out each of the Self Portraits - - - 

(several artists shared additional details and portrait pictures on their websites, so please click their name for the link)

TRACY KRUEGER

Stencils Used:

Pretty As  A Peacock

ATC MixUp Evans

StencilClub Nov 2019 


KIM COLLISTER


Stencils Used:

Gross Anatomy

Dangled Pods

Grand Wisteria


SUNILA MAHAJAN


Stencils Used:

Swag Borders

Collage Textures and Patterns

Floral Waterfall


LINDA EDKINS WYATT


Stencils Used:

ATC MixUp

Lemurian Leaves

Leaf, Lemurian Garden


JUDY WOOD


Stencils Used:

Color Mixing Swatch


LEIGH ANN BIERMAN


Stencils Used:

Window Ledge

Create Face

Mikki's Flowers


CHRISTY STRICKLER


Stencils Used:

Rose Window and Border


LAURA RAYNOR


Stencils Used:

StencilClub November 2019 

Leaves and Berries


MICHELE KOSCIOLEK


Stencils Used:

StencilClub December 2021 


CHEETARAH


Stencils Used:

Uplifting words

Mermaids

Past, Present, Future 


SUSAN BROWN


Stencils Used:

Urban Insiders 

Whimsical Waves 

Goal Doorways 


DIANA LARSON


Stencils Used:

West African Symbols 5 

ATC Mixup Stout 2

And lastly, my self-portrait!
Here's just a (very) short explanation on how I created my portrait.  I wanted to spend my time on the process, not the end result, and here she is, messy, chaotic, and imperfect - just like me.  ♥

Step One

I printed off a 'selfie' photograph to use a guide on my page.

(am I the only one that is a little freaked out by seeing my face on a page, looking back at me?)

Step Two

Make a *bunch* of gelli prints, using a variety of StencilGirl® stencils.  We all know how gelli print sessions go.  You start with a few, and end up with a lot.  LOL

Step Three

Cut shapes out of the gelli prints that will be overlay-ed on top of the actual self photo.  I took liberty in embellishing facial features and such, as I see myself.  This was the real fun part!

Step Four

Adhere gelli print collage to the page with matte medium.  Paint over, write over, add more design elements till she is finished.


Stencils Used: 

StencilClub October 2020 

Triangular Pathways

Pebbles Layer Me

I really enjoyed using my gelli prints in this way.  I may give it a try over other collage images to see what varied results I can achieve.

That's all for today! I hope you have a glorious week and year!