
Hello all, Happy October!
Super excited to be sharing this little project with you.
This time around rather than creating in my journal I opted to create on a wood blank that I purchased at dollar tree ~ as we all know stencils are for more than just paper!
I love showcasing family photos, pieces of art or perhaps a poem or even a reminder note.
This little clip frame is perfect on the shelf of my studio and makes a great little gift.
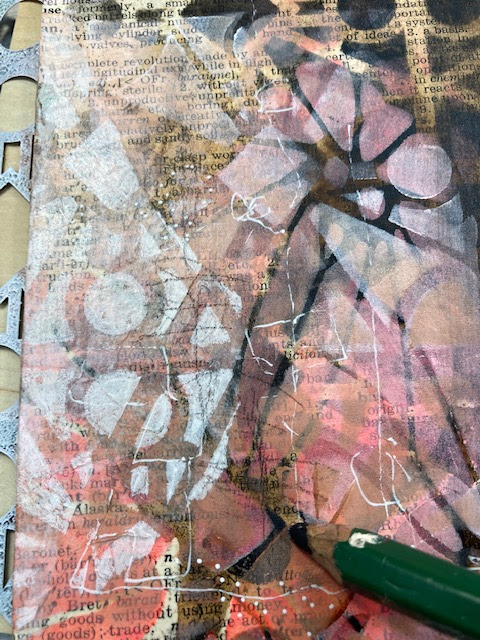
For this project I used two different stencils, acrylic ink and acrylic paints.
I love painted layers and will go through the various steps of achieving this look and adding depth to your art pieces.
The end result should be light and dreamy ~ remember to use a light tough when applying paint.
The Process:
- Using the gel plate, add your choice paint color ~ I love white because it pops!
- Apply the stencil and cover it with white tissue paper ~ gently rub the entire surface and pull
- Set aside and we will incorporate later
- Cover the wood panel with an old book page using a glue stick. I found this to be the easiest and most effective method
- Trim off any excess paper
- Apply matte medium to entire surface and allow to dry completely ~ this will seal the paper and prep it for the paint application
- With a spray bottle spray some of the surface and add a small amount of acrylic ink ~ I tend to add a small amount of water first to allow for movement ~
- Spray some more water on to the ink and start moving the wood panel in various directions to get those gorgeous drips
- Once satisfied dry completely
- Using your stencil cover the wood panel and with a cosmetic sponge apply the first layer or acrylic paint ~ I am using black. *do not overload the sponge
- remove the stencil and allow to dry

- With a piece of tape secure your wood piece to your work surface
- Tape out any portions of the stencil you DO NOT want to use (not so pretty but it works)
- Tape down the stencil ( only on one side) to your work surface ( this will ensure that we layer over the exact same portion of the stencil design)
- Start with your first layer of acrylic paint ~ apply a small amount with a cosmetic sponge and very light pounces
- For this project I started with the lightest color first and will continue to add darker hues
- Continue with the second layer adding a darker shade ~ I started in the center and moved outwards
- Stop three quarters of the way allowing the first layer to be visible

- Lifting the tape relocate the stencil to another part of the panel, overlapping just a tad.
- With the same technique as above ~ use the lighter shade only
- If you are working on a larger substrate you will need to do this several times
- For the final stenciled layer I used the initial stencil and lightly added paint ( to various parts using transparent oxide yellow~ once again small amount of paint and very light pouncing motion

- Remember that tissue paper ~ go grab it tear it up and with your matte medium find a home for it on your project
- I also added lines and marks with my white gel pen and a pencil
- Apply matte medium to the entire surface and allow to dry
- Add a clip and some ribbons and voila!
- Alternatively holes can be punched with a hole punch add some rope and hang.
I look forward to seeing your projects ~ ENJOY

Have a Happy Arty Day !!!

Connect with me on:
Supply List:
Stencils:
- Buenos Aires #L456 https://www.stencilgirlproducts.com/stencil-buenos-aires-large-nathalie-kalbach-p/l456.htm
- Blooming Where Planted #L449 https://www.stencilgirlproducts.com/stencil-blooming-where-planted-cecilia-swatton-p/l449.htm
Gel Press Plate https://gelpress.com/product/10802/
Acrylic Paint
- white
- light pink
- dark pink
- black
- transparent oxide yellow
Acrylic Ink:
- DR~Sepia
Wood panel
Old book paper
Tissue Paper
Matte Medium
Cosmetic Sponges
Heat Tool
Clip
Fabric or Ribbons
Tina Hois
ReplyDelete