Hi everyone! Carol Ponsford here patiently awaiting spring in Indiana. What about you, are you
looking forward to the bright colors of spring? I know some of you are getting ready for your winter
and I hope you can find the beauty that comes with winter also. Funny how nature gives us all of
the colorful and monotone palettes depending on the season, Well, Spring is what has inspired my
journal page this month. I love all of the colorful mediums that are available and this month I knew
that watercolor paint would work great with the March StencilClub set designed by Valerie Sjodin.
Let's get started!
I am using my 8 1/2" x 8 1/2" Dylusions Journal by Ranger. I love the way this journal takes
mediums of all kinds. I used Pixie Spray by iCraft for the first time and sprayed one side of the
journal then placed the script stencil on top and pressed in to place. I loved how it kept the stencil
in place to help create the negative space for the words. I know Mary Beth uses frequently
and I am definitely using it again in the future.
I then take water and wet down the first area that I want the watercolor paint to flow into.
I only did one section at a time so that the water would not dry before I got to the next color.
I get a nice amount of the paint on my brush and drop it into the top section of where I had put
the water. The paint will start to flow into the entire area where the water is. If it doesn't move quite
like you want you can rinse your brush and use water to help it flow to all of the areas.
I repeated the process above across the left page and let it set to dry. Once dry, I peeled up the
stencil and cleaned off the excess paint so that it would not contaminate the next section (dry
the stencil completely or it may not adhere firmly), sprayed the right page with the Pixie Spray,
applied the dry stencil and repeated the process with the remaining colors I wanted on the page.
You can use any colors you choose but some of you might want to know what colors I chose.
I used Golden QOR Watercolors from left to right: Permanent Gambage, Quinacridone Gold Deep, Permanent Alizarin Crimson, Dioxazine Purple, Phthalo Turquoise, and Sap Green.
I let that dry completely before removing. I cleaned the stencil and set it aside for later.
While the paint on the right page was drying I started working on other components
of the journal spread. I needed to make some masks to cover elements I was going to add
so on card stock I sponged the Create image from the other stencil and a couple
of the paint brush w/drip with Ranger Jet Black Archival Ink.
I then cut these images out and set aside. Only cut around the outside of the Create splat
not the word itself and I left a very thin line of paper connecting the drip to the brush.
Next I placed the brush stencil where I wanted the brushes to be (I used the drip to gauge the
position so that the drip was flowing into the painted sections) and using a sponge and Archival
black ink to add only the handles of the brushes hanging above all of the colorful drips. I also
added the splat just off center of the middle the page. I repositioned the brush handles and used a
fairly dry watercolor paint in the matching color to add the brush tips and drips.
Unfortunately I had some paint bleed from under the stencil. If that doesn't bother you then
move on but, it did bother me so I had to do a little paint matching to the background paper with
some of my acrylic paints and I just painted several layers of paint to cover the fuzzy areas.
You can see a little glossy look to the right upper page that was caused by the
acrylic paint but don't worry about that, it will be hidden by the next step.
Next I positioned the mask I had cut over the areas I wanted to keep protected. I laid the
script stencil on top and used Ranger's newest Tim Holtz Distress Paint color Lost Shadow to sponge
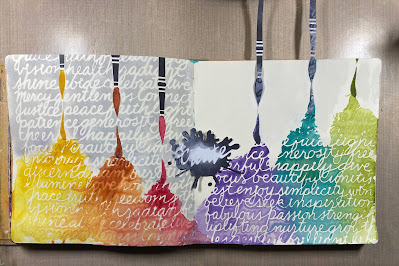
over the script moving the mask as needed across the page. This picture shows the left
page once it is finished and the right page that is ready for the application of the Lost Shadow paint.
Once I finished the right page I removed the stencil and mask and this journal spread is complete!
I hope you enjoyed seeing one way you could use these wonderful stencils. I chose
to use the brush with watercolors but this could be done with a lot of other mediums and
you have many writing and drawing tools to choose from. I will be anxious to see
what you do so please be sure to share your creations on the StencilGirl® social media sites.
Whether you are headed into Spring or Winter, I hope you find some inspiration from your surroundings.
Until next month when I will be back to share what the April StencilClub set inspires me to create!
Join StencilClub by March 15 to receive these exclusive stencils and accompanying video
tutorial with PDF (both downloadable!), and 20% OFF STENCILS EVERY DAY!!
Happy Creating!
To see more of my work please visit my Instagram page.


Wow, you're doing really well.
ReplyDeleteI remember the times when I was also engaged in something similar, I was very fond of calligraphy and illustrations then.
Thank you Aaron!
Delete