
I started this page by glueing down some brightly coloured collage papers. I then added a thin coat of fluid neon pink acrylic paint over the top. I used the Magic Garden Stencil and wiped away the excess paint to get a print over my page. I then darkened the edges of the collage and added some blue to help the contrasting colours pop.

I wanted to add some texture into the darker areas of the page, so I used parts of the Unfinished stencil in black gesso, but it got a little lost. I then added some highlights with a paint pen to the letters, but didn't really like that, so sponged some of the navy paint over it again to blend it in. I ended up liking this as it is much more subtle now than it was originally.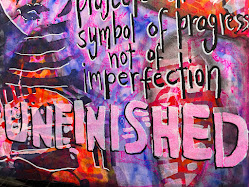

Finally I stencilled the large words 'unfinished' over the piece with the unfinished stencil. This was because I really was unfinished - usually I know when a piece is done. This page had a large 'blank' area to the right of the image that was bugging me. After leaving it aside for a day, I found the perfect quote, that not only finished the page, but captured my struggle with it too.
Here is a link to the full step by step video for you to see my process in action. Click on the links above to go to the stencils used in this project.
Until next time,
Niamh
YouTube: @niamhbaly
1G: @niamhbaly
FB: @niamhs art journal
Starting a project can be exciting yet overwhelming. Having a clear direction is key, and that's where a marketing plan writing service can be incredibly helpful. It not only streamlines your strategy but also provides valuable insight that supports your studies. This kind of expert assistance ensures your project begins with focus, structure, and a strong academic foundation.
ReplyDelete