
Hi everyone, Carol Ponsford here with my June project using the June StencilClub set
Pathways designed by the talented Carolyn Dube. When I first received this set I
knew exactly the direction I wanted to take this project. If you would like to see a video
of the process click this link
Creating a Woven Journal Page
youtu.be and it will take you to the StencilGirl® Products YouTube site.

The first thing I did was to pull out my journal to prepare the surface.
I needed to have a blank page behind the page so that I could adhere the
two pages together to hide the messy back that I would end up with. I laid
the path stencil on top of the page to estimate where I would paint
and painted the area with black acrylic paint.

After this was dry, I laid the stencil on top and with a slightly lighter
shade (I used Pewter) I sponged through the stencil to show the paths that
I would need to add holes to for the weaving of the fabric strips. I marked with a
Stabilo All white pencil so that I would be able to remove the lines after cutting.
It took some mental energy to prepare the holes so that fabric would
be exposed in the areas I wanted it to show the most. I cut all of the holes
as well as the bottom of the page off where the strips would hang freely.

Next I took my 9"x12" gel plate and pressed the lined patterned stencil firmly on top.
Using my brayer, I spread the black paint on top of the stencil making sure to get down
in all parts of the stencil. I took white copy paper and removed as much paint from
the centers of the designs but left just a little around the edges.

Using some hand carved stamps and Archival ink, I stamped small
designs in the box areas of the stenciled patterns.

Then using the foam applicator, I added 6 different colors of paint
randomly around the plate then removed the stencil.
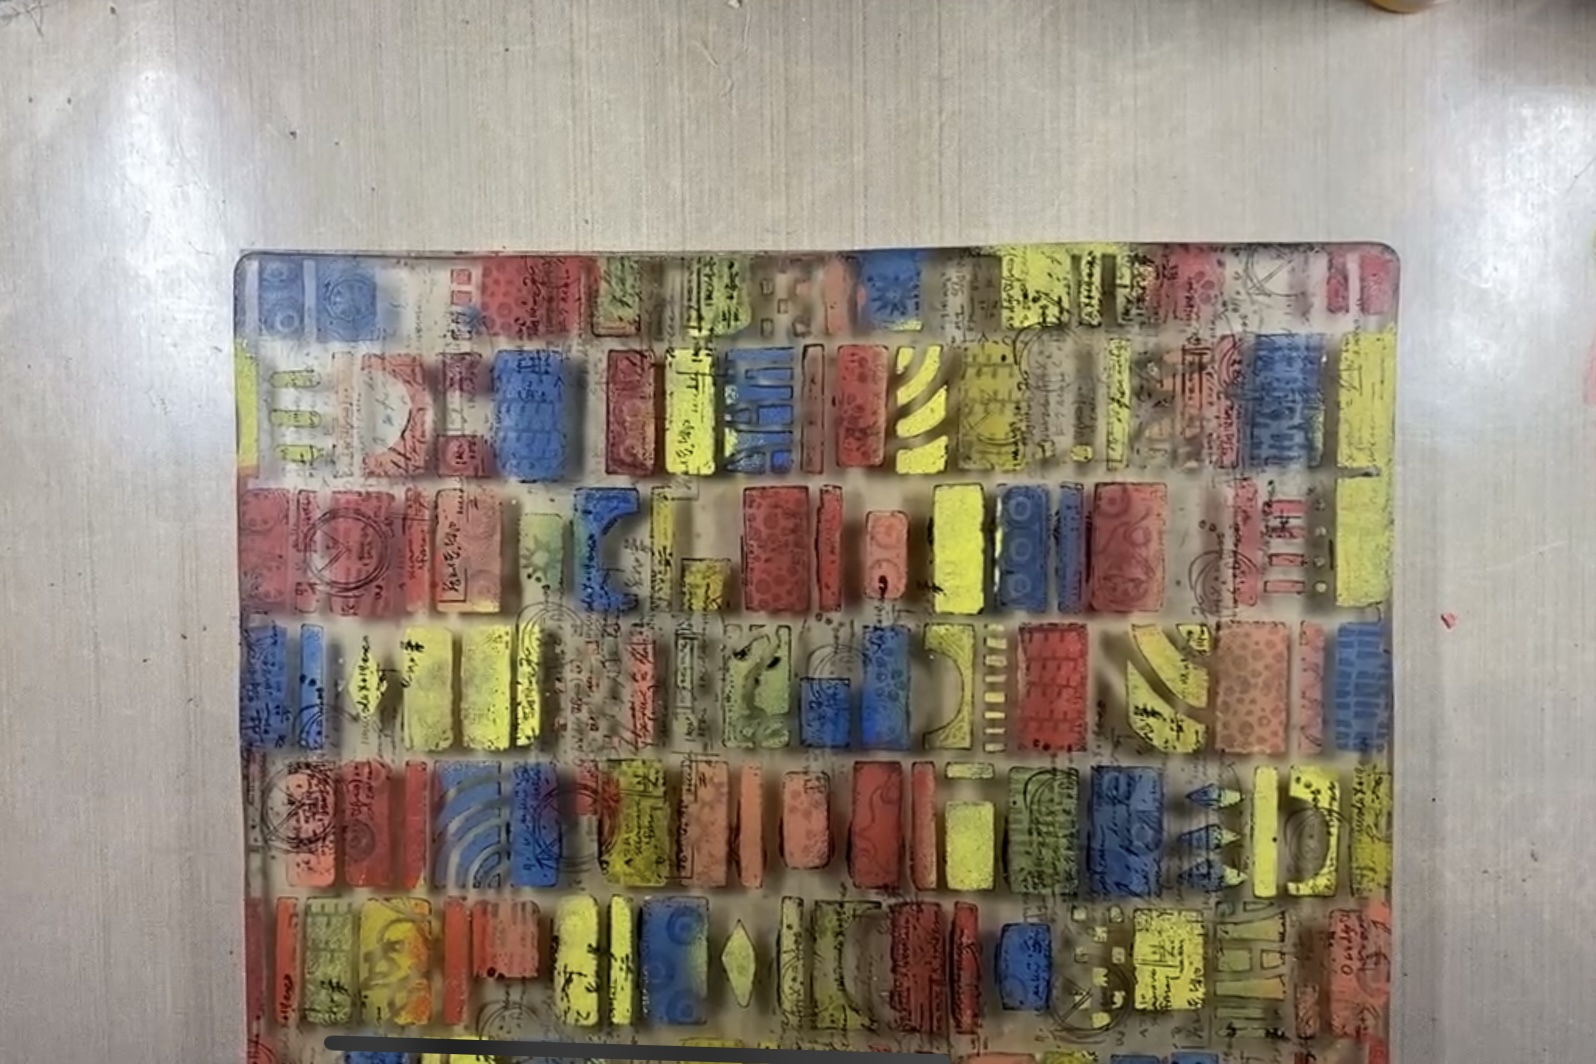
Next I took a script stamp and continued stamping in open areas with
black Archival ink until I was happy with the design.


I used a 6"x6" gel plate as a palette and with my brayer mixed Snowflake white and Heavy
Cream colors to get a slightly off white color to pull the print onto strips of silk sari ribbon.

I loved how these strips of fabric turned out. Some were more successful than others
but I like grungy so the imperfections didn't bother me. I repeated the process until
I had enough strips for all of the opening that I needed to fill.

The next step was to weave all of the strips into their places. I started on the left
side of the page and wove each strip towards the bottom of the page in their respective path.
I left a small amount of fabric at the top of each path because I wasn't sure if I wanted fabric
sticking out of the top or not. Ultimately I chose to cut those ends off. Just a warning that you
will have paint chip off of the fabric during this step but if you go slow the amount will be
minimal (it just makes a little mess). I had not painted the back page because I was unsure if I
wanted it white or black but after seeing the fabric strips dangling down, I decided I wanted
to go with black to bring out the colors on the strips of fabric so I painted the back page black
where that page would show.

While the paint was drying, I began working on the wording I wanted to add and figuring
out the spacing of it. Then I used masking tape to secure the top ends that I had cut off.

I used a palette knife to spread regular gel matte medium on the back of the top page
(I applied generously) and then folded the back page over onto the
back of the front page. Turned the front page up and rubbed until it was adhered firmly.

I drew lines to mark the placement of my script with the Stabilo All
white pencil and then took my white Posca Pen and added my saying.
I hope you enjoyed this post and would love to see what you do with these stencils. I
appreciate StencilGirl® Products providing me with this free StencilClub set
so that I can play in advance and share what I create each month with you. Check
back in next month when I will share what I have created with the July StencilClub set!

Here is a list of supplies that I used:
Dylusions 8 1/2" x 8 1/2" journal
9x12 gel plate
brayer
Silk sari ribbon
scissors
ruler
paint brush
palette knife
Stabilo All white pencil
white Posca Pen
sponge applicator
Stampers Anonymous Tim Holtz stamp #P4-2189
some handout stamps
Ranger Archival stamp pad in Jet Black
and Golden Regular Gel Matte medium
Master's Touch - Permanent Black
PaperArtsy Fresco Acrylic paints in these colors:
Southern Skies Limelight
Zesty Zing Tangerine Twist
Coral London Bus
Pewter Snowflake
and Heavy Cream
Join StencilClub by June 15 to receive these exclusive stencils and accompanying video tutorial with PDF (both downloadable!), and 20% OFF STENCILS EVERY DAY!!
Happy Creating!
To see more of my work please visit my Instagram page.
Great page Carol! You did a great job on your video too!!!
ReplyDeleteThank you Marla!
DeleteReally interesting and imaginative project, Carol - thanks for the inspiration!
ReplyDeleteThank you for checking it out Terry.
DeleteInspirational! After not touching my paints/stencils or gel plates for over a year.... I'm determined to make some time for my journal again. Thank you!
ReplyDelete