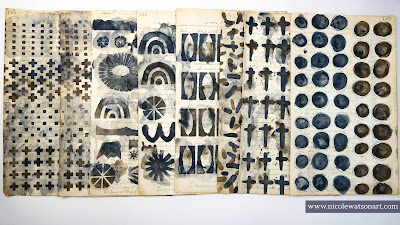
Hello Friends! Nicole back with another grungy paper tutorial, this one a bit bittersweet.
After three incredible years with the Creative Team, this is my final post. It has been a true honor to do what I love for StencilGirl®! I have met so many of YOU creatives who also love stencils, and there is nothing better than inspiring you to create and use those stencils!
This is not a forever goodbye. I'm looking forward to focussing my time on designing more stencils for StencilGirl® and sharing my creations, as always, over on Instagram and my YouTube channel. And, you never know when I might make a surprise appearance here!
With that, I wanted to leave you with one more grungy paper tutorial! I gathered a handful of 9x12 stencils that I haven't had a chance to play with along with my favorite Payne's gray and just played.
And, oh how I needed to play!

To begin, I always lightly gesso my papers. This helps add some integrity to older papers and allows the paint and water to move more easily on the page.
The process is quick, and it doesn't matter if entire page is perfectly covered. My process varies each time, but this session I was using up some gesso that I had turned over like ketchup to get the last bits out! I sprayed my papers with water and added gesso with my brush.
I’m using papers from an old ledger, but any papers will work! Old book pages are fun, too. Just make sure they aren't too thin and brittle. Ledgers aren’t always easy to find, so if you want to add that fun handwriting layer, you could always stamp or scribble all over paper before stenciling.
Creating the Papers
Once all the gessoed pages were dry, I started making my papers. The general process is the same each time, but I find that often I get a little more creative and adventurous as the playtime goes on. Oftentimes, I don't want to stop!
I simply use an applicator with paint through the stencil. Then, I add water + watered down paint and scruff up the stenciled image to distress it.
One thing I always keep in mind, is that I'm creating moments. It's not important to me that the entire paper is a work of art! I like to have variations on each page that I can use in different ways as needed for collage, backgrounds, journals, and more.
My first couple papers were simple, and then I changed it up a bit.
For this one, I tried to create an ombre effect, keeping the paint darker to the left and fading it to the right. When I was done stenciling, I added quite a bit of watered down paint to the left side and tilted the paper for drips.
I just used Payne's gray in the cross-like shapes and added watered-down raw umber with it. I liked stenciling it in two different directions for completely different looks.
Phew! That was a lot of amazing playtime, and I did not want to stop! I had so much fun making these papers and discovering amazing shapes and patterns in these stencils.
You can watch the grungy paper play in action in the video below:
Links to my other grungy paper/technique tutorials:
Thank You!
As I close out this blog and season, I just wanted to take a quick moment to thank you for all your kindness. I also want to thank the team at StencilGirl® for this amazing opportunity. It has been such a fun few years playing with these stencils.
I hope you create some grungy papers soon!
-Nicole
Connect with me on


What a great demo Nicole! You will be missed, I always love what you create and watching you work your magic. I hope you will start teaching classes in different areas of the country. Would love to take an in person class with you.
ReplyDeletethank you so much, carol! I'm most definitely keeping my future open to opportunities that come my way! :) not sure if teaching will be one, but you never know. it would be fun, for sure! - nicole
DeleteThank you for sharing your technique. I'm looking forward to your future stencils and will follow you on Insta and Youtube.
ReplyDeletethanks so much!! - nicole
DeleteI love these grungy papers and always enjoy your creativity. Thanks for sharing your ideas and techniques. I'll miss your columns.
ReplyDeletethank you! I'll still be sharing lots of art with stencils! :) -nicole
DeleteLove love love, Nicole! So utterly inspiring! xxx
ReplyDeletethank you so much! - nicole
Delete