Showing posts with label atc stencil. Show all posts

Friday, October 23, 2020

Mixed Media Postcards by Mary C. Nasser

Hi, everyone! Mary C. Nasser here! I am so honored and excited that Rae Missigman asked me to be one of twelve Creative Contributors for The Painted Paper Project, a free online course she created with Sandi Keene. The Painted Paper Project is dedicated to spreading joy through art! It is a project that promotes kindness and gratitude. The idea is that you make a project and either mail it or hand-deliver it. I love both happy mail and practicing gratitude!
​
I hope you enjoy my Mixed Media Postcards project and make your own Mixed Media Postcards, too!
Have fun and happy creating!


Art Supplies I used in this video:
  • Strathmore 400 Series Toned Tan Mixed Media Paper Pad 6" x 8" cut in half to postcard size: 4" x 6"
  • Strathmore 400 Series Toned Gray Mixed Media Paper Pad 6" x 8" cut in half to postcard size: 4" x 6"
  • Strathmore 400 Series Toned Blue Mixed Media Paper Pad 6" x 8" cut in half to postcard size: 4" x 6"
  • StencilGirl® Stencils: Map with Roundabouts, Map Stencil, ATC Mixup - Nasser, Let's Go 1 and
    Let's Go 2
  • Vintage maps and gel print on newsprint (for collage ephemera)
  • Metal Ruler (for tearing)
  • UHU glue stick
  • Yellow scraper
  • PaperArtsy paints in Buff and Mermaid
  • Utrecht white gesso
  • 6B pencil
  • Cosmetic sponge, InkBlusher and sponge dauber
  • QOR watercolor in Pthalo Blue (Green Shade)
  • Liquitex Heavy Body Artist Acrylic in Turquoise Deep
  • Black uni-ball pen
  • Pam Carriker's acrylic ink in Turquoise
  • StazOn Ink in Jet Black and Blue Teal
  • Black IDenti-Pen
  • Map stickers: Vintage Hemispheres
  • Wow! Embossing Pad
  • Aegean Sea embossing powder
  • Teal Golden High Flow Acrylic in Fineline Applicator (for splatters)
Thanks so much!


Monday, July 6, 2020

Upcycled Stenciled Cork Board with a Cold Wax Finish and Brimfield

It's Jill McDowell here with you today.  I had such wonderful plans for this column.   My head was filled with visions of field trips to my favorite haunts where we would find eclectic pieces to repurpose and revamp. Magical places full of interesting people telling stories about the treasures they’ve laid before us.  New England is full of so many vibrant places that I really wanted to share with you.  

But like all of us, my plans changed in March when the long tendrils of the Corona Virus came knocking at our door. Since my foraging days were put on hold, I decided to shop my own garage to find a project to upcycle for you.

Picking through my treasures, I stumbled upon an old type tray that I had picked up a few years ago at the famous Brimfield Antiques Show in Brimfield, MA.
Brimfield is actually one of those places that I’d planned on taking you to.  It’s the largest show of its kind in the country, with twelve jammed packed fields of tented dealers selling their eclectic wares.  Brimfield is a wondrous place, full of oddities and inspiration.  I try to make time each year to take a pilgrimage there with my friend, Theresa.  Since I can’t take you along with me this year, I created a photo album from some of our past excursions to give you a feel for what its like.
Theresa and I both purchased type trays one year.  At $5 apiece they were a steal.  Her’s ended up being reclaimed by her husband who fixed it atop his toolbox.  Mine waited patiently for two years in the back of my garage before being upcycled into this cork board.
I specifically choose this particular type tray because most of the interior was missing.  I didn’t want a lot of tiny spaces to fill but loved the character that just a few cubby holes would add to my cork board.  I only had to wrangle with one jagged edge to clean it up and that was an easy fix.
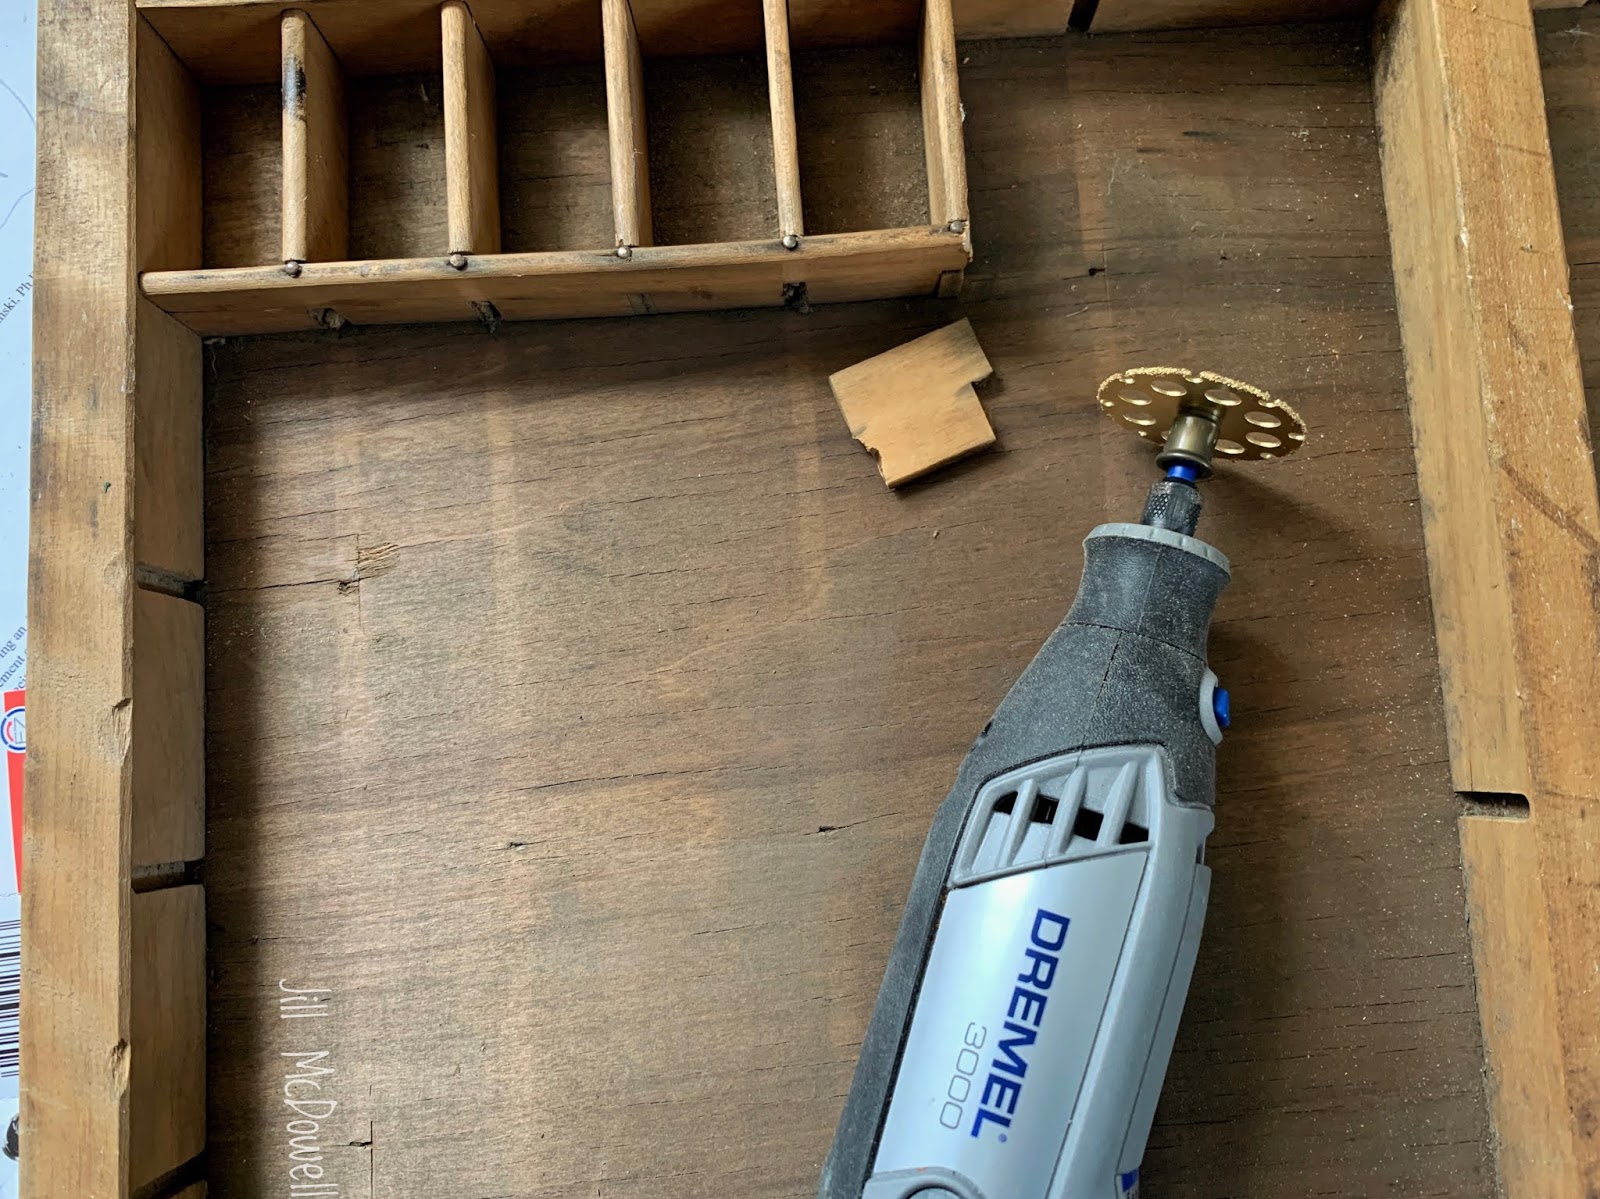
I used my trusty Dremel Drill to cut the rogue piece off and then lightly sanded the entire tray.
Then I painted the tray with two coats of Valspar latex paint in Olive Marinade.  I decided later that it was a little too yellow for my liking and repainted it with Valspar’s Cypress Point green latex paint.  After all, isn’t that what color samples are for?
To prepare a base for the cork top, I cut and glued together two pieces of mat board for each section of the tray.  Thick corrugated cardboard would have also worked as a base for the cork.  (Note, I waited to glue the bases into the tray until after they were stenciled.)
Then I cut and covered each of the three sections with Self Adhesive Cork Contact Paper.  
Easy Peasy!
I laid down a base coat of gesso on each of the three the panels.  When they were dry I used masking tape to create a border around the edges.  I used my Four Buds Stencil from StencilGirl to create an allover pattern spanning the three panels.  (For video tips on how I line up my stencils head on over to my blog.)  I used Skye Blue archival ink for the center of the stencil and Memento Luxe Nautical Blue ink for the outside edges.
Then I removed the tape and covered the stencil section with a piece of copy paper to keep it clean.  I painted the border black and stenciled over it with White STAZ On Pigment Ink using StencilGirl's original ATC Mixup stencil by Mary Beth Shaw.  I loved how the Diamond pattern echoed the negative space in the main design.

Then I added some detailing with a gold POSCA Pen
Here's what a panel looked like after this first layer of color was done
Of course, you could stop here and have a perfectly nice cork board, but never one to be satisfied so easily, I decided to try my hand at aging the cork with a green R&F Paint Stick over of a base coat of Cold Wax.  I've always loved a wax finish and thought it would complement the cork nicely.

I applied a thin layer of cold wax with a paper towel, let it sit for about an hour and then buffed it out.
This was my first time working with cold wax and I'm really glad I used it.

Then I mixed up a bit of the R&F Paint Stick with the cold wax and wiped along the edges with my gloved finger.


Here's one panel that been aged next to one that hasn’t.  The aged panel looks like it could have been found on the bottom of an ancient sitting pool.

Looking back at my Brimfield inspiration album, I really liked that little yellow grumpy car grate. It inspired me to add yellow into my piece.  I was careful not to use acrylic paint over cold wax since I know that acrylic and cold wax don’t play nice together.  (You can put cold wax over acrylic paint but it’s not advisable to put acrylic paint over cold wax.). I opted instead to use yellow India Ink applied with a water brush.
I wasn't happy with the starkness of the border so I put some life back into it with blue India Ink.

I finished my Cork Board with three thin layers of cold wax, buffed between applications.  Then I glued the panels into my Type Tray.  I stenciled some of the scrap pieces left over from the Cork Contact Paper with the numbers in the ATC Stencil, cut them out, and adhered them into the cubby holes. Then I added hardware on the back of the type tray to hang it.  And now I have a beautiful, three sectioned, Cork Board to hang keepsakes and inspiration on and to display some of my tiniest treasures.


I hope I've inspired you to shop your own house to find a project to reimagine and Upcycle.  All it takes is a little paint and a little imagination to transform an old forgotten piece into a one-of-a-kind personalized piece to treasure.  Stay Well,  Jill

Monday, June 8, 2020

Modern Leather Earrings Embellished with StencilGirl® Stencil Designs


Oh hey my friends are you ready to make some modern leather earrings using StencilGirl® stencils?  I'm Debi Adams and I've been having an absolute blast over in my little craft workshop working up these cute little accessories. It hasn't been that difficult for me to find things to do while being quarantined.  The introvert in me enjoys being told to stay inside, although I will admit, this length of time has been a bit confining.  What about you?  Hard stuff for sure.  Anyway, I'm always on the look out, whether physically shopping or online "researching", for the latest trends. I follow a lot of unique, style-setting leaders on instagram in all areas of designs, not just art.  As my new Columnist title states, I'm officially on the "trendsetter" trail.  From home decor to wedding florals, watercoloring to macrame, I try and open myself up to a bit of each. It is often reflected in my art and sometimes, not so much, but it never goes away void.   Having four grown daughters who continually keep me updated is definitely a perk.   What I have observed is that much of what is being created today is very organic, simple and geometric in design.  When I decided to make these earrings I kept those ideas in mind and lucky for me, my girls loved them!  Though these may not be your look, it is starting place and yet another idea for ways to extend the use of your stencils.   


 It doesn't take a lot of supplies to create these. I bought a package of leather pieces. You can get them from a leather supplier or even at your local hobby store. Although I recommend using leather paint (very reasonably priced btw) on leather for pliability, these earrings are not being used as clothing so chalk paint or acrylic paint will work fine too. Grab some thin permanent pens for mark making. I got a 24 kt. gold metallic pen too. I would seal it all with a leather sealer when finished.


 This little punch tool is a gem.  You can purchase it online. It has an interchangeable tip for different sizes of holes. It's called a Hole Punch Drill.  It slices through leather like butter, perfect for earring making.


As for the circles, you can get some specialty leather scissors and cut your own shapes or you can use steel rule die-cuts, which is what I used here.  I did see some plain shapes, pre-cut at a popular craft store in the jewelry-making section, so there's that. :) Also, you will need whatever earring base you like, studs or hoops, and if choosing the latter,  jump rings and a jump ring tool. 


And lastly, don't forget your favorite stencils.  Although all will work, I found the ones with smaller details were the best.  I used Mary C. Nasser's Mixup stencil, Mary Beth Shaw's ATC Mixup #1 and Seth Apter's Mixup #2.  Most of the Mixups are perfect! 


 I traced some of the images onto the leather first but feel free to start stenciling anyway you want once you have painted your base.  Tip: The paint dries very fast on leather.
Here you can see where I used Mary C. Nasser's stencil. I traced the design then painted in the image. 


And here is how my earrings shaped up.    


Love this color combo.  Totally in.  I used Seth's stencil here. 


Although I didn't do it on these, you can add additional pieces of embellished leather onto your earrings to  make a layering of sorts.  Love that tulip flower on Mary Beth's stencil. 


Of course, you can make a necklace instead of earrings or you can create an entire collection.  It's all up to you.  Feel free to add more and layer it up like you do with any mixed media piece. I cannot wait to see what you create! 


Happy you stopped by.  Hoping you learned something new.  

XO,

Debi Adams
debi-adams.com
debi_adams-instagram
Debi Adams-Facebook
Debi Adams-Pinterest

Wednesday, October 16, 2019

Mushroom Stencils by Debi Adams


Mushrooms. The generic version (aka, plain) is known as a white button mushroom, but these mushrooms can be anything but simple and you get to decide. Also known as fungi, they have such lovely parts, the cap, the stem, and the gills. Each one has a story and a beauty of its own.


Tags collaged with paint, ink, and texture paste.

Debi Adams created some to be whimsical and fun and others upright, stoic and perhaps a bit realistic. A few have revealed their undersides (for shame). 

Mushroom Gills, S736, is a 6" x6" stencil.


Truly this collection is more of a "tossed salad” of sorts with all types of mushrooms thrown in the lot which allows them to be interpreted in a myriad of ways.

ATC Mixup Adams: Toadstools


The card maker in Debi definitely wanted to have the key elements available and they are in the ATC collection. There are backgrounds, though not all mushrooms, definitely some statement pieces, and a sprinkling of sentiments.

Tall Skinny Mushrooms,  L749 is a9" x 12" Stencil.
As for the application, Debi designed them to go in any artistic direction.  

She says, "I can see them being abstract or done with a mid-century flair, watercolored, layered, gelli printed, really anything the mind can dream up." 

Texture paste on acrylic.

"So, there you have it. Oh, but wait, you want to know why? Hmmm. I just like them. They say happy, weird, quirky, organic.  I love their colorings, dimensionality, ruffles, curves and the fact that they are different. Kind of like all of us."


You can find these stencils by clicking on any picture or right here.

ATC with watercolors, acrylics and a white pen.


Friday, July 26, 2019

Mermaid Mixed Media Art Journaling

Hello, all! Katie Lamb here today to share a my new mixed media art journal layout with ATC Mixup Daley and Mermaids Stencil and Masks!

Start off by dabbing two tones of blue acrylic paint on to a blank journal with a make-up sponge.
Next take a texture background stamp and stamp it in navy blue along the center of the pages.
Take a few smaller ones and stamp those around the pages.
Use a makeup sponge to dab paint through the stencils and leave to fully dry.
Then place the stencil back over the image and draw around the outline of the stencil with a fine black pen.
Thank you for visiting!
Katie Lamb