Showing posts with label vintage photos. Show all posts

Monday, November 15, 2021

Stenciling and Stitching on Cabinet Cards

Stenciling and Stitching on Cabinet Cards


As the name of my business implies, I am wildly attracted to Ephemera. 

e·phem·er·a

/əˈfem(ə)rə/ noun - things that exist or are used or enjoyed for only a short time."There were papers, letters, old boxes—all sorts of ephemera"


I chose it as the name of my shop/studio as almost every supply list for art workshops in mixed media I attended had it listed. When visitors come in the shop and ask what it is, I tell them it is items of memorabilia, typically written or printed, originally expected to have a short life, but salvaged and savored by artists in collage. 


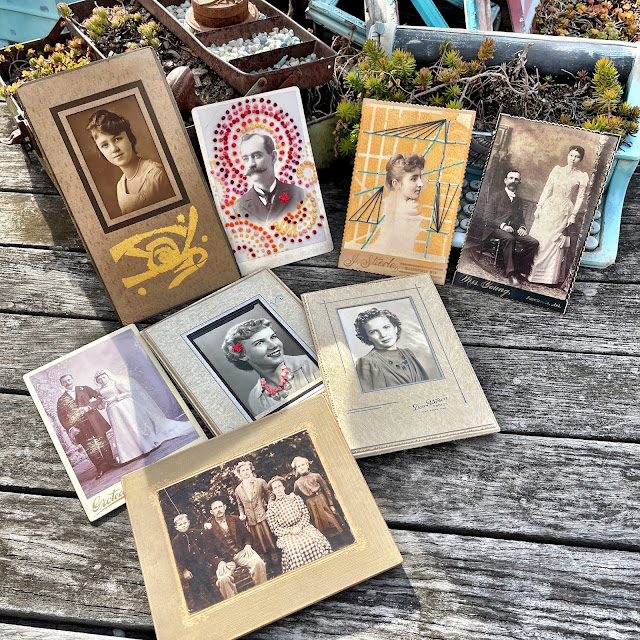
When I see stacks of cabinet cards or other old photos in flea markets or garage sales, I feel compelled to rescue them. Although their highest and best use is to be with their family, I rationalize that, when separated from their loved ones or relatives, being in art is better than being in a landfill. I hope they feel the same way. 


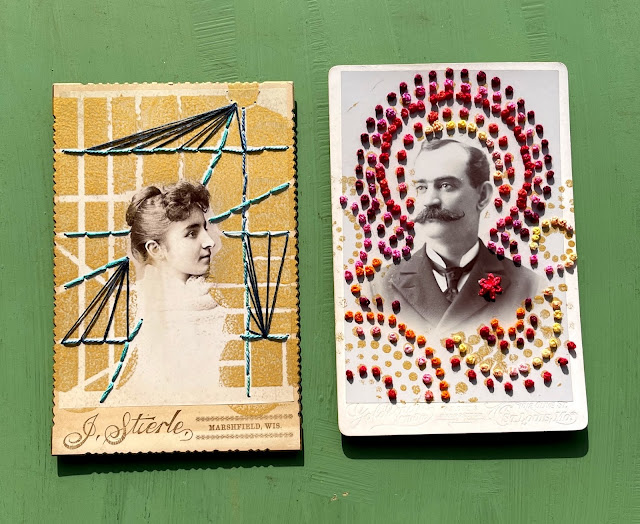
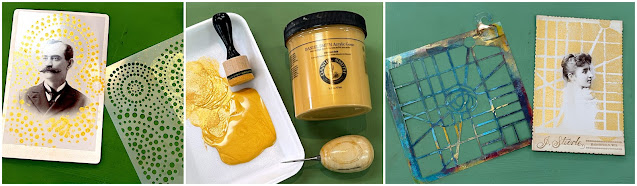
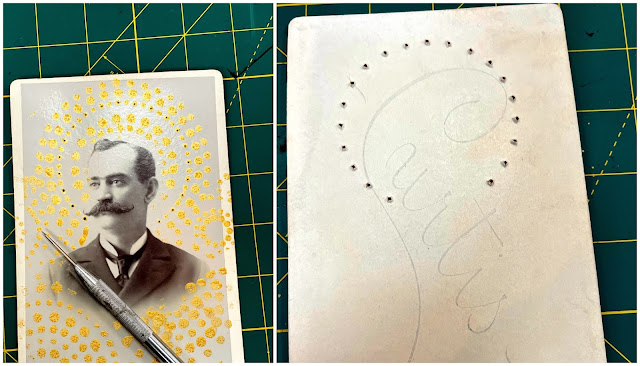
We have been stitching quite a bit in the studio lately and someone sent a remarkable “Pin” related to stitching on Cabinet Cards. I dove down that rabbit hole and quickly made a Pinterest Board of my favorites before giving it a spin, myself. And, I added the twist of using stencils with my beloved Daniel Smith Gold Gesso to add a pattern to stitch upon. When stitching through something painted, I always go for non-sticky paint or gesso. 


Here are some things I learned:

  1. I used painters/light masking tape to try and mask the faces on one card. Unfortunately, when I removed it, it took up the delicate photo. After that, I relied upon visuals to avoid stenciling where I wanted no paint and just tacked the top of the stencil to the top of the card. I could have also carefully placed a piece of paper atop parts to keep paint free, sandwiched between the stencil and surface.
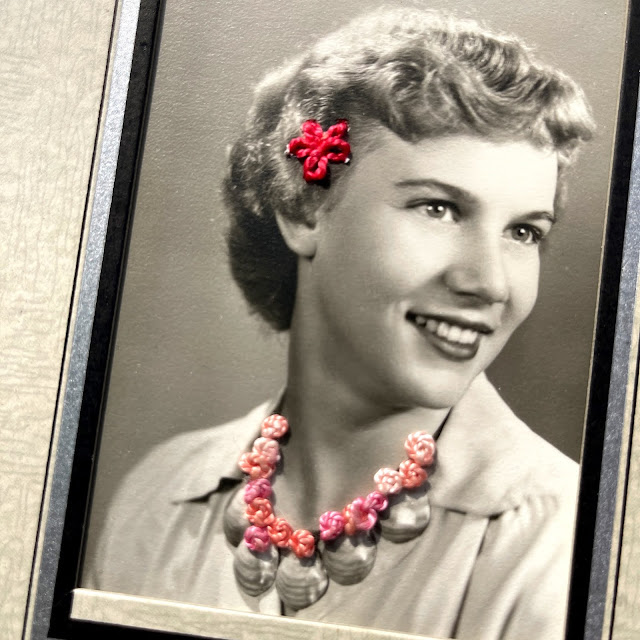
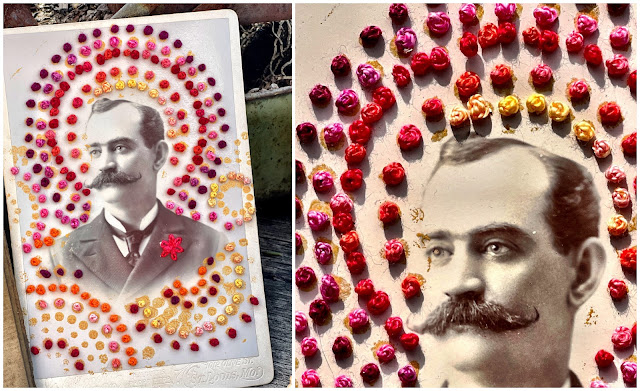
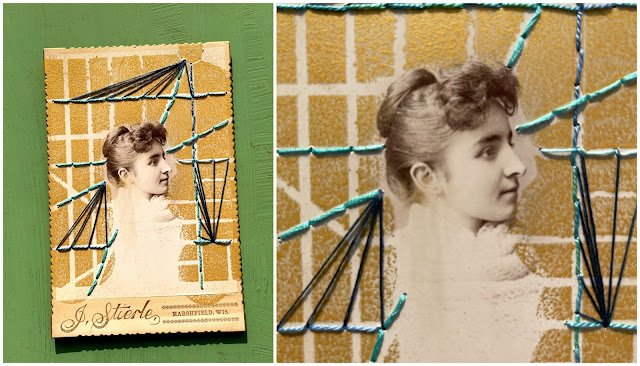
  2. Not having the flexibility of the fabric to stitch on, straight up/down stitches worked the best like Running Stitch, Backstitch, and Straight Stitch. Also, stitches that sit on top of the card like French knots and Lazy Daisys worked well.,
  3. I used an awl and metal ruler to mark my stitch holes on straight lines so that my stitch lengths were consistent. I was extremely careful near the edges of the cards so as not to create a hole on the side. 
  4. The stencils proved to be a great guide as you will see. Although I stayed to more geometric shapes, to begin with, I can now imagine using all kinds of shapes and adapting my stitching to them. 
  5. I used a variety of threads to stitch with including 6-strand embroidery floss and Perle cotton. As the hole you create with the awl is larger than one would usually make in fabric with a needle, use a thick enough thread so your knot won't slip back through it. 


My first go was with this pretty lady where I experimented with a flower in her hair and gussied up her necklace with French Knots. 

Then, I got more adventurous. Out came the Gesso and Stencils. 


I didn't realize it until I started writing and looked up the stencils I used, but both came from StencilClub of which I've been a member for years. The circles on the left were designed by June Pfaff Daley for the June 2021 StencilClub, and the one on the right was in the March 2021 Mary Nasser & Mary Beth Shaw Mash-up - Love those two!


Using an awl and cutting mat I punched through the card where I wanted to place a stitch. 


Mr. Moustachio was begging for tons of French Knots and a dapper flower on his lapel.


This sweet young woman looked a little lost so I gave her a map with lines in Backstitch and long straight stitches 


This project brought back warm memories of the Stitching Cards my mom got for me at Woolworths. Have a great time and if you try it, let me know. I think I am going to get even more adventurous in my next rounds!

Happy Stitching!

Kristin 


Tuesday, March 16, 2021

Mixed Media Pastiche is Bloomin' Fun!


Greetings & Salutations!

Carol Baxter sharing a few artsy-crafty stenciled projects today.

Vintage photos + stenciled papers + ephemera = my mixed media pastiche projects.

The stenciled backgrounds bring the work together. Imaginative words are optional.

You may know, Mary Beth used to sell her paintings at art fairs. She also sold picture collages of kids and adults with amusing sayings. Wry bits of art such as these never fail to make me smile and were my inspiration.

Mostly, I used papers from my stash for these projects.  

My Ink Sister Patty came up with this particular photo caption. I felt I needed a garden for the flying pig buzzing the little boys. Garden Flowers and Leaves & Garden Flowers and Leaves Outlined by Jessica Sporn made the background special. I actually spent a few hours making papers with these stencils. 


Bloomin’ Awesome is my next piece. I decided to let the photo speak for itself rather than add words.

I had a bit of photo mat paper I had purchased a bag of at the thrift store. I must have painted it at some point with the Spirit Wind Mask by Valerie Sjodin. That's Drops and Swirls Repeat, also by Valerie, stenciled on the cloth.

Dang! I remember when I could do this on a swing.

I had to break out my hot glue gun to affix the lace.

While I was playing with the bits and pieces I planned to use, I realized it needed more embellishment because the orange paper did not give it enough oomph. I added another layer of lace, a bit of map paper, as well as tracing and doodles – that upper left side was rather empty. A little burnish on the paper edges backing the photo gave the piece a little more depth. 

Sometimes subtle is what you need. Especially if you are stenciling words. 

This piece of paper from my stash was created with a pull from my gel plate using the small stencil from the Circle Up Set by Suzi Dennis for StencilClub March 2016.

Is it cheating? I was too lazy to stencil all the words I added so I dropped this into Photoshop. Apologies if there is a Katheryn Collingsworth. I made the name up.


I am one of those people that when I look at a map I want it to be facing the way I am traveling. The L-thumb-trick? I like it. Fortunately, I am happily married so I needn't worry about which way to swipe on a dating app but when I saw these two dudes and the expression on the face of the woman in the straw hat, this card was the result.

I used the It's a Small World Longitude Mask by Mary C. Nasser.


Another notecard using the Pollen for Bees Stencil by Daniella Woolf and Scribble Roses Stencil by Mary Beth Shaw.


Composition books cost a buck and are not very interesting. I covered these with some of Mary Beth's printed collage paper and then added a little embellishment.

If you're freaky then own it!

What's in your photo and stenciled paper collage stashes? Fair warning, mixed media pastiche is addictive!

Thanks for stopping by!

Carol B.