
Hello Beautiful Person!
It took me a minute to figure out what I wanted to do for this project. :) Ideas from everywhere popped into my head. I love food - all kinds of food, vegetables, meats, fruits, cakes, pies, cookies, condiments; baked, fried, grilled, sliced, diced, whole, halved - you see where I’m going. The few foods that I don’t like are the ones that large quantities of people do not like, i.e. liver, anchovies - no offense to liver and anchovy lovers.


The idea that bubbled to the top was to create something colorful for my table - I chose a clear plate. I was recently inspired by a video that my stencil sister Carolyn Dube did, reviewing Liquitex Acrylic Gouache. By inspired, I mean I just had to have some. :) I thought this was a perfect project to use the gouache paint as the colors are opaque and vivid.
The important thing to remember about this technique is that you are painting in reverse. Think about how you paint when you are working in a journal or painting on a canvas with acrylics … typically you paint the background first and the focal point last, or close to last. When you are painting on something that you turn over to see through, you need to paint the focal point/image that you want in the front first. Another advantage with this technique is that since you will not be eating on the surface where the paint is applied, you don’t need special paint.
I chose a plastic plate with a smooth inner circle.
NOTE: The medium I’m using to help the paint adhere to the plastic will also work on glass and other surfaces. I decided on the theme of tropical and picked out stencils that capture that feeling for me. Tropical really appeals to me right now because I live in the Midwest, USA and we have had ‘wintery weather’ that is making me long for warm sunshine.
NOTE: The medium I’m using to help the paint adhere to the plastic will also work on glass and other surfaces. I decided on the theme of tropical and picked out stencils that capture that feeling for me. Tropical really appeals to me right now because I live in the Midwest, USA and we have had ‘wintery weather’ that is making me long for warm sunshine.
Step 1:
I cleaned the back the plate with rubbing alcohol. I put low tack tape on the large stencil from the March 2017 Stencil Club Set to mask off the areas that I did not want around the small pineapple. I positioned the pineapple off center inside the smooth circle. After mixing the paints with Paint Adhesion medium and a little white gesso (to help make the colors more opaque), I dabbed color through the stencil. I wanted a more artsy/painterly look, so I made sure my sponge was a little juicy.

Step 2:
The 4-inch stencil from the August 2017 Stencil Club set provided a sun in the sky to shine on my pineapple. I used a baby wipe to clean up any paint that went beyond where I wanted it.

Step 3:
I used a paintbrush to paint in a base for the pineapple so it wouldn’t be floating.

Step 4:
After the sun and pineapple dried completely, I added the background using the Flower of Life Stencil. This 6” circle stencil fit perfectly - that was luck not planning on my part. :)

Step 5:
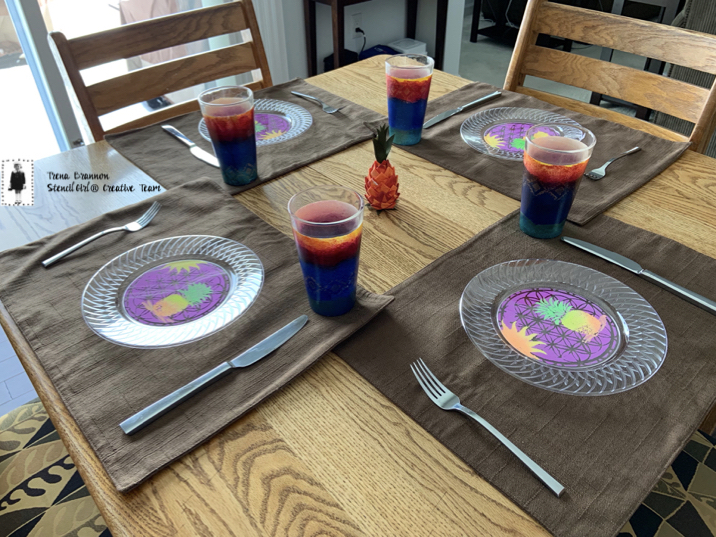
This was my prototype, my test run. :) Next, I used this process to paint the other plates. I made each one a little different - pineapple or sun in a different spot. The last step was to seal the paint with a varnish. I set up my table on the darker place mattes and also with a white doily - just to see how the painting would show up. Sharing the photo with the dollie. Which do you like better?
In the place setting, I included glasses I painted a few months ago to add even more color to the table. Click here to see that StencilTalk tutorial. That cute little pineapple in the center of the table is from Maui. Our daughter gave it to my husband and me last year when we attended her tropical destination wedding - brings up such warm memories for me!
In the place setting, I included glasses I painted a few months ago to add even more color to the table. Click here to see that StencilTalk tutorial. That cute little pineapple in the center of the table is from Maui. Our daughter gave it to my husband and me last year when we attended her tropical destination wedding - brings up such warm memories for me!

This was a fun way to spice up and personalize a brunch!
Notes/Tips/other ideas:
- For cleaner lines, start with a dry sponge and dab off excess paint.
- When cleaning plates, hand wash. Do not leave in water for long periods of time.
- This would be a fun kids project at birthday party, Let them make their own cake plates at the beginning of the party, or a clear frame. They will dry in a short time. Depending on their age, you can limit the supplies and use the appropriate paint. They can take it home.
Supplies I used:
- Substrate: clear plastic plate (I found at Sam’s Club)
- Paints/Medium: DecoArt Paint Adhesion; Liquitex Acrylic Gouache, white gesso and gloss varnish
- Other Stuff: Isopropyl Alcohol, Tulip Sponge Pouncers, painters tape
- Stencils: SC-03-2017, SC-08-2017, S084


I hope this post inspires you to create something fun that makes your heart smile!
Thank you so much for reading.
Take care and STAY POSITIVE!
Trena

Take care and STAY POSITIVE!
Trena
No comments:
Post a Comment
If you are entering a GIVEAWAY, please add your email address in the event we need to contact you.
To avoid SPAM, please write it like this:
marybeth (at) stencilgirltalk (dot com)
Thank You!