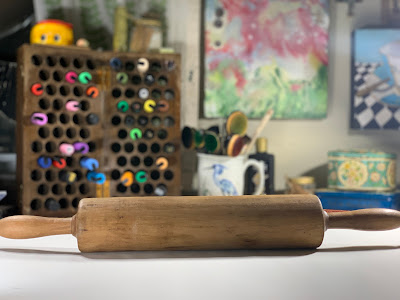
Happy and healthy 2021! It’s Jill McDowell here with you today with another edition of my Upcycled column. Today I’m writing about repurposing an old fashion kitchen tool for creating repeating Gel prints.
When I was a kid everyone had a rolling pin in their kitchen. Not so much these days now that grocery stores come complete with in-house bakeries and stock pre-rolled pie crusts in a refrigerated case. On the surface, a rolling pin is a simple cylindrical tool used to flatten and shape dough without getting your hands dirty. But for many of us it is much more than that. I don’t bake often, but when I do use a rolling pin to make my Christmas cookies and holiday pies, memories of simpler times and family, many who are now gone, roll out with the dough.
This particular rolling pin was my Grandmother’s so I treasure it. It evokes memories of my Nana in her kitchen rolling out pie crusts, cookie dough, and donuts while my Mom, her Aunt, and her cousin talked and told stories. Nana’s kitchen always smelled wonderful and she always let me help, wrapping her hands around mine as I rolled out the dough and listened to the laughter in the kitchen. I really hope that you too have fond memories like this.
While I would never ever even think about repurposing my Nana’s rolling pin, (once you use a tool in your studio you should never use it again in the kitchen), there are plenty of others that have been abandoned in the thrift stores. I picked up one few years back for less than two dollars knowing that I wanted to do something with it but not knowing exactly what. (Come to think of it, I’ve picked up quite a few of such treasures during my travels...) At the time I remember that I considered getting out my wood burning tool, using it as a quilt hanger, or painting it. But in the end I put it away in my closet of misfit toys, (along with all my other treasures) and waited for a spark of inspiration to reveal itself to me. Sometimes things just need a little time, (ok - actually sometimes a lot of time) to marinate. Recently, while cleaning out the closet, I rediscovered the rolling pin and was rewarded with an idea of how to repurpose it.
This is actually a simple project that’s really easy to carry out. The only supplies you need are an old rolling pin (you shouldn’t ever use it in the kitchen again), a few StencilGirl®️ stencils, a sheet of fun foam, (you can use either thick or thin fun foam - I prefer the thick. Both can be found at the craft store in the kids section), and some double sided tape. You will also need a ballpoint pen and sharp scissors. Other than that, whatever you normally use to make your Gel prints will work fine for this project; a gel plate (I’m using the 12x12 inch square and the 8 inch round gel plates by Gel Press), a brayer, your medium of choice (I used VersaFine Clair pigment inks and Golden Open acrylics), and some paper to print on. I also used a baren to burnish the paper, but that’s something you can do without.
I find this technique works best with some of the larger stencils that I’d usually think about using as focal points, (think Lanie Frick’s bunnies and ewes, Cecilia Swatton’s heron, Angela Cartwight’s People With Pets) and larger shapes (Michell Wards’s Maltese, Marrakech, Fleur de’ lyes, and Quatrefoil). I chose to work with three of my favorite stencils by Gwen LaFleur, Ornamental Peacock, BoHo Birds, and Boho Fish.
Here’s how to trick out a rolling pin to Gel print with:
1) Use a ball point pen to trace the stencil onto a sheet of thick fun foam. Press down hard with the pen to make a good deep indentations.
You can also print numbers and letters using this technique. (Carolyn Dube has a few large letter and number stencils would work well for this.) Just remember to trace them in reverse on the foam so that they are readable when printed. (Tip: to minimize confusion, write the word on a piece of tissue or tracing paper, then turn it over and use it as a guide.... LOL, Ask me how I know this.)
2) Remove the stencil and go over all the lines again with the pen, joining the breaks where there are bridges in the stencil pattern.
I chose to trace the two realistic birds in the BoHo Birds stencil twice each; once facing left and once facing right. Just turn the stencil over to get the reverse.
3) If your feeling adventurous fill in open areas with patterns using stencils in your stash. I used my Trivet Duo stencil to fill in the body of the stylized bird below. You can also doodle or do extra line work to make the design your own.
4) Use a sharp pair of scissors to cut out the outline of the shape. (My original plan was to use a craft knife to cut the foam. But I found scissors to be a much simpler and more effective solution.) Where the curves are hard to access cut small, manageable sections at a time.
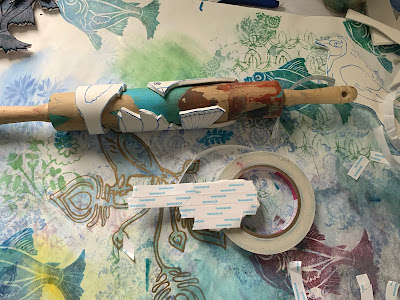
5) Completely cover the back of the stamp with double sided tape. It’s important to cover the entire stamp since it will be rolled around the rolling pin and you don’t want the edges to stick up.
6) Remove the paper from the back of the tape and then roll the stamp firmly around the pin. Position the stamps like you are laying a brick wall, overlapping the stamps so that the pin rolls evenly on the Gel Press Gel Plate. (In the pic below, notice that there is an open gap that runs from the top to the bottom of the rolling pin. This will cause the rolling pin to skip and slide on the plate. I just added an overlapping stamp on the top of the rolling pin to avert the problem.)
Rather than writing about my gel printing adventures I thought I’d show you how it actually went. So I created this short video for you.
Here are a few beauty shots of some of the prints that came out of my gel printing sessions.
Thanks for spending your time with me today. I hope I’ve inspired you to look at an old rolling pin in a new way. Have a happy and healthy new year. Hugs, Jill
Follow me at: https://itsjustjillmcd.typepad.com


What a fun idea - thanks, Jill!
ReplyDeleteMe encanta! Gracias!
ReplyDelete