Hello everyone! Cynthia Silveri here! I'm honored to be back on the blog sharing another creative use for stencils. I used Cathy Nichols February 2020 StencilClub 4" x 4" bunny stencil to decorate one of my sourdough loaves in anticipation of springtime!
In many places around the world and throughout time, people used communal ovens. In order to find your loaf of bread in this big oven, you needed to have your dough marked with your “signature”. Most of the marks were cut into the bread in intricate designs. On a trip to Malta many years ago, I got to experience eating these lovely and delicious loaves each with the mark of their maker baked in.
Today we see rustic loaves of bread with many beautiful designs, more about aesthetics than identity. This stenciling technique is even easier than cutting a design into your dough, although a few slashes are still necessary to make that perfect loaf. This is a fun way to dress up your homemade bread, or even a cake!

Materials:
Your favorite bread dough recipe (or
my sourdough recipe, which follows the instructions).
A small stencil (4” x 4”
recommended) with a fairly simple pattern.
Small strainer with fine holes
Flour or cocoa powder, about ¼ cup
or less
Pastry brush
Technique:
- Prepare your stencil by taping tiny “handles” on each
side, so that you can lift it off the loaf when you are finished
stenciling. You don’t have to do this, but it might be easier to remove it
from the loaf so you don’t disturb your design. Lightly dusting with flour
also keeps the stencil from sticking to the dough.

- After your bread dough has risen to where it is ready
to bake, position the stencil lightly on top of your loaf. A circular or
big oval shaped loaf works best for most designs.
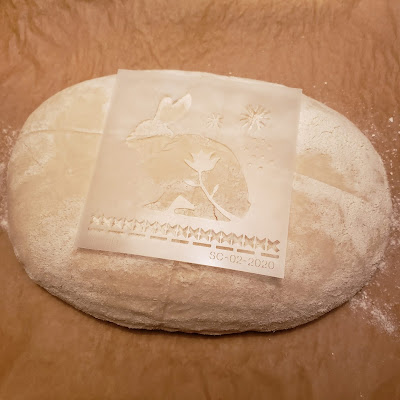
- Using cocoa powder (this shows up best on the finished
loaf, but you can also use flour especially if you bake a dark loaf) and
the small strainer, sift it over the stencil openings until completely
covered.


- Remove the stencil carefully. Using the pastry brush,
dust off any excess that might have gotten on the loaf around the edges of
the stencil.


- Bake and enjoy!


Simple
No Knead Sourdough Bread Recipe
Adapted
from techniques and recipes from https://breadtopia.com/ and my friend Colleen.
You
can purchase starter, make your own, or get some from a friend! I highly
recommend trying sourdough if you have never done it. It is really not as
difficult as it may seem and it is not only delicious, but lighter and much
easier to digest than regular bread.
2-1/3
cups of “fed” sourdough starter
1
cup spring water
1
scant tablespoon salt
3-1/3
cups of bread or all-purpose flour (a little more or less depending on the type
of flour you use and the humidity in your house-err on the side of wetter
rather than drier dough. I recommend watching Breadtopia’s tutorial for
detailed directions).
In
a medium glass bowl measure in the starter, water and salt. Mix well. Add the
flour and mix until well combined. It is not necessary to knead the dough! (You
can also do this in a stand mixer with a dough hook or even in a bread machine
if you prefer-but I find that it is more work to clean up either of these
methods, I use a bowl). Use your hands to fold the dough over itself in the
bowl (wet them with cold water to keep dough from sticking).
Cover
loosely with a damp towel or plastic bowl cover and let rise for several hours
until it is about double in size. If still fairly sticky, wet your hands with
cold water or use some flour, then pick up the dough from the middle and let
gravity pull it down, turn it 90 degrees and let it “fold in half” again via
gravity. Do this a couple of more times.
Form
the loaf into a rounded shape and place it in a well-floured proofing basket or
bowl with the bottom of the loaf facing up. Let it rise again for 1-3 hours.
Heat your oven to 500 degrees while it finishes the last hour of rising.
Turn
the loaf out onto a sheet of parchment and stencil as above. Make several
slashes around the design. Using the parchment paper to lower it, place the
loaf into a Dutch oven and put the lid on it. Bake for 10-15 minutes then
remove the lid and turn the oven down to 425 degrees to finish baking, about
30-40 minutes or until the internal temperature of the bread is 200 degrees.
Makes
a large loaf, approx. 2 lbs. You can divide in half for two smaller loaves, if
desired. It is easier to stencil on a large loaf.
Love this. Think this technique would work with the Eggs stencils, S021 and S043. I have always baked bread in my dutch oven beside a campfire. Hadn't thought of baking it in an oven. Thanks for expanding my universe.
ReplyDelete