Showing posts with label stencil on food. Show all posts

Thursday, March 4, 2021

Stenciled Sourdough by Cynthia Silveri

Hello everyone! Cynthia Silveri here! I'm honored to be back on the blog sharing another creative use for stencils. I used Cathy Nichols February 2020 StencilClub 4" x 4" bunny stencil to decorate one of my sourdough loaves in anticipation of springtime!

In many places around the world and throughout time, people used communal ovens. In order to find your loaf of bread in this big oven, you needed to have your dough marked with your “signature”. Most of the marks were cut into the bread in intricate designs. On a trip to Malta many years ago, I got to experience eating these lovely and delicious loaves each with the mark of their maker baked in.

Today we see rustic loaves of bread with many beautiful designs, more about aesthetics than identity. This stenciling technique is even easier than cutting a design into your dough, although a few slashes are still necessary to make that perfect loaf. This is a fun way to dress up your homemade bread, or even a cake!


Materials:

Your favorite bread dough recipe (or my sourdough recipe, which follows the instructions).

A small stencil (4” x 4” recommended) with a fairly simple pattern.

Small strainer with fine holes

Flour or cocoa powder, about ¼ cup or less

Pastry brush


Technique:

  1. Prepare your stencil by taping tiny “handles” on each side, so that you can lift it off the loaf when you are finished stenciling. You don’t have to do this, but it might be easier to remove it from the loaf so you don’t disturb your design. Lightly dusting with flour also keeps the stencil from sticking to the dough. 
  2. After your bread dough has risen to where it is ready to bake, position the stencil lightly on top of your loaf. A circular or big oval shaped loaf works best for most designs.
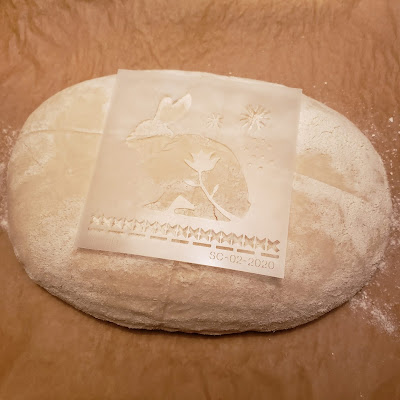
  3. Using cocoa powder (this shows up best on the finished loaf, but you can also use flour especially if you bake a dark loaf) and the small strainer, sift it over the stencil openings until completely covered.
  4. Remove the stencil carefully. Using the pastry brush, dust off any excess that might have gotten on the loaf around the edges of the stencil.
  5. Bake and enjoy!

Simple No Knead Sourdough Bread Recipe

Adapted from techniques and recipes from https://breadtopia.com/ and my friend Colleen.

You can purchase starter, make your own, or get some from a friend! I highly recommend trying sourdough if you have never done it. It is really not as difficult as it may seem and it is not only delicious, but lighter and much easier to digest than regular bread.


2-1/3 cups of “fed” sourdough starter

1 cup spring water

1 scant tablespoon salt

3-1/3 cups of bread or all-purpose flour (a little more or less depending on the type of flour you use and the humidity in your house-err on the side of wetter rather than drier dough. I recommend watching Breadtopia’s tutorial for detailed directions).


In a medium glass bowl measure in the starter, water and salt. Mix well. Add the flour and mix until well combined. It is not necessary to knead the dough! (You can also do this in a stand mixer with a dough hook or even in a bread machine if you prefer-but I find that it is more work to clean up either of these methods, I use a bowl). Use your hands to fold the dough over itself in the bowl (wet them with cold water to keep dough from sticking).

Cover loosely with a damp towel or plastic bowl cover and let rise for several hours until it is about double in size. If still fairly sticky, wet your hands with cold water or use some flour, then pick up the dough from the middle and let gravity pull it down, turn it 90 degrees and let it “fold in half” again via gravity. Do this a couple of more times.

Form the loaf into a rounded shape and place it in a well-floured proofing basket or bowl with the bottom of the loaf facing up. Let it rise again for 1-3 hours. Heat your oven to 500 degrees while it finishes the last hour of rising.

Turn the loaf out onto a sheet of parchment and stencil as above. Make several slashes around the design. Using the parchment paper to lower it, place the loaf into a Dutch oven and put the lid on it. Bake for 10-15 minutes then remove the lid and turn the oven down to 425 degrees to finish baking, about 30-40 minutes or until the internal temperature of the bread is 200 degrees.

Makes a large loaf, approx. 2 lbs. You can divide in half for two smaller loaves, if desired. It is easier to stencil on a large loaf.

Thursday, February 14, 2019

Stencil on Food: Piped Chocolate Giant Cookie Topper


Aloha stencil fans. It's Jill McDowell here with you today. Did you know that the official Hawaii state fish is the Humuhumunukunukuapua? (Try saying that just once, never mind three time fast.) The fish is actually a trigger fish but the Hawaiian word translates into “nose like a pig’s". Although the translation may roll more smoothly off of my tongue, it's surely not nearly as fun to say. 


I’ve just returned from a once in a lifetime trip to Hawaii that’s left me flying high in a tropical mood. So this month, I thought that I would build on my tropical vibe and spend a little "Shaka" time learning a new skill that I can use to honor the Humuhumunukunukuapua.  If piping warm chocolate into a yummy, brightly colored Boho Fish Topper that crowns a Giant Brownie Cookie sounds good to you, then you're reading the right post.
But before we start, I want to take a moment to talk a little about safety. Materials and supplies that are used in your art studio should never come in contact with anything food related.  However, in this post, you'll see me use stencils, pencils, and markers from my art studio.  Be assured that this project is designed in such a manner to ensure that any surface that comes on contact with my studio supplies will never come in contact with the piped chocolate. 

Step 1: Create the Design


To start I made a carrier sheet out of parchment paper on which I penciled in a few guidelines, two to show me where to pipe a scalloped border and one so that I will know where the edge of the cookie will be. Eventually, I will be piping the melted chocolate on the back side of this carrier sheet. For now, I put the Carrier sheet aside.
Next, I began creating a design template on Kraft paper. I picked StencilGirl®'s Boho Fish stencil by Gwen Lafleur as the focal points, tracing the outlines with a pencil. Kraft paper works well for this project since it has enough contrast to be seen through the parchment paper carrier sheet made in step 1.
The fish get treated to an inking with a black magic marker. This thickens and darkens the lines so that you can use them as guides when you pipe the chocolate.
I picked the Random Circles Stencil from StencilGirl® by Mary Beth Shaw to use as a background.
The circles reminded me of bubbles and will give me places to doodle later on.
After inking the background, I cut out the kraft paper template and taped it to a sturdy piece of cardboard with masking tape. I made sure that cardboard was slightly bigger than my carrier sheet but small enough to lay flat on my refrigerator shelf. 
Then I taped the parchment paper carrier sheet upside down over the kraft paper template. I double checked to be sure that the carrier sheet was upside down so that I would be sure not to pipe the chocolate over the actual pencil marks.  

Step 2: Melt the Chocolate

Unfortunately, I forgot to take pics of melting the chocolate but there are lots of videos on YouTube that detail how to do this. I'll just give you a quick recap of my takeaways.
  1. Chocolate: Use good chocolate and melt it slowly over medium heat in a double boiler: I used Ghirardelli semi-sweet and white chocolate baking bars. It took about 15 minutes to get it fully melted and smooth.
  2. Temperature: The chocolate needs to be kept warm for piping. Once the chocolate melted, I turned the burners off and on intermittently to control the heat. Just like in Goldilocks and the Three Bears, the chocolate should be piped at a temperature that is not too hot, nor too cold, but just right...
  3. Colors: You can mix some really bright colors in separate metal bowls with the melted white chocolate and Candy Coloring. Just be sure to use real Candy Colors, since regular food coloring contains alcohol which will seize up the chocolate. Also add the color slowly, (drop, mix, drop, mix) as it can get intense really fast. The colors in my background came out much darker than I had anticipated. If I had had more white chocolate I would have used it to lighten them up a bit.


Step 3: Pipe the Chocolate

The process for piping the chocolate was actually not very difficult once I got the hang of it. It sounds much more intimidating than it really is. Again, there are many YouTube videos online that you can reference but for me the keys were:
  1. Volume: Fill the disposable piping bags with only what you need to use in the next 5 to 10 minutes and never fill the bag more than 1/2 full.  This keeps the mess to a minimum and the temperature of the chocolate consistent. 
  2. Size Matters: Make a teeny-tiny, pinprick sized hole with kitchen scissors in the corner of the piping bag after it is filled with the melted chocolate. If you find that the hole is too small you can always make it bigger, but if it is too big, you will never be able to make it smaller;
  3. Practice, Practice, Practice: I practiced piping lines off to the side on a silicone mat first before I started working on my real design. I’m right handed, and found that I had the most control if I squeezed the bag with my right hand, stabilized it with my left index finger, and pulled the bag towards me without letting the tip of the bag touch the carrier sheet.  To end a line, I touched the tip of the piping bag down onto the carrier sheet and then pulled up.  Although it took some practice, I think I was able to learn how to pipe a line fairly quickly.
  4. Perfection is not required: Since the design is worked on the back of the topper, from the top layer down though to the bottom layer, you can get away with being a little messy. (For you accountants, this technique is similar to the FIFO, (or First in, First Out) inventory method). The first layer of piping will end up on the top of the topper and the colorized layers that are piped over it will end up underneath the first layer. (Just the opposite of painting...  This will make more sense to you later, I promise.) I took advantage of this when I doodled with white chocolate knowing that I could fully cover up the doodle with the colorized chocolate in the background without worrying about staying in the lines.
I piped the semi-sweet chocolate over the carrier sheet first, following all of the stencil lines.
Then I added a wonky scalloped border using the guidelines I'd penciled in to keep the edges in line.

After each layer of piping, I laid the cardboard and topper flat in the refrigerator for a few minutes, just long enough for the chocolate to begin to set up. This cooling off lets you pipe another layer of chocolate on top without melting and mixing the colors of the layer below it.
Then I started layering in the background colors.  

The doodling commenced with piped white chocolate.  
I may have gotten just a little carried away with the doodles!
Then I covered the all of doodles up with piped colored chocolate.

Once I'd filled in all the blank spaces and all of the parchment paper was covered in chocolate, I put the topper in the refrigerator one last time for about 15 minutes to make sure that all of the chocolate was fully firmed up.  Then I took it out of the refrigerator, flipped it over so that the piping layers sat firmly in the palm of my hand, and carefully peeled the parchment carrier sheet off of the top.
Now you can see the layers of color over the white chocolate doodles.
I stored the Topper overnight in the refrigerator sandwiched between parchment paper and sealed in an airtight Tupperware container. Then I baked a store bought brownie mix in a giant cookie pan according to the directions on the box.  


When the cookie was cool, I removed it from the pan, added a thin layer of canned cream cheese frosting on top to act as a glue, placed the Boho Fish Topper on top, and here's the result...

Here are a few close-ups of the BoHo Fish and the doodles:


Final Thoughts: (or what would I do differently next time)

I had a lot of fun making this Topper, finding new ways to use my stencils, and exploring the world of cake decorating. Overall I'm really happy with the result given that I've never worked with chocolate before. And it sure did taste good. However, I do think though that the background is too dark and overly complex. Since I believe that it's important to learn from my experiences, I decided to manipulate a picture of the Topper in ProCreate to see what changes I might make in the future.  

This is the edited ProCreate version of the design.  Next time I'd think about isolating the colors and allowing for more white chocolate space to peek through the background.  Better yet, I might take it a step even further and eliminate the doodles entirely, (although they were really a fun experiment) to simplify the design and put the focus on those really cool BoHo Fish.

If you have any experience piping chocolate, I'd love to compare notes with you. I'm also happy to answer any questions that you may have. Mahalo for taking the time to read my post.  

Aloha!
Jill

StencilGirl® Stencils used in this project:


BoHo Fish designed by Gwen Lafleur

Random Circles designed by Mary Beth Shaw


Wednesday, February 6, 2019

Stencil on Food: Calories take flight!


Hey there and hello!

Calories take flight when you use stencils on food, right?

I mean, I had to burn calories grocery shopping, spreading cream cheese on the crackers, stenciling with spice, adding a smidge of raspberry chipotle sauce and an herb garnish, and writing this post.

When your bestie calls and says she is coming over, here's an easy-peasy way to dress up some cracker appetizers for an impromptu appetizer.


Instructions and Tips:

Note: Wash your stencil before and after each use. If you are going to use a stencil for cooking, it should NEVER be used for regular painting with acrylics, watercolors, etc.

1. Spread (relatively level) whipped cream cheese on the crackers of your choice. I like Triskets.

Tip: Don't spread the cream cheese all the way to the edges.*

2. Gently place the stencil atop the cracker.

Tip: Because the stencil is larger than the cracker, I found it helped if a had the lid from the spice container under the unused part of the stencil.

3. Sprinkle your herb of choice. I tried dill (worked best) and lavender lemon pepper.

Tip: Small pinch and then add some if need be - I found that if I went slow, the first pinch was often plenty.


4. Slowly lift the stencil off, keeping it as level as you can. You may need to hold the cracker down* with your other hand as you perform this step.

Scalloped Border Mask by Valerie Sjodin

5. Garnish cracker with a drop of sauce and a little sprig of whatever herb you have handy. I had thyme and rosemary growing and I used red raspberry chipotle sauce.


I tried making cinnamon sugar toast - the shape melts into the butter too quickly. Which made me think of the irony of the commercials that want us to use cream cheese because it is half the calories of butter... does that mean one can/should use twice as much cream cheese?

Worked on cream cheese!


Music Staff Stencil by Valerie Sjodin
I hope you enjoy experimenting with your stencils as much as I do! 

Wishing you an art-filled day,
Carol 

Friday, April 6, 2018

Throw a Party! It's the StencilGirl CreativeTeam Food Challenge!

To take your stencils into the kitchen or not... that is the question.

Our CreativeTeam turned up the heat in the kitchen and in their studios for this Food Challenge! 


If you are not ready to entertain guests at the moment, trust us, you will be by the end of this post.


Remember, if you are going to use a stencil to make edibles, 
use it ONLY to make edibles.

A Serving of Frosted Cheesecake on Frosted Plate by Belen of Art & Whimsy


Stencil used: Pomegranate Seeds Grape Apple Flower Mask by Valerie Sjodin


Grab A Piece of Tina Walker's Chocolate

Want to make some? Check out Tina's diy post on her blog.


Stencil used: Hands by Jessica Sporn


Debi Adams' Sweet Cookies


Debi used royal frosting texture paste and Jessica Sporn's Becoming and Herb stencils on these sugar cookies.


What goes with cookies but a cocoa with whipped cream?

Karen Gaunt writes: "Stenciling with food was certainly a challenge and I had to rack my brains quite a bit to come up with something! I decided to use Traci Bautista's Deconstructed Cabbage Rose Mask to create some latte art of my own at home. The simple and circular design of this stencil made it perfect to use over my mug!"


Tip: You could also trace your stencil onto parchment paper, cut out the design, then use the parchment to decorate food.


Louise Nelson's Artsy Coffee Mug


Louise writes: "I know from previous experience that when I traced the stencil with a marker (Pebeo) on a non-porous surface that the ink from the marker bled under the stencil. This time, I wanted to take creative advantage of the effect. I cut down Traci Bautista's Soulful Scribbles Stencil so I had  just the freestyle oval shapes and then traced around them. The ink bleed under the stencil and created a gorgeous effect. I also used the edge of a piece of stencil off cut to drag and smudge marker lines at the top and bottom of the mug."


Louise and Karen should get together, don't you think?! And Sherry to, for where else to drink a cuppa but in a cafe!


Cheerful Cafe Art by Sherry Canino of Canino's Artistic Cafe


Stencil used: Teacups and Teapot by Jessica Sporn


PickaPeppa Cream Cheese Appetizer 
by Cindy Gilstrap of Junque Art Studio


Cindy writes: "This appetizer is always a hit at gatherings and so easy to make! Using a stencil on top makes it look all fancy like you spent a ton of time on it. (But shhhh, don’t tell anyone it only took you a few minutes.) You will need an 8oz. brick of cream cheese, PickaPeppa Sauce, stencil of your choice (I used Vine by Melanie Testa), crackers. Place stencil on top of chilled cream cheese and gently push into cream cheese so the sauce doesn’t seep under stencil. Using the back of a spoon gently spread a thin layer of pickapeppa sauce across stencil design. Gently remove stencil. Drip more pickapeppa sauce down sides of cream cheese and onto plate. Serve with crackers! Yum!"


Cheese Board by Torrie Gass of Fox & Hazel


Torrie writes: "I've recently rediscovered my love for brie cheese, and thought a lovely cheeseboard would be so perfect. This is a bamboo cutting board that I re-painted and added gold leaf veins to. The stencil I used is Herbs by Jessica Sporn, and I stencilled on a sage plant with black gesso. Once everything dried, I sealed the board with a coat of poly to ensure it's safe for serving food on. This project was so quick and fun to make, and now I've got a fun cheese board to serve with!"


Stencil used: Herbs by Jessica Sporn


Card by Sandee Setliff

Sandee is happiest when she is painting and NOT in the kitchen!


Stencils used: Love Story by Cathy Nichols and Speckled Eggs by Tracie Lyn Huskamp


Time for more food! 


Kiala Givehand's Plate of Brownies

Kiala used powdered sugar on her brownies. Learn how she decorated the tops on her blog.  We spy a few different stencils here! Can you guess which ones?!


Fondant and Icing Window Brownie Coca-Cola Cake by Carol Baxter 


Stencil used: the small one from November 2017 StencilClub - Fragmented by Nathalie Kalbach.


Have fun stenciling on food and party on!